Citrix Provisioning Load Balancing with NetScaler

After deploying a Provisioning Services site in high availability, we should continue to create an IP address to which the computers that boot with PXE connect and this is balanced to the PVS server with less load. We will rely on Citrix NetScaler Load Balancing to carry out this function!
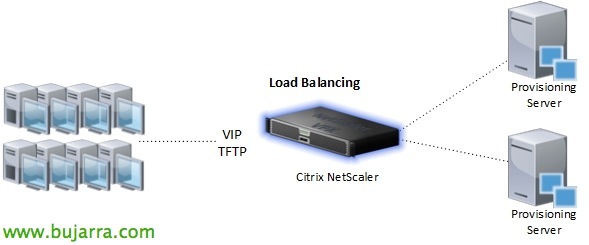
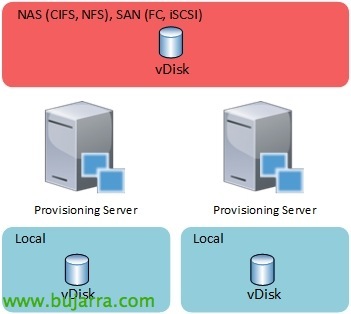
By having multiple PVS servers on the farm, we will have to instruct the targets to contact the TFTP server of the network, usually the PVS server itself. The simplest way would be to do a Round Robin and in DHCP refer to that A record created on the DNS server that randomly and without any control attacks a PVS server or another. In this document, we will balance with a virtual IP from the NetScaler and we will also check the health of the service status.

The first thing will be to have Load Balancing enabled from “Basic Features” inside “System”. Then we can start registering the TFTP servers in our NetScaler (they will usually be the same PVS), for this, since “Traffic Management” > “Load Balancing” > “Servers” > “Add...”, Start!

We will add all Provisioning Services servers, providing a name and your IP address & “Create”,

List! we confirm that they are OK,

Next we will create the TFTP service, “Services” > "Add...",

We will give the TFTP service a name, we will create one for each PVS server, we will select the TFTP protocol and the 69, as well as enable the 'UDP-ECV monitor'’ since TFTP uses UDP.

We confirm that everything is OK and the services UP!

Finally, we will create the VIP for the TFTP service and it will be balanced by this IP to which the clients connect. “Virtual Servers” > “Add...”,

We give it a name, IP address, TFTP protocol, the port we confirm that it is 69 and select the services we have just created!
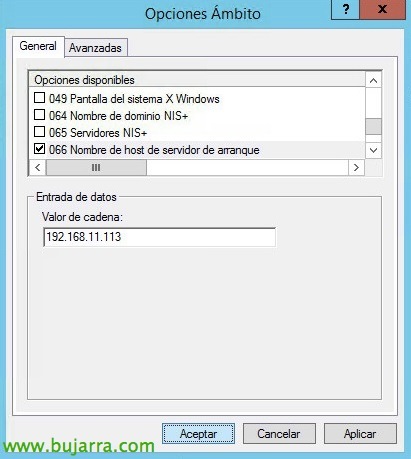
To finish, it will be enough to modify in the 66 with NetScaler VIP. Optionally we can create an internal DNS record and we can better use an fqdn name, More elegant 🙂