Nagios – Checking snapshots on VMware virtual machines

In this post we will see how Nagios can help us monitor the existence of snapshots in our virtual infrastructure, Everyone knows the danger of having snapshots or leaving them for long periods… Hanging backups that leave half-baked snapshots… To combat this, We'll automate a periodic check-in with a great script!

This script needs us to have SSH enabled on an ESXi host (at least) to check for snapshots in a host's datastores, will therefore not use SNMP. The script, will need to be validated against the ESXi host when running, So we will have to configure SSH Fingerprint. This way the ESXi host will trust the user who runs the script from the Nagios machine and will not ask for credentials.
First things, will be to log us into the shell of our beloved Nagios, there, We log in with the user who executes the scripts, In my case the user knows that it's 'centreon-engine’ (since I use CES), so we logged in, we generate the keys for our user and copy the public key to the ESXi host, As it is the first time we connect, we will also confirm with a 'Yes’ that we trust your firm.
[SourceCode]his – centreon-engine
ssh-keygen -t rsa
scp /var/lib/centreon-engine/.ssh/id_rsa.pub root@HOST_ESXI:/tmp[/SourceCode]

Now, We're going to the ESXi host, we connect with a Putty or similar using SSH, and add to the trust key file the one we have just generated:
[SourceCode]cat /tmp/id_rsa.pub >> /etc/ssh/keys-root/authorized_keys[/SourceCode]

GOOD, The interesting thing begins, already, We downloaded this script, We copy it to the /usr/lib/nagios/plugins/ directory and make it executable:
We tried to run it, eye, when you run it as root it will ask us to validate, if we want, we can do the above steps and also copy the root public key so that the ESXi host trusts what we are going to execute. And if not, We enter the key manually and hint! We must specify the ESXi host to which we will make the query and also indicate first the number of snapshots that we will allow until Warning sings, then the value to Critical and if we want also the age in days that we allow:
[SourceCode]./check_VM_snapshots HOST_ESXi NUM_SNAP_WARNING NUM_SNAP_CRITICAL DIAS_SNAP[/SourceCode]
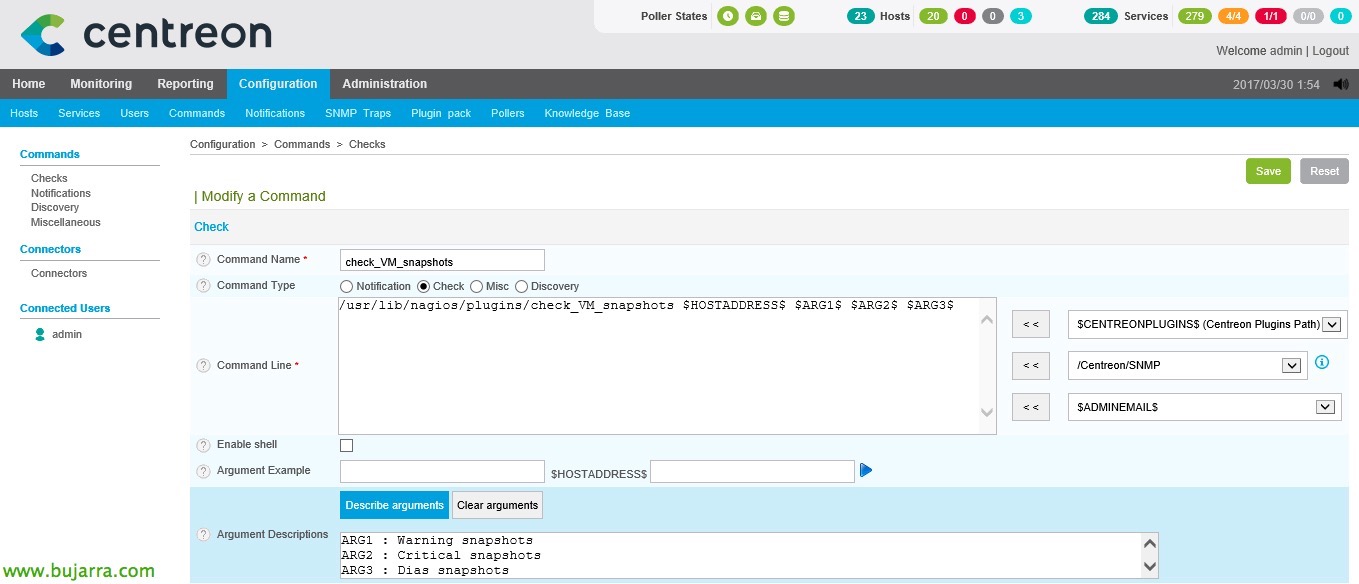
Remember, we first created from Centreon the Command, since “Configuration” > “Commands” > “Add…” or we duplicate an existing one and complete:
- Command Name: We give the command a name, in my case I put the same as the script to associate it more easily.
- Check Type: We leave it at Check.
- Command Line: /usr/lib/nagios/plugins/check_VM_snapshots $HOSTADDRESS$ $ARG 1$ $ARG 2$ $ARG 3$
Click on “Describe arguments” and we define the 3 Command Arguments, ARG1 will be the Warning as we will remember, ARG2 Critical value and ARG3 days old snap.
We record with “Save”!

Now we can define the Service that will monitor the Snapshots, We create or duplicate it from “Configuration” > “Services”. We must take into account the following:
- Description: It will be the name under which we will see the service in monitoring, a name like 'Snapshots in MVs'’ identifies it perfectly or that? 😉
- Linked with Hosts: We will associate it with the ESXi host with which we made the fingerprint. It will be the host in charge of searching the datastores and VMs for the existence of snapshots.
- Template: Normally 'generic-active-service-custom', it will depend on the ones we use or have modified.
- Check Command: Select the Command we created in the previous step 'check_VM_snapshots’
- Args: This command requires us to complete the 3 Arguments, In this example I want that when there is 1 snapshot in my organization alert me with a Warning and if there is 2 or more with a Critical, all this when the snaps are more than 2 days.
We keep with “Save”.

We export the data and reload the settings so that Centreon can read the new changes we just put in. As always we will go to "Configuration" > "Pollers" > "Export configuration", Selecting our poller, We mark the checks and restart & "Export".
And now, since “Monitoring” we will see that the service that will be checked comes out. To force and test it, We select him and in the combo we choose: 'Services – Schedule immediate check (Forced)’.
And that's it!!!! We already have more things monitored in our environment! Every day we will rest better!!! As usual, I hope you all enjoy it!!