Enabling Jitsi Recordings and Streaming with Jibri

If in a Previous Post We saw how we can set up our own video conferencing solution for our company, Today we are going to give it a couple of additions, such as the possibility of recording the sessions or live streaming our meetings.
Through Jibri we will be able to record on disc or in the cloud the sessions we do, as well as if you want to do a live stream and broadcast on Youtube. An important consideration will be that we can only make a recording simultaneously or stream, for more, we will have to create different Jibri's (e.g. in containers).
The idea is to follow the previous post so we are going to allow this interesting functionality! We start from the fact that on Github The entire project is well documented, here we go with an Ubuntu 20.04.
Let's start with the basics, We have to have the version 8 Java, we will know the version we have running:
java -version
In my case, having Ubuntu 20.04, I see that I have the version 11, So you have to downgrade, First we make sure to install the version 8:
Sudo apt-get install openJDK-8-jre sudo apt-get install openjdk-8-jdk
And when you run 'update-alternatives –Java config’ We will be able to choose the version of Java that we will use, in my case we chose the 2:
There are 2 choices for the alternative java (providing /usr/bin/java).

  Selection Path Priority Status
------------------------------------------------------------
* 0            /usr/lib/jvm/java-11-openjdk-amd64/bin/java      1111      Auto Mode
  1            /usr/lib/jvm/java-11-openjdk-amd64/bin/java      1111      Manual mode
  2            /usr/lib/jvm/java-8-openjdk-amd64/jre/bin/java   1081      Manual mode
We create the JAVA_HOME variable with 'nano ~/.bashrc', we add it to the end of the file, and after saving the file we will leave the session and load again to confirm that the variable is loaded (with a simple 'echo $JAVA_HOME').
export JAVA_HOME=/usr/lib/jvm/java-1.8.0-openjdk-amd64/bin/java
We install the following dependencies that will be necessary:
apt update apt install unzip ffmpeg curl alsa-utils icewm xdotool xserver-xorg-input-void xserver-xorg-video-dummy -y
Loading the ALSA loopback module, We force it to load into the boot and verify that we have it loaded:
ECHO "snd-aloop" >> /etc/modules modprobe snd-aloop lsmod | Grep snd_aloop
We install the latest stable version of Google Chrome:
curl -sS -o - https://dl-ssl.google.com/linux/linux_signing_key.pub | apt-key add echo "deb [arch=amd64] HTTP://dl.google.com/linux/chrome/deb/ stable main" > /etc/apt/sources.list.d/google-chrome.list apt update && apt install google-chrome-stable -y
To hide the Warning that Chrome will take out that will record the session: “Chrome is being controlled by automated test software” We will indicate this by means of a preference:
mkdir -p /etc/opt/chrome/policies/managed echo '{ "CommandLineFlagSecurityWarningsEnabled": False }' >>/etc/opt/chrome/policies/managed/managed_policies.json
We will also need Chromedriver:
CHROME_DRIVER_VERSION='curl -sS chromedriver.storage.googleapis.com/LATEST_RELEASE' wget -N http://chromedriver.storage.googleapis.com/$CHROME_DRIVER_VERSION/chromedriver_linux64.zip -P ~/ unzip ~/chromedriver_linux64.zip -d ~/ rm ~/chromedriver_linux64.zip mv -f ~/chromedriver /usr/local/bin/chromedriver chown root:root /usr/local/bin/chromedriver chmod 0755 /usr/local/bin/chromedriver
We installed the Jitsi repository to finally install Jibri:
wget -qO - https://download.jitsi.org/jitsi-key.gpg.key | Sudo apt-key add -
sh -c "echo 'deb https://download.jitsi.org stable/' > /etc/apt/sources.list.d/jitsi-stable.list"
apt update apt install jibri -y
We put the Jibri user in the groups to have access to the audio or video devices:
usermod -aG adm,audio,video,Plugdev Jibri
Add to the end of the /etc/prosody/conf.avail/meet.domain.eso.cfg.lua file the following:
Component "internal.auth.meet.domain.eso" "Muc"
    modules_enabled = {
      "ping";
    }
    storage = "memory"
    muc_room_cache_size = 1000

VirtualHost "recorder.meet.domain.eso"
    modules_enabled = {
      "ping";
    }
    authentication = "internal_plain"
And we reload Prosody:
Prosody Reload
We create the two accounts that Prosody will use and we establish a password that we will use in a little while:
prosodyctl register jibri auth.meet.domain.eso PASSWORD prosodyctl register recorder recorder.meet.domain.eso PASSWORD
We add these 2 lines at the end of '/etc/jitsi/jicofo/sip-communicator.properties’ to locate Jibri drivers:
org.jitsi.jicofo.jibri.BREWERY=Ji**********@************************io.eso
org.jitsi.jicofo.jibri.PENDING_TIMEOUT=90
Y recargamos Jicofo:
/etc/init.d/jicofo reload
Descomentamos y dejar así las siguientes líneas en ‘/etc/jitsi/meet/meet.dominio.eso-config.js’ para habilitar las grabaciones o streaming:
fileRecordingsEnabled: True,
liveStreamingEnabled: True,
hiddenDomain: 'recorder.meet.domain.eso',
Creamos el fichero de configuración de Jibri ‘/etc/jitsi/jibri/config.json’:
{
    "recording_directory":"/srv/recordings",
    "finalize_recording_script_path": "/path/to/finalize_recording.sh",
    "xmpp_environments": [
        {
            "Name": "prod environment",
            "xmpp_server_hosts": [
                "meet.dominio.eso"
            ],
            "xmpp_domain": "meet.dominio.eso",
            "control_login": {
                // The domain to use for logging in
                "domain": "auth.meet.dominio.eso",
                // The credentials for logging in
                "username": "jibri",
                "password": "PASSWORD"
            },
            "control_muc": {
                "domain": "internal.auth.meet.domain.eso",
                "room_name": "JibriBrewery",
                "nickname": "jibri-nickname"
            },
            "call_login": {
                "domain": "recorder.meet.domain.eso",
                "username": "recorder",
                "password": "PASSWORD"
            },
            "room_jid_domain_string_to_strip_from_start": "conference.",
            "usage_timeout": "0"
        }
    ]
}
We create the directory where we are going to leave the recordings and give ourselves permissions, We could also save them in the cloud or in a share that we mount on the machine:
mkdir /srv/recordings chown jibri:jitsi /srv/recordings
We restart Jitsi:
Service Jibri Restart
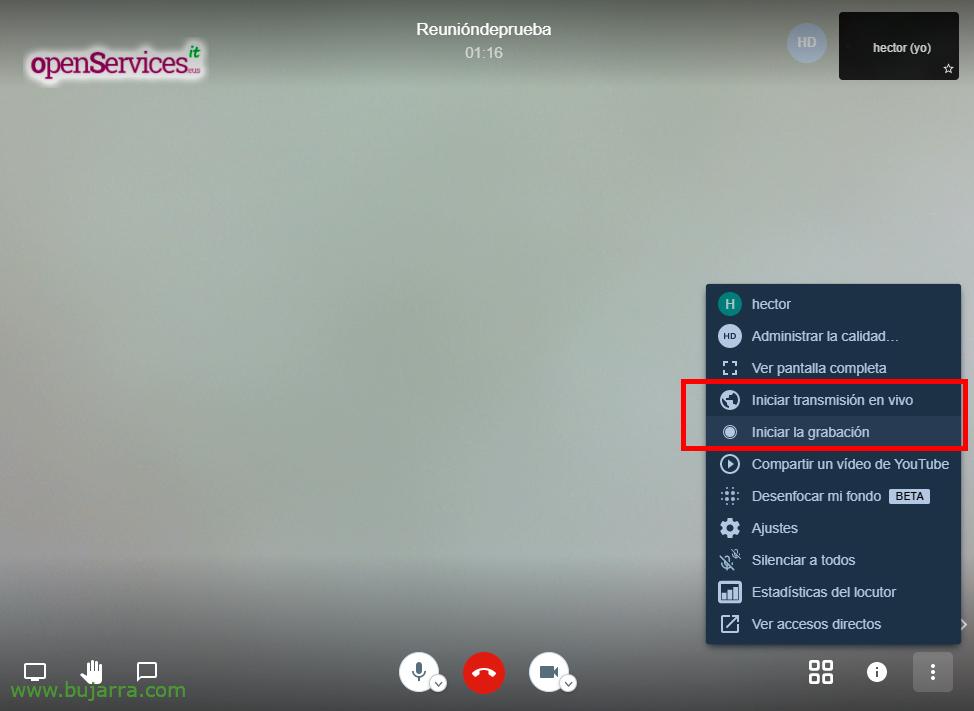
And that's it! We can try to do a meeting and do a live stream or make a recording of the meeting.
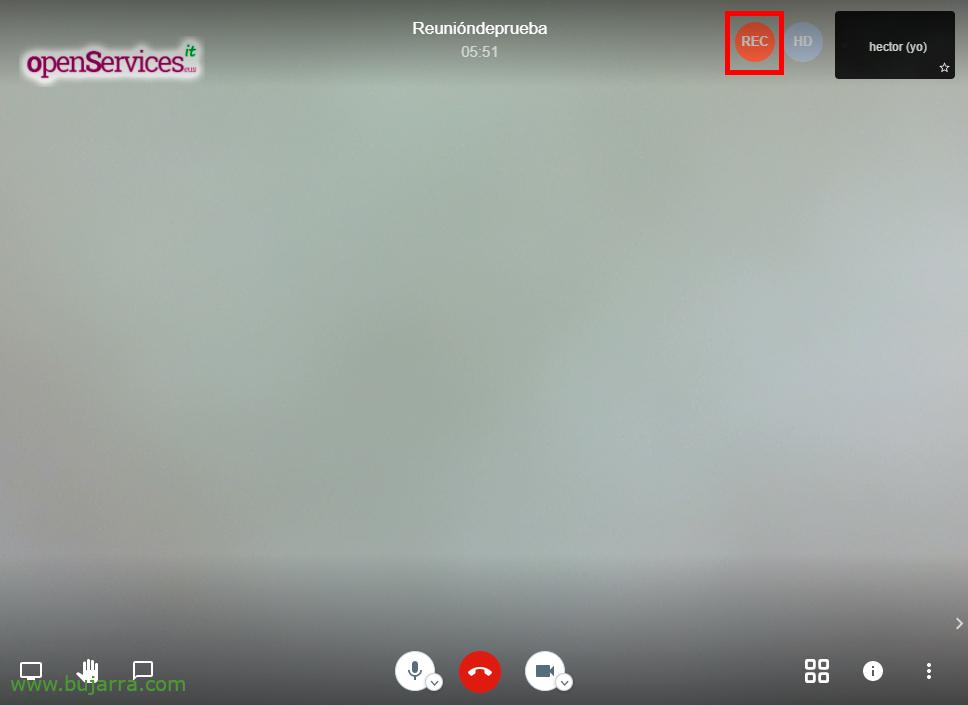
When starting the recording, all participants will hear a message that the session is being recorded and you can also check it because we will see an icon at the top right.

And we will be able to confirm that the recordings are left in the directory that we have indicated, In this example in '/srv/recordings/'.
I hope that as always, that you have found it of interest and thank all of you who give those likes and recommendations on social networks.