VMware Mirage – Part 1 – Basic Installation and Configuration

In May of this year, VMware acquired the Wanova company, at VMware World Showcased Mirage, a software that will help us centralize and simplify the management of desktop images, both physical and virtual. Being able to have Windows images with corporate applications and deploy them to customers in a simple way, as well as any updates to the images.

With VMware Mirage we will have all computers centralized, stored in a volume on the Mirage server, these computers called CVD (Centralized Virtual Desktop) will have a backup of their data and both users and we admins will be able to recover files or directly the image & apply it to another computer (physical or virtual) due to theft, losses… It is perfectly designed to work over WAN as it deduplicates at the transfer level as well as when storing any CVD in the volume.
Additionally, it can be perfectly used to carry out migrations of entire offices or individual computers, as well as when we want to migrate from Windows XP to Windows 7!

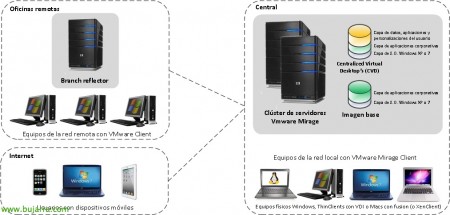
In the image we have an example of coexistence of VMware Mirage with VMware View or VMware Fusion (for Macs.). In the case of having a Citrix XenClient environment, it would also be a good alternative for complete management..
Components of VMware Mirage::
1 – VMware Mirage Management Server:: It is used to manage the Mirage Server., It can be accessed from the management console,, from the CLI, or with automation scripts.. It stores its information in a SQL database..
2 – VMware Mirage Server:: The Mirage Server is the heart of the system., It is responsible for knowing the state of all clients and keeping them updated,, as well as carrying out the operations that come in through the management console.. It supports up to 1500 desktops per server..
3 – VMware Mirage Management Console.: This will be the console that we will use to manage the Mirage servers, where we will be able to create tasks, monitor the system, create reports…
4 – VMware Mirage Web Applications: It will be the web portal that we can use for users to recover their files.
5 – VMware Mirage Client: This will be the software that we will install on the machines that we want to centralize, virtual or physical.
It is a requirement to have .NET Framework installed beforehand 3.5 before installing any VMware Mirage components.
– CVD or Centralized Virtual Desktop: These are the user-managed machines, which we will have centralized to back them up, apply the images…
– Reference machine: It will be the machine taken as an image (UNDER + Applications) that we will apply to the CVD.
Components of a CVD:
– Base image: The image applied by the administrator will be composed of an operating system and corporate applications.
– Driver profile: It will be a set of drivers that will be applied to the different models of equipment.
– Applications installed by the user: Applications that the user installs on their own.
– User data and settings: Their profile.
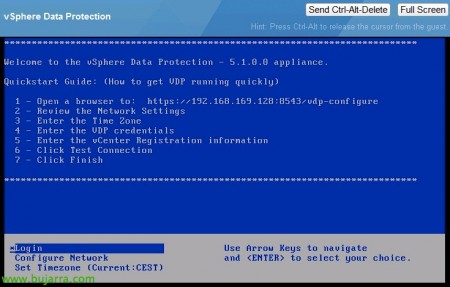
Installation of VMware Mirage Management Server,

The first step will be to install Mirage Management Server,

We accept the license,

We must specify a SQL server 2008 R2 and an instance where we will create the MirageDB database in advance. In addition to indicating the configuration directory, we will use UNC paths in case of a cluster.

Account for starting the services & we will create a group of Mirage administrators in Active Directory, we make them admins of the machine and set it to 'domain group' format’

“Install” to begin installation,

…

“Finish”,
Installing VMware Mirage Server,

The following, will be installing Mirage Server,

We accept the agreement,

We select the same server and SQL instance, we will also create a directory for the cache of all CVDs (Centralized Virtual Desktop), in my case, 100Gb will be enough.

We specify the account to start the services of Mirage Server,

“Install” to begin installation,

…

“Finish”,

We will need to restart the server to continue with the installations,
Installing VMware Mirage Management Console,

We will install the management console to connect to the Management Servers and manage the Mirage Servers,

We accept the license agreement,

“Install” para comenzar a instalar la consola,

…

“Finish”,
Instalación de VMware Mirage Web Applications,

Si queremos permitir un acceso vía web a los documentos que tenemos o tienen los usuarios vía web, deberemos instalar Mirage Web Applications en un equipo.

Indicaremos la dirección del servidor que tiene instalado Mirage Management Server,

Select “Web Access” & “Admin Web Access” & Pressed “Next” to begin your installation,

…

“Finish”, ya tenemos la instalación completa a nivel de componentes de servidor.
Instalación de VMware Mirage Client,
Esta parte lógicamente sólo la realizaremos en los equipos clientes que queramos centralizar para gestionar sus imágenes, hacer backup de ellos o bien para utilizarlos como equipos de referencia y

We have two types of installation, GUI type in the wizard or we will also have the possibility to install it massively via GPO, “Next” to install it with the wizard.

We accept the license agreement,

We must specify the Mirage Server to which we will associate this computer and the type of connection if we want it to be secure (by default on the server it would come disabled),

“Install” to begin your installation,

…

And “Finish”,

The other possibility would be to install it with parameters to perform automated installations, we would run it as: ‘MirageClient.xXX.50588.msi SERVERIP=MIRAGE_SERVER:PORT USESSLTRANSPORT=true /quiet’.

Y tendríamos el cliente de VMware Mirage instalado en el equipo a falta de asignarlo como CVD o equipo de referencia. Las asignaciones las realizaremos desde la consola de administración, aún que habrá una configuración que podremos habilitar para que los propios usuarios registren sus equipos si interesase.
Configuración básica de VMware Mirage,
En esta parte final veremos cómo conectarnos al servidor de gestión y configurar ciertos parámetros a nivel global y a nivel de servidor.

First things, We open the console “VMware Mirage Management Console.”, desde el árbol deberemos agregar un Management Server en “Add System…”

Indicamos el servidor de gestión & “OK”,

Lo primero de todo será licenciar la instalación, To this end, from “System Configuration” > “Settings”. En la pestaña ‘General’ agregaremos la licencia desde “Set License…”, The next step will be to configure an Active Directory account with permission to create/delete computer accounts, modify their properties or reset their password. In addition to configuring general frequency values for CVD snapshots or volume space warnings.

In the ‘CVD Auto Creation’ tab’ we will allow users to register computers automatically and create them as CVDs. We will provide text indicating the instructions,

In ‘File Portal’’ we will add a shortcut to the file portal from the Mirage Client, we will add the URL in the format: 'https://MIRAGE_WEB_APPLICATION/Explorer’.

In the ‘USMT’ tab’ We need to add the USMT directory 4.0 (User State Migration Tool) to allow for user profile migration, this will be a requirement when we want to migrate from Windows XP to Windows 7 our users. The USMT directory can be found on a machine with AIK (Automated Installation Kit) installed, we can download it from here and it would be in ‘%ProgramFiles%Windows AIKToolsUSMT’.
Anyway, if you do not have AIK installed, I am leaving you this ZIP with the requested directory. The ZIP password is: www.bujarra.com

List!

At the server level, it would be advisable to enable secure connection by enabling ‘SSL’.