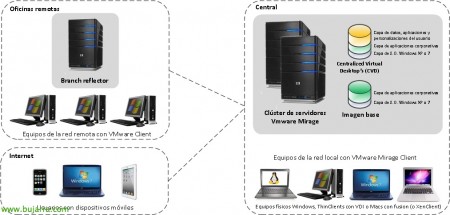
vSphere Data Protection

One of the new features of vSphere 5.1 was the introduction of vSphere Data Protection (since vSphere Data Recovery is discontinued), a new virtual machine backup and recovery software for our vSphere virtual infrastructure 5.1. Like VMware Data Recovery uses VADP (vSphere API for Data Protection) with CBT (Changed Blocks Tracking), but it also uses EMC Avamar's variable block-level deduplication to optimize copies and restores. Provide deduplication together to all appliance tasks and VMs. It is fully integrated with the vSphere Web Client and will provide the possibility of file recovery to end users.
Requirements:
– VMware vCenter Server 5.1
– VMware ESX/ESXi 4.0, 4.0i, 4.1i, 5.0i, 5.1
– Successful DNS resolution
– vSphere License 5.1 Essentials Plus or higher

The first thing will be to deploy the vSphere Data Protection appliance (VDP) from the VMware website, We will have three different ones depending on the capacity of our backup:
– 0.5Tb: Has 4 VMDK files and we'll need 850 Available Gb of Space.
– 1Tb: Has 7 VMDK files and we'll need 1,57 Available Gb of Space.
– 2Tb: Has 13 VMDK files and we'll need 3,02 Available Gb of Space.

We will configure during the OVF import the network configuration & We import it!

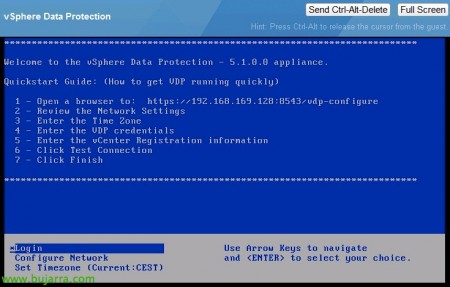
We connect by console & once started, we open the URL in a browser,

We open 'https://vSPHERE_DATA_PROTECTION:8543/VPD-configure', We validate with the default credentials, user: root, contraseña: Change me

The vSphere Data Protection configuration wizard will appear, “Next”,

We confirm the network parameters,

We select the time zone,

We will need to create a password for 9 characteristics to the root user as well as complex,

We provide the data required to register VDP in our virtual infrastructure, providing the data of our vCenter server and SSO, We validate the connection from “Test connection”,

“OK”,

And “Finish”,

“OK” We will have to restart the appliance to load the configuration,

Once started, We confirm that we have all services started. From here we will also be able to roll back the status of the appliance, being able to return to a previous state in case of any problem; in addition to upgrading it from here.

From the vSphere Web Client, we'll go to 'vSphere Data Protection’ and we connect to our VDP appliance with “Connect”. We can connect up to 10 VDP by vCenter.

List, This will be your management console, The first thing we can do is set up a backup from “Create Backup Job”,

In the wizard we will first select the VM's to be backed up,

We will select the schedule for this copy, the frequency of when we want it to run,

We will select the retention policy for the copies of the VMs,

We give the task a name,

We confirm that everything is correct & “Finish”,

“OK”,

In the 'Backup' tab’ our tasks and their status will come out, we can force the copy from “Backup Now”,

“OK”,

And we wait while it's done 🙂

From the “Configuration”, we can define the windows of copy time or maintenance to avoid them.

To restore a virtual machine from a backup, on the “Restore”, we select it & “Restore”,

Select the version we want to recover,

We will select where to recover it, whether to crush the VM origin into our infrastructure or whether to create a new one,

List! “Finish”,

“OK”,

On the “Reports” We will see the status of the copies or tasks carried out,

When we have made a copy, We will be able to see the space used and the space deduplicated!!

Another of the characteristics it has, is the ability for a user to log into the vSphere Data Protection Restore Client web portal to recover files that may have been deleted, or the administrators will do it, according to choice 😉
Please note that FLR (File Level Recovery) will not be available in the event of: Raw discs, Dynamos disks in Windows, Partitions Combined Across Multiple Disks, GPT disks, ext4, FAT16, FAT32, Extended partitions, Encrypted or compressed partitions.

When validated on the portal, You will get all the restore points on the machine, We will choose the version that interests us the most.

And we explore even the file or directory that we are interested in recovering & Pressed “Restore selected files…”

We select the destination of the recovery & “Restore”,

“Yes”,

“OK”
With this we will have a simple way to have a complete backup of our infrastructure, where we will define a backup window, We will select the machines that we are interested in backing up and then recover them completely or at the file level.