VMware vSphere Authentication Proxy

Already in a Previous document of the version 4.1 we saw as a novelty that we could include our ESXi hosts in an Active Directory to authenticate directly with centralized accounts; one of the new features of vSphere 5 is the possibility of deploying an intermediate proxy between the hosts and our domain. All this to help in the deployment with Auto Deploy not to put users with passwords in configuration files, we will also be able to use it with hosts not deployed with Auto Deploy!
If we install it under Windows 2008 R2 we will have to install the patch KB981506 from the Microsoft website, otherwise we will receive the error: 'Failed to bind CAM website with CTL and Failed to initialize CAMAdapter' on file “C:ProgramDataVMwarevSphereAuthenticationProxylogscamadapter.log”. Requirements: IIS with IIS Metabase Support 6, ISAPI Extensions & IP and domain restrictions. In addition, we must already have vSphere Auto Deploy deployed in our infrastructure so as not to have another error: 'Failed to get the url of Waiter's website from VC' & 'Failed to initialize CAMAdapter'.

From VMware vSphere DVD 5.0, Select “VMware vSphere Authentication Proxy” & “Install”,

Getting started with the installation wizard for VMware vSphere Authentication Proxy, “Next”,

“Next” to view patents…

“Next” to accept the license agreement,

Select the installation path for Authentication Proxy, default is '%ProgramFiles' (x86)%VMwarevSphere Authentication Proxy’ & “Next”

We will give the information about our vCenter Server, your IP address, HTTP port, a user with administrator privileges and their password. “Next”,

We indicate what we want our authentication proxy to look like in the vCenter & “Next”,

Click on “Install” for installation to begin!

… Wait a few seconds…

“Finish”,

GOOD, now in the IIS Management Console, we must enable the IP addresses that we want to connect to the site “Computer Account Management Web Site” We're going to “IP address and domain restrictions,

“Add Permission Entry…”

And we enter the individual IP addresses of our ESXi hosts or directly an IP range & We accept everything.

Then, we will have to export the certificate that we have on the IIS site, to do this using the IIS Management Console 7 > About the site “Computer Account Management Web Site” > “SSL Configuration” > “Links…” > over the https site with the 51915 > “Modify…”, About the certificate “See…”, eyelash “Details” > “Copy to file…” and select: “Do not export the private key” & exporting it as “X.509 Base Coded 64 (.cer)”.
If we have problems, we can open the URL directly that ESXi deals with from a browser, until we can see the contents of the dll with the data of our AD: https://DIRECCIÓN_IP_PROXY:51915/CAM_ISAPI/camiis.dll

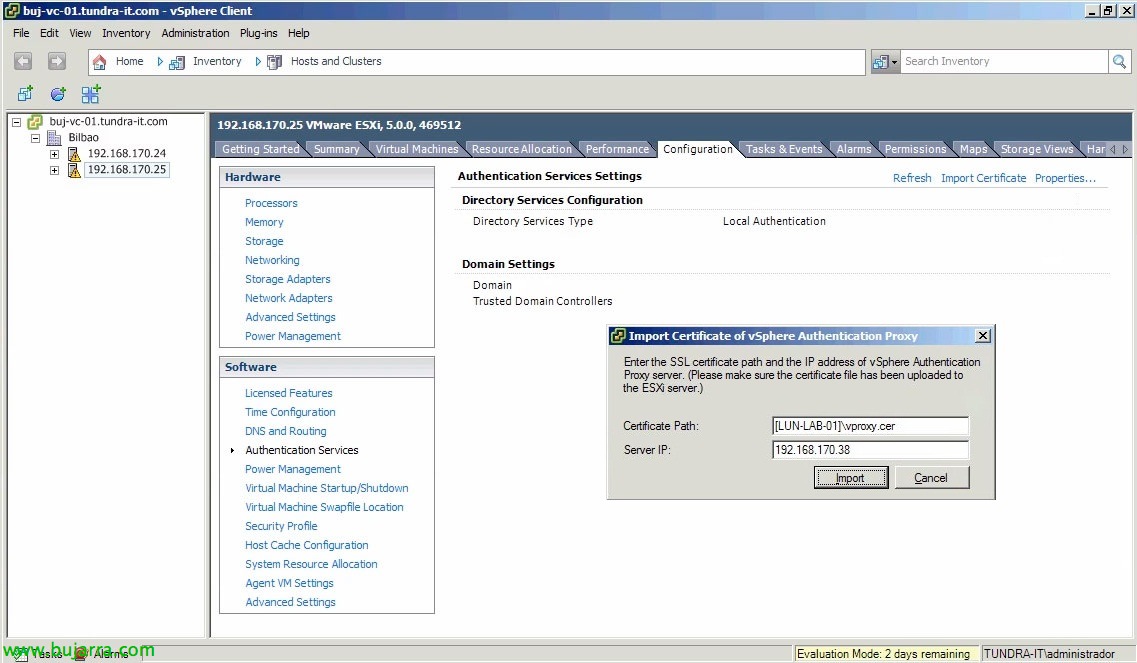
GOOD, after the certificate is exported from IIS, We will have to upload it temporarily to a datastore, to import from “Authentication Services” > “Import Certificate…”. We will enter the certificate in the following format to import it successfully:
Certificate Path: [DATASTORE]PATHCERTIFICADO.cer
Server IP: DIRECCIÓN_IP_PROXY
Once imported, we can add our hosts manually from the link “Properties…”

Under 'Select Directory Service Type’ Introduce “Active Directory”, in 'Domain’ The domain to unite us (we could include the OU's where we will put said team account, e.g: tundra-it.com/OU Servers) and check 'Use vSphere Authentication Proxy', by entering the proxy IP address, Click on “Join Domain” and we will see that it will put us in domain without requesting credentials.