Creating VM Templates in VMware VirtualCenter

En este documento veremos cómo podemos usar el VirtualCenter 2.5 de VMware para poder crear una plantilla de una máquina virtual ya existente y cómo generar de esta plantilla diferentes máquinas virtuales.
La cuestión es ahorrarse el tener que andar instalando siempre un sistema operativo y tener ya una plantilla con él instalado, o cualquier otro tipo de ejemplo, pero este es el más normal. Así que lo que hay que hacer, is, primero crear una máquina virtual, instalarle el sistema operativo que nos interese, por ejemplo un Windows 2003, aprovecharemos y actualizaremos este S.O. con el último parche y poco más. Apagaríamos está MV y la convertiríamos en una plantilla, y desde esta plantilla cuando necesitemos un servidor, simplemente lo distribuiremos de esta plantilla y nos ahorraremos el trabajo de tener que instalar de nuevo un sistema operativo de nuevo.

Tenemos que instalar una revisión de Windows en nuestro servidor con el VirtualCenter, simplemente para tener el Sysprep, tenemos que bajarnos el paquete que corresponda con la versión de S.O. de plantilla que queramos generar, en mi caso la plantilla la generaré a partir de una MV basada en Windows 2003. Así que me bajo de internet el parche KB926028, of HERE. Y comenzamos está instalación para tener el sysprep de la versión que me corresponde. “Following” to install it,

We accept the license agreement “I do” & “Following”,

… esperamos mientras se instala este parche…

GOOD, “End”.

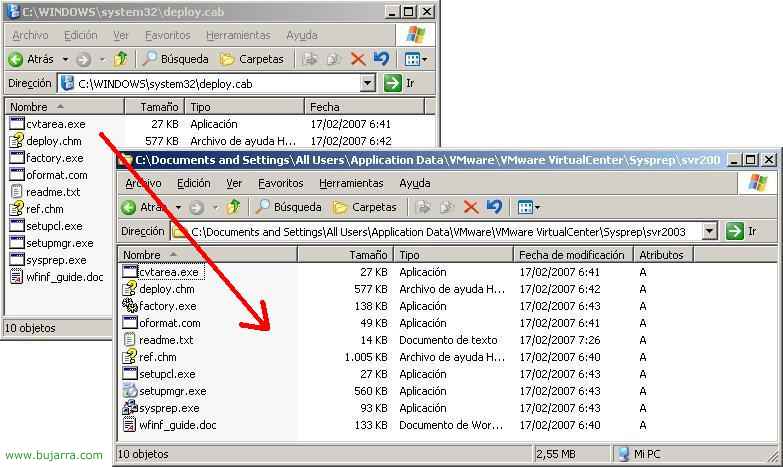
Qué ha hecho el paquete de instalación anterior? Nos ha generado el fichero DEPLOY.CAB en C:WindowsSystem32 del servidor de VirtualCenter, logically, What we need to do now is very important, We need to extract the content of this file into a specific directory. In “C:Documents and SettingsAll UsersApplication DataVMwareVMware VirtualCenterSysprepsvr2003”. And it must be that directory, regardless of the language of our installation, regardless of whether VirtualCenter is installed in Spanish and these directories do not exist, we will create them as they are. We must decompress the DEPLOY.CAB in this directory. If our future template is from another OS. logically, the last directory would change.

GOOD, we need to go to the VirtualCenter, what we need to do now is create a configuration to save us the following work: Cuando distribuyamos una máquina virtual desde una plantilla para no andar configurando parámetros obvios como el número de serie, el idioma del teclado, la configuración regional, el nombre de la organización, nombre del equipo, IP address… Podemos usar un archivo de instalación desatendida para todo esto y todavía ser más cómodo nuestro trabajo. Si no sabes cómo generar un archivo de instalación desatendida puedes hechar un vistazo HERE. Y si no se puede generar posteriormente. Abrimos la consola y en “Edit” > “Customization Specifications…”

Click on “New” para crear un nuevo tipo de especificación.

Seleccionamos el sistema operativo de la máquina virtual destino (Target Virtual Machine OS), en mi caso será un “Windows”, y como yo ya tengo un archivo de instalación desatendida marcaré “Use Custom Sysprep Answer File”. If we do not check this option, we can see on the left menu the types of questions we will be able to answer and avoid during installation, logically we can avoid answering certain questions like the MACHINE NAME or IP ADDRESS, since these can be answered when the final VM starts. We provide a name for customization to identify it when we use it later. “Next”,

As I have checked the option of “Use Custom Sysprep Answer File” the previous screen asks me to locate my unattended installation file of type .inf. I indicate it and continue, “Next”,

We can specify network parameters, automatic configuration using DHCP or manually configuring the address, we choose our option, “Next”,

Of course, it needs to generate a new SID for the Windows machines., Mark “Generate New Security ID (SID)” & “Next”,

We check the summary to ensure everything is fine and click on “Finish” to save our customization settings.

Now, assuming we already have a virtual machine prepared to create a template from (in my case named Windows 2003), we convert it to a template, by right-clicking on it and “Convert to Template…” following the wizard and providing a name, in my case, Of course: TEMPLATE.

Now, to verify that it has successfully, generated our template correctly, we change the view by clicking on the button “Inventory” and we are going to “Virtual Machines And Templates”,

Effectively, there we have our Windows template 2003, named TEMPLATE. Now we will see how to create virtual machines from it, to do this, right-click and “Deploy Virtual Machine from this Template…”

Le tenemos que indicar un nombre a la máquina virtual, en mi casó será “VM W2k301”, y seleccionamos el Datacenter donde la vamos a ubicar. “Next”,

Si tenemos un clúster y queremos almacenarlo en él, we select it, otherwise, seleccionaríamos directamente el host desde aquí, “Next”,

Al tener clúster, tenemos varios hosts, debemos indicar en cual de ellos se ejecutará la MV, seleccionamos uno cualquiera y “Next”,

Seleccionamos nuestro almacenamiento, donde queremos guardar esta MV, lo normal es en nuestra SAN, “Next”,

Y aquí tenemos que seleccionar si queremos customizar su instalación, para ello antes hemos generado la customización llamada “Plantilla 2003” que tendrá la información para introducirla a la máquina virtual y no tardar más de un minuto en distribuir un nuevo servidor (do all this from the last option “Customize using an existing customization specification”. Even so, if we have not previously generated a customization/personalization, we could create it now from “Customize using the Customization Wizard”. “Next”,

We check that everything is correct and press “Finish” to create the virtual machine with all the parameters already defined earlier. So now there is nothing left but to start the virtual machine and work with it!
www.bujarra.com – Héctor Herrero – Nh*****@*****ra.com – v 1.0