Configuring Citrix Merchandising Server and Client Distribution with Citrix Receiver
Today we see one of the latest Citrix novelties, your Merchandising Server product together with your Receiver client. The Citrix Merchandising Server product offers us a perfect distribution of any type of customer (or plug-in) to our network teams, apart from always keeping them updated as it continuously checks for new developments! We can create a series of rules to distribute the plugin that interests us to whoever and how we are interested. Of course,, to distribute the plugins, we will need Citrix Receiver in the installed stations, being able to make a remote and silent installation in any way (with Microsoft GPO's…), once you have Citrix Receiver, it will know if you should install a plugin or not, Fully transparent to the user! Of course, it is free for those who have a Citrix environment since it does not require a license, and if we give it some thought we can see that we can distribute other types of software with it.
The first thing to do is to get Citrix Merchandising Server, We have two ways to get it, all of them based on a virtual appliance, one of them for Citrix XenServer (XenCenter) in BZ2 and another for VMware ESX (vSphere) In ova; eye! we will need a MyCitrix account to be able to download it. We download it depending on our virtual infrastructure we have and import it, yes indeed, we will have to assign 4Gb of RAM and 2 vCPU's, We connect it to our production network… We turn on the machine and it's ready to set it up!
Citrix Merchandising Server Configuration,
This would be the first impression once we start the appliace, with the '1 keys' – 8’ we will be able to establish the different network configurations,
Once established, we go out and it tells us that we will have to save the changes with '9',
We confirm with 'yes',
Enter a password for the root user’ and the appliance will be restarted to apply the configuration changes.
Open a browser and go to https://APPLIANCE_MERCHANDISING/appliance, We log in to the admin console with 'root’ and its default password 'C1trix321'. “Log on”,
First of all, you need to set up connectivity to Active Directory, So let's “Configuration” > “Configure AD”,
We enter the connectivity data to our D.A. One of the great things it brings is the ability to watch a Citrix TV video in each section of the appliance to be configured, So if we have doubts during the configuration it is as simple as clicking on “Click for an example video”, amazing. What I said, We enter the parameters of a domain controller (IP address only), LDAP's default port will be 389, We indicate the path of a user with administrator permissions and their password, as well as the route that will be the 'DN Base’ and the synchronization period. Click on “Save and Sync”.
If we look at the upper left, it will indicate that it was synchronized without problems, Once Ready, We have to assign an administrator, for this, We're going to “Configuration” > “Permissions” and we are looking for a user that we want to be the administrator & “Search”,
Select the user and click on “Edit”.
We indicate that he is an administrator so that he is in charge of uploading or adding plugins, to distribute them and configure access. “Save”. We log out as 'root’ And we get out of everything.
We log in as the user we just gave permission to,
This would be the main screen, Next to set up (is optional), would be the issue of certificates, create a request for our computer name and make the connection reliable and secure. Either by requesting the certificate from an external certificate authority or an internal one of ours. On the main screen we will have the following resources: Forum Information, news, Documentation and videos on configurations.
Let us therefore go to “Configurations” > “SSL Certificate Management” and select 'Export certificate signing request', we enter the information to generate the CSR and click on “Export”,
We save the certificate request wherever we want and process the request to import the certificate.
Once we have the base certificate 64 (.cer) we can attach it and select the option 'Import certificate from a certificate authority’ in “Configurations” > “SSL Certificate Management”. “Submit”,
We confirm that it will affect and restart the appliance.
Once imported, we will be able to see from 'Manage SSL Certificates'’ that indeed we already have the correct certificate installed and because in the browser it will no longer give us any validity error.
If we are going to “Configurations” > “Options” We enter the support data on this server so that when users want to contact us they have the access information, that they will see from the Receiver. “Save”,
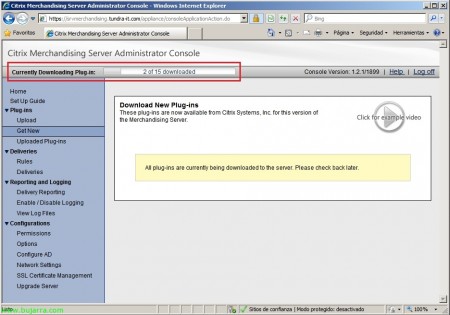
GOOD, Started, the first thing is to feed plug-ins to Merchandising, for this we will go to “Plug-ins” > “Get New”. From there we will be able to observe the plug-ins offered by Citrix directly through the Internet. We will be able to select the ones that interest us and download them one by one manually or all of them. In this document we will see how with Merchandising Server we can distribute the PNA client or Citrix Online plug in; Even so, I will download all the plugins and later indicate which plug-in I will distribute.
We confirm to download the plug-ins,
…We wait for them to get off so we can continue…
Once we have the plug-in we are interested in downloaded,, in “Deliveries” > “Rules” We will create the delivery rules for such customers, who they will be delivered to and then we will configure the plug-in deliveries with the rule that we are going to configure. We give the rule a name, we indicate in 'Field’ the mode of selecting users, groups, Equipment… in short, the recipient of the plug-in. “Save”.
GOOD, We configure the distribution of the plug-ins, “Deliveries” > “Deliveries”, We follow this wizard of 5 Steps to have our first distribution ready. In '1 – General’ We indicate the name of the delivery, distribution order in case we have multiple deliveries, whether we want the installation to be silent or not, how to explainer text to users if they see the product installation. We will also configure the support data if we are interested in the customer.
In '2 – Plug-ins’ We will add the client to distribute from “Add”,
In my case I will select the Online plug-in with install action, “Add”,
Perfect, Continue.
In '3 – Configuration’ we will be able to configure the client that we are going to distribute, In my case, I will be able to indicate which server to connect to (the server with the XenApp Services, although in my case it will be the CSG server in case they also access externally).
In '4 – Rules’ We'll add the distribution rules, The recipients, so we will add the rules previously defined from “Add”,
We look for the rules, we mark them and add them with “Add”, Continue,
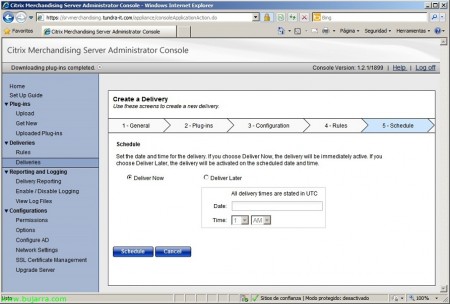
In '5 – Schedule’ it will be where we will configure the programming of the distribution, in my case I will put it so that it is available from now on, So “Deliver Now” & “Schedule”.
We will be able to see at all times from the logs that we have in “Reporting and Logging” What Happens, we will also be able to check the customer distributions if they have been OK or not…
Deploying Citrix Receiver,
What we will need in the client stations to connect to the distribution server is Citrix Receiver, It will be the application that controls at all times the plug-ins that our users have, so we must install it. In the following steps we will see what a manual installation would be like, of course we could distribute it through some directive of our Active Directory being totally transparent to users; Once they have it installed, they will start installing the plug-ins that they have associated with it, or to update or uninstall them (depending on the action configured in the deployment).
From a client computer, We open a browser and go to 'https://APPLIANCE_MERCHANDISING/appliance/download', We mark the check “I accept the Terms of Use” and click on “Download”, In any case, it should be something simple for our users to do (manually).
We execute it,
… Citrix Receiver installation has nothing… Just wait…
It will ask us to authenticate ourselves to know who we are and to know if we have any prepared customers; We enter it and click on “Sign in”,
Citrix Receiver will remain in the notification area bar, and when he has something to install he will show it to us… Fully transparent to users…
The Citrix Online plug-in asks us for authentication to connect to where we have indicated above, We introduce it…
And we would already have quickly and transparently the applications that our users must use!
Citrix TV videos on configuring Citrix Merchandising Server:
How To: Download Plug-ins from Citrix Merchandising Server
How To: Creating rules in Citrix Merchandising Server
How To: Configuring distributions on Citrix Merchandising Server
How To: Configuring synchronization between Active Directory and Citrix Merchandising Server
How To: View and download deployment reports on Merchandising Server
How To: Treating LOG's on Citrix Merchandising Server
How To: Uninstalling a client from Merchandising Server
How To: Modifying metadata files (Metadata Files) for plug-ins
How To: Configuring SSL Certificates on Citrix Merchandising Server


