Generic VMware Virtual Center Settings

Connecting to an ESX host or VirtualCenter with VMware Infrastructure Client – HERE
Organizando una estructura de VirtualCenter, Creating directories, Datacenters and Adding Hosts – HERE
Creación de máquinas virtuales (MV) – HERE
Migrar una MV entre diferentes hosts – HERE
Creando un clúster con (HA and DRS) and migrating hosts to it – HERE
Creación y usos de las reservas de recursos o Resource Pool – HERE
Resumen de todas las pestañas y partes de la consola de administración de VirtualCenter – HERE
Connecting to an ESX host or VirtualCenter with VMware Infrastructure Client,
Simplemente mostrar cómo nos conectaríamos a un host ESX o a un VirtualCenter de VMware con el cliente de infraestructuras. Debemos instalarnos primero el cliente, desde un servidor ESX o bajándonoslo de Internet – HERE.

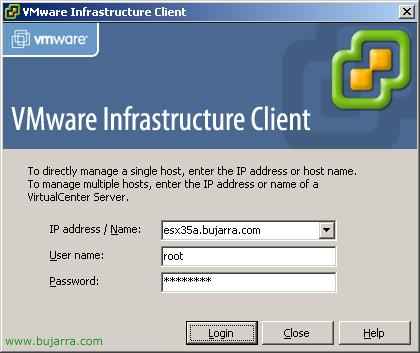
Abrimos el cliente e introducimos el nombre del host ESX a conectarnos, normally, al conectarnos a un host de ESX el usuario será ‘root’ y la contraseña que le hayamos indicado en la instalación.

Nos mostrará un aviso de seguridad, This will be a warning indicating that the security certificate is not trusted. We must click on “Ignore” and check the box for “Do not display any security warnings for ESX server”. This ensures that all communication and data transfer with our ESX server will be encrypted.

And this would be the management panel we will use to administer an ESX host. But not all of them, since to manage a group of servers we will use a VirtualCenter.

Now we will see how to connect to a VirtualCenter, as this will be the one we use to manage the ESX hosts, among other things. We enter the server name with VirtualCenter, its user, which will usually be 'Administrator'’ and the password it has locally or from the domain, depending. Click on “Login” to connect.

Nos mostrará un aviso de seguridad, This will be a warning indicating that the security certificate is not trusted. We must click on “Ignore” and check the box for “Do not display any security warnings for VirtualCenter server”. This assures us that all communication and data transfer with our VirtualCenter server will be encrypted.
Organizando una estructura de VirtualCenter, Creating directories, Datacenters and Adding Hosts,
In this section we will see how to structure an ESX server organization with VirtualCenter, Additionally, we will create a datacenter, which is a physical location of ESX servers, and we will add hosts to it.

When connecting to a VirtualCenter for the first time, it will be empty and we must organize it, Normally, if it is a small structure, a datacenter is created directly here, but if we can have different locations for the servers, we will first create a series of directories to organize it. So about “Host & Clusters” Right-click “New Folder”

And we organize by directories, for example, Europe, Spain… until we reach the location of the datacenter. Right-click on a directory and create our first Datacenter “New Datacenter”, and it is usually given the name of the physical location of the host servers.

Once we have our site defined, now all that remains is to add our ESX servers or hosts, for this, right-click on the datacenter > “Add Host…” and add all the ESX servers we want to manage.

We enter the name of a host, full name (FQDN) and a user to connect to the server, usually the user ‘root’’ and your password “Next”,

It checks the version of the ESX server and the virtual machines it hosts, in this case none, “Next”,

We select which datacenter we want to add it to and “Next”,

Check that everything is OK and click on “Finish” to add it. And now we must add as many hosts as we want to introduce in this Datacenter to later create virtual machines on them, to be able to create a cluster and add them to it, to be able to use HA or DRS…
Creación de máquinas virtuales (MV),
Here we will see how to create a virtual machine on an ESX host. In my case I will create a machine with Windows XP, to create it quickly, normally servers are created so that we can have our virtualization servers or also workstations and be able to use Desktop Virtualization tools so that our users can use ThinClients.

Now we see that our VirtualCenter is taking shape, we already have our two ESX servers and on one of them we will create a virtual machine, by right-clicking on one of them > “New Virtual Machine…”

We must follow the wizard, From here we can specify the name of the VM, the disk it should have, the RAM, where we will host the VM… We must select the type of configuration, in my case I will select “Custom…” to see all the possibilities it gives us. “Next”,

We select a name for the VM and a location to place it, the datacenter, “Next”,

We must choose where we will store it, whether on the ESX server's hard drive or if we have a shared storage disk. If we have more than one ESX server we must have shared storage, because if we want the VMs to run on other ESXs if an ESX fails, we must have it. So I, who have it, select my shared storage datastore. “Next”,

Seleccionamos el S.O. which the VM will have, this does not mean that it will install that OS for us. si no que preparará el hardware de la máquina con los requisitos de ella. “Next”,

Seleccionamos el número de procesadores virtuales que le queremos asignar a la máquina virtual, dependerá de la carga que vaya a sufir. “Next”,

Seleccionamos la memoria RAM que queremos que tenga está MV, igual que el anterior, este es un parámetro totalmente dependiente del tipo de carga que vaya a aguantar la MV. “Next”,

Debemos seleccionar las interfaces de red que nos interese que tenga está MV, y a qué red virtual la conectaremos, en mi caso sólo le crearé un adaptador de red virtual e irá a la red de MV “Virtual Machine Network”, ademas estará conectada al encender la MV, “Next”,

Seleccionamos el tipo de adaptador de almacenamiento, si será BusLogic o LSI Logic, “Next”,

We need to create a virtual hard drive for the VM, So we dial “Create a new virtual disk” and “Next”,

We select the capacity of the virtual hard drive, “Next”,

We can select advanced options for the drive if we want,, such as whether changes are saved or not when the VM is shut down. “Next”,

We have a summary of the VM, if everything is correct we click on “Finish” to create it, Now it's time to install it with our CDs or ISO image.

We press PLAY to start the VM and the other icon to access the VM console and see its screen.

It is essential that once we have the virtual machine installed, we install VMware Tools, as it will significantly improve the VM's performance.
Migrar una MV entre diferentes hosts,
This procedure shows how to move different virtual machines between different hosts, It would be a manual move, assuming we do not have DRS to move them automatically.

Viendo la situación actual, tenemos dos servidores esx35a y esx35b, si queremos que una MV se ejecute en otro servidor, vemos que ahora está en el B, para que se ejecute en la A, con botón derecho en la MV y “Migrate…”

Seleccionamos el servidor destino a la que le moveremos y “Next”,

Comprueba si puede migrarse, y si tenemos un Pool de recursos en ella, seleccionaríamos a cual la moveríamos, en este caso no hay ninguno. “Next”,

Nos da la posibilidad de mover los ficheros de la MV, logically, se da por echo que existe un almacenamiento compartido, así que los ficheros de la MV estarán en este espacio y no hay que moverlos a ningún sitio, si no que simplemente se ejecute en este nuevo host. “Next”,

Comprobamos que está todo OK para migrar la MV y pulsamos en “Finish”.

Vemos que la MV ya se ejecutaría en el host esx35a, y que abajo en las tareas se ha completado.
Creando un clúster con (HA and DRS) and migrating hosts to it,
Esta es la parte interesante de VMware Infrastructure, poder tener balanceo de los hosts y las máquinas virtuales, poder tener un clúster de hosts y no saber en qué host se ejecuta qué MV, si no configurar la carga a nivel de grupo de servidores.

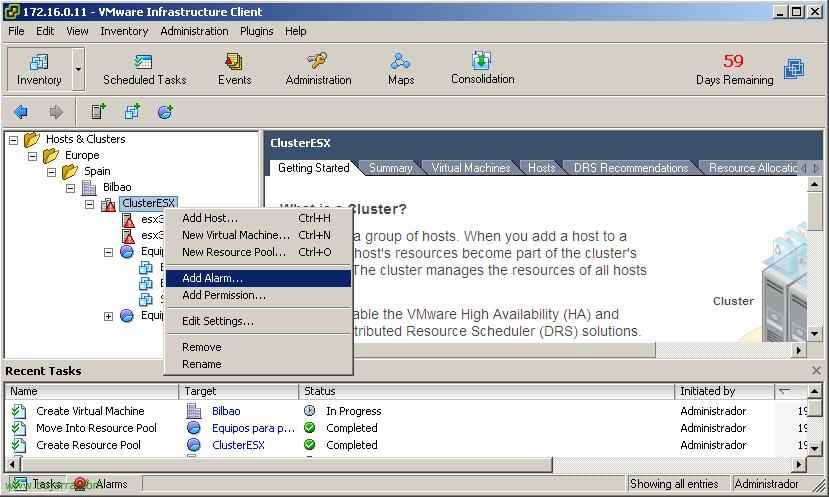
Para crear un clúster lo haremos a nivel de Datacender, con botón derecho en él y seleccionando la opción de “New Cluster…”
Note: ¿Qué es VMotion? Es una tecnología implementada en VI, en la que nos permite mover una maquina virtual de un host (ESX) a otro host sin tener que detenerla y los usuarios se percaten. Users can be working with that virtual machine and it moves manually or automatically to another host. For this, we will need common storage (NAS/SAN/iSCSI). Virtual machines move from one host to another for maintenance purposes on the hosts or directly for performance reasons, They move to the server that is the least loaded.

We indicate the name to the cluster and select the options we want for our cluster. We will mark depending on the license we have acquired. We have:
– “VMware HA” Which allows us to automatically migrate VMs between hosts in case of a host failure.
– “VMware DRS” The Distributed Resources Scheduler allows virtual machines (VMs) to be automatically moved between hosts without needing to stop the VM, depending on how we configure it., It would move them live, and if a host fails, the VMs from that host will be distributed to the available hosts without interrupting user operations..

We need to configure VMware DRS., This is the way VMs will move between ESX hosts., We have three options.:
– “Manual”: No VM will move automatically between hosts., otherwise, We would have to move them manually., So if an ESX host is overloaded, DRS will not run and move the VMs to free up resources..
– “Partially automated.”: VMs will also not move between hosts if any of them are overloaded., sólo se moverán a la hora de arrancar una MV, verá cual es el servidor con menos carga y desde él se ejecutará.
– “Fully automated”: Y este es el modo más interesante, poder mover las MV de forma automática entre los diferentes hosts, si un host se sobrecarga será inteligente y moverá la MV que considere al host más libre de carga, todo ello dependiendo del tipo de valor que indiquemos, si más conservativo/suave o más agresivo. El parámetro que se suele dejar en las cuatro estrellas. “Next”,

Configurando “VMware HA”, simplemente indicaremos cual es el número de host que permitiremos que se apaguen y el HA siga funcionando, dependerá de la carga que pueda soportar los hosts que nos queden libres. And above all, whether we will allow the VMs to run when we overload the hosts or not. “Next”,

About the swap file of the virtual machines or “VM Swapfile”, where it will be located, whether with the VMs (recommended) or in the host's datastore. The usual thing is to store it with the virtual machines since if we use VMotion the performance will be worse if it has to be copied between different hosts. “Next”,
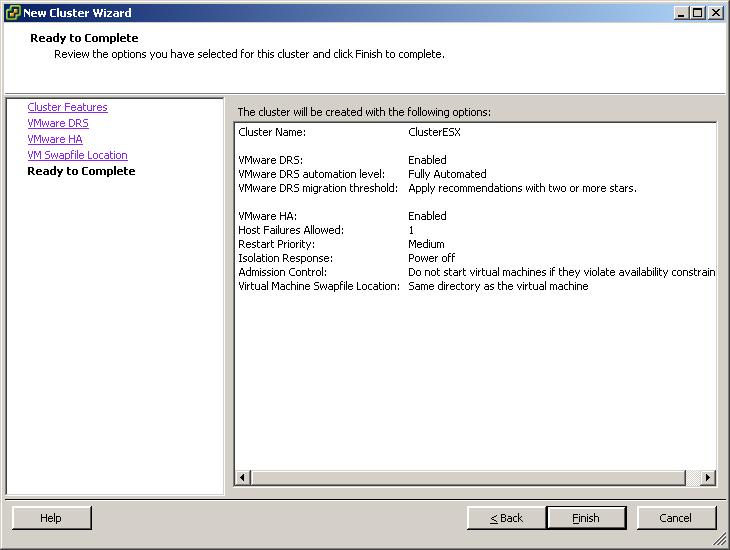
We check the summary of the cluster creation and click on “Finish” to create it.

Once the cluster is created, we must add the hosts to the cluster, as simple as dragging a host to the cluster.

When we add a host to a cluster it asks us what to do with the VMs of this host, whether to put them in an existing resource pool in the cluster or to create a resource pool, dejamos la primera opción y ya despúes crearemos pooles de recursos si nos interesan. “Next”,

Comprobamos que es lo que queremos hacer “Finish” para agregar este host en este clúster.
Creación y usos de las reservas de recursos o Resource Pool,
Sirve para crear un recurso donde meteremos máquinas virtuales y podamos reservarles recursos de CPU o memoria, para que otras MV no les cojan recursos que no las pertenezcan. Podamos tener en un pool de recursos unas máquinas virtuales vitales para la organización, por ejemplo un par de servidores de base de datos y reservarles una cantidad de memoria RAM que veamos como mínima para ellas.

Para crear un pool de recursos lo podremos hacer desde el Datacenter o el Clúster directamente, Right-click “New Resource Pool…”

Indicamos un nombre al pool de recursos y seleccionamos las reservas que nos interesen. For example, the CPU resources, how many Megahertz (Mhz) we will allocate to it or if we want to limit it so that it does not use more MHz than we specify. And the same for RAM resources, we can allocate a number of Megabytes or limit it so that it does not use more than we specify. Additionally, we can share different levels of load in case we have multiple resource pools so that some allocations have more or less priority. “OK” To save.

And we move our VMs to our resource pools. For example, allocations for critical systems or for test systems so they do not consume more than they should.
Resumen de todas las pestañas y partes de la consola de administración de VirtualCenter,
From here, we will see a summary of all the windows and tabs of VirtualCenter using the VMware Infrastructure Client,

If we go to the view of “Virtual Machines and Templates” we will be able to see the virtual machines that our Datacenter has and the templates available, from the “Summary” we will see the number of hosts or ESX servers, the number of virtual machines, the number of clusters, the number of networks and different data stores.

From the “Virtual Machines” we can see the status of the different virtual machines, whether they are powered on or not, the status of the alarms, the name of the host where they are located, the memory and CPU they are consuming.

On the “Hosts” we can see the ESX servers in our organization / Datacenter, the status of each server, whether they have any alarms or not, and the CPU or memory consumption, as well as the total amount of RAM available to each of them.

On the “Tasks & Events” we have the tasks that have been carried out in our Datacenter in the section of “Tasks”.

Y en la parte de “Events” los eventos que hemos podido tener en los hosts o MV.

On the “Alarms” veremos las alarmas que nos han saltado (in “Triggered Alarms”) y las que tenemos creadas o definidas.

On the “Permissions” los permisos que tenemos creados de grupos con permisos de acceso a los recursos.

Podemos tener un mapa de nuestra organización para ver la estructura de máquinas virtuales, nuestras redes, nuestras conexiones de datos… all this from “Maps”.

Si cambiamos la vista y nos vamos a la normal, veremos las propiedades que tenemos a nivel de Clúster, vemos todas sus pestañas. In “Summary” vemos si tenemos habilitado o no DRS o HA, vemos el total de gigahercios de nuestro clúster y de memoria RAM, así como el total de hosts, de procesadores y de máquinas virtuales.

On the “Resource Allocation” we can see if we have any limits set at the virtual machine level for CPU or RAM.

On the “Performance art” we will see a chart of the CPU load at the cluster level,

in this case we see the chart at the RAM level,

if we hover over a host, these are the properties we can observe for each host. On the “Summary” we have a summary of this host, it indicates which server it is, how many virtual machines are running, how much CPU is in use, how much RAM, its datastores and virtual networks.

On the “Virtual Machines” we will see the virtual machines this host has, if they are running or not, the status of their alerts, and the consumption of both CPU and memory.

On the “Performance art” we will see a chart of the CPU or memory status of the host.

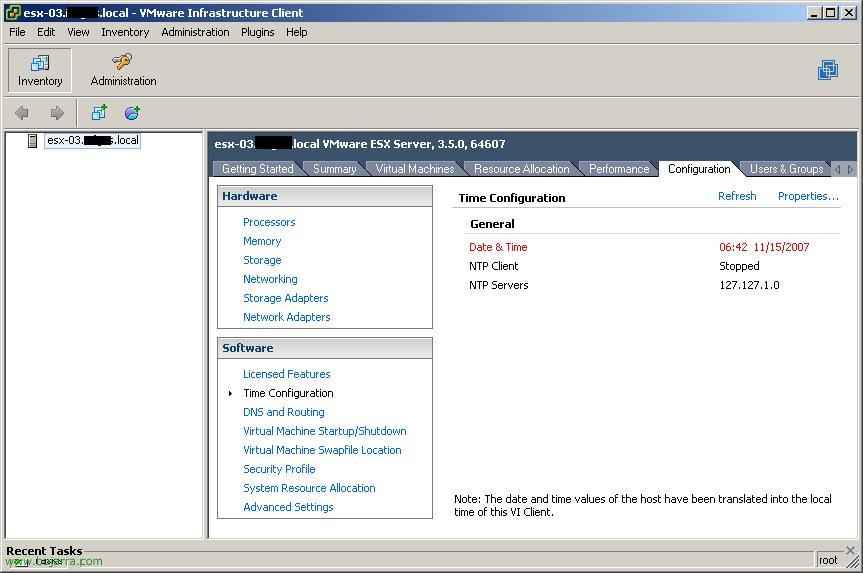
In “Configuration” es donde podremos configurar casi todas las opciones a nivel de host. In “Processors” vemos los procesadores que tiene este host.

In “Memory” la memoria que tiene este servidor, cuanta está asignada, cuanta usada y cuanta usa la Service Console.

In “Networking” vemos el estado de la red virtual, los switches virtuales, qué tenemos conectado a cada switch y los adaptadores de red físicos.

In “Network Adapters” las tarjetas de red que dispone mi host y si tienen algún switch virtual conectadas a ellas, the type of connection…

In “Licensed Features” es donde se configura el licenciamiento a nivel de host, donde indicamos quien es el servidor de licencias, el tipo de licencias, la edición de las licencias y si disponemos de algún complemento adicional o Add-On.

In “DNS and Routing” podremos configurar parámetros cómo el nombre del host, the domain to which it belongs, your DNS servers and gateways, whether for the Service Console or for VMkernel.

In “Virtual Machine Startup/Shutdown” we can configure the times for VMs to start automatically or shut down when a host starts or stops.

In “Virtual Machine Swapfile Location” we can configure where to place the VM swap file.

In “Security Profile” this is where we configure the firewall settings, the ports we will open, both for outgoing and incoming connections.

And finally, we review the properties of the Virtual Machines. On the “Summary” we see a summary of the hardware assigned to the VM, so what it is consuming, only its on/off status, your IP address, and if VMware Tools are installed.

On a virtual machine we can take snapshots, que son imagenes iguales de la MV, cómo sacarle una foto en un momento determinado, para poder restaurarla a ese estado posteriormente si lo necesitamos, a modo de backup. Esto es lo que usa el VMware Consolidated backup para funcionar.

Estas serían las propiedades que tenemos a nivel de máquina virtual, a nivel de hardware, desde aquí será donde podamos agregarle diferente hardware a una máquina virtual, More Albums, o quitarle algún hardware que no necesite como la disquetera.

On the “Options” podemos modificar parámetros más avanzados de hardware.

And in the “Resources” sirve para realizar reservas a nivel de MV, tanto de CPU, memoria o disco.

Si damos con el botón derecho la opción de “Report Performance” on a VC, podremos sacar gráficas de rendimiento a nivel de CPU, disk, memory, red o sistema. Y poder exportarlas a ficheros XLS de Excel.

Si cambiamos la vista a “Networks”…

Veremos las redes en común que tiene nuestro Datacenter y las MV conectadas a ellas.

Si cambiamos la vista a “Datastores”…

Veremos los almacenamientos que tiene nuestro Datacenter, sean compartidos o de los propios ESX y poder explorar para ver el contenido desde “Browse Datastore…”

Desde el botón “Scheduled Tasks” podemos programar diferentes tareas cómo: cambiar el estado de encendido de una MV, clonar una MV, distribuir una MV desde una plantilla, Mover una MV con VMotion, Reubicar una MV, crear una MV, crear un snapshot de una MV o agregar un host.

En el botón de “Administration” in the “Sessions” podemos ver las sesiones activas que tenemos de usuarios administrando este VirtualCenter.

In “Licenses” podemos ver el estado de nuesta licencia, cuanto tenemos consumido y cuanto libre.

And on the “System Logs” los logs a bajo nivel de lo que sucede.

Otra de las posibilidades que nos da VirtualCenter es la de poder importar appliances virtuales, podernos bajar de internet cualquier servidor e integrarlo en nuesta comunidad ESX. Since “File” > “Virtual Appliance” > “Import…”

Seleccionamos de donde obtendremos este appliance, si desde internet, desde un fichero en concreto o desde una dirección URL en concreto. We select the first option & “Next”.

Y si pinchamos en “VMware Virtual Appliance Marketplace” podremos bajarnos vía web algún appliance que nos interese.

Esta es la web oficial de VMware de los Virtual Appliances (http://www.vmware.com/appliances) y desde aquí podemos buscar el appliance que necesitemos ya instalado.

Tenemos más opciones interesantes en “Administration” > “VirtualCenter Management Server Configuration…”

Tenemos todas estas opciones configurables, importantes cómo las licencias, o conexión al Directorio Activo, SNMP, configuración del servidor de correo, SSL…
www.bujarra.com – Héctor Herrero – Nh*****@*****ra.com – v 1.0