HP iLO2 Setup and Use – Integrated Lights-Out 2

This document describes how if we have HP servers we can connect to them using iLO/iLO2 technology over the local area network, and without the need to have a KVM and have to connect each server to the KVM (Keyboard Video Mouse) for your local administration, with iLO what we can do is connect a network patch cord to the socket that the servers bring to the switch and assign an IP address to this adapter. Then from any PC we connect with a browser to this IP address and we can connect locally to the server, as if we would be connected with a local keyboard/mouse/monitor or with the KVM. It's like a KVM virtual console.

This would be the iLO2 NIC, where we need to connect the network patch cord on the back of the server to the switch.

To configure iLO2, we have to boot the server and press F8 during boot, where it says “Integrated Lights-Out 2 Advanced press [F8] to configure”,

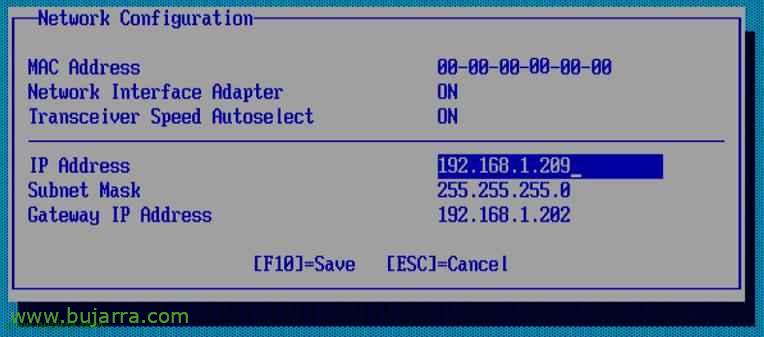
Let's go to the part of “Network” > “NIC and TCP/IP” to set up an IP address for iLO.

We assign it to you in “IP Address”, we indicate a fixed IP, Or good, We can configure it not to be fixed, if not with DHCP and assigned by it, or by making a reservation at DHCP, the configuration that suits us best,

To disable the use of DHCP or to set a hostname to the iLO of this server we are going to “Network” > “DNS/DHCP”,

And we disable DHCP by setting “OFF” in “DHCP Enable”. And in “DNS Name” We can configure the name of this server if we have enough on our network.

And now from any position, if we connect via HTTPS to the IP address that we have just assigned to this server adapter, We'll connect to the console, First we must accept the certificate “Go to this website (Not recommended)”.

It will ask us for a user, “Login name” and a password or “Password”. This data is first stored on the server in an etiquette indicating the name of the administrator and their password or directly in iLO we can create a user with access permissions.

Once inside, We see that we can see the information on the server, Your Status, as well as the status of the disks or any type of useful information, Temperatures, Speeds… All this from the “System Status” and in “Summary”; Although we have more information, I am not going to highlight it in this document, This and everyone wants to see from this console.

What I was going to do, to remotely connect with a console, We must go to the “Remote Console” and click on the one that interests us, in this case in “Integrated Remote Console”,

It will load us with an ActiveX, We install it… “Install ActiveX control…”

We install it “Install”,

And through a web browser we will see the server console and from here we can manage it remotely.

When connected to a server, the UID LED (Unit identification) it will be blinking so that if any administrator goes to the DPC he will see that that server is being managed, although this LED can be enabled for other functions such as indicating which server we want to be managed or whatever.
www.bujarra.com – Héctor Herrero – Nh*****@*****ra.com – v 1.0