
Installing and Configuring the VMware ACE Management Server

In this document, we will look at installing the VMware ACE Management Server product. VMware ACE will allow us to have, Distribute virtual machines to our employees in a secure way, since through certain directives or policies we can customize certain properties of the machine. An example to understand it, it is enough to create a VC and if we want a salesperson to take it with the product that we are going to sell inside and we do not want it to be hacked’ We can encrypt your content, capping so that you can't use external drives such as CDs, Hard Drives, net… We can make the virtual machine expire… and all of this can be managed from the VMware ACE Management Server, all this through Virtual Rights Management. Policies can be created from VMware Workstation ACE Edition, as well as virtual machines, This is explained in the following documents: http://www.bujarra.com/?p=1855 and http://www.bujarra.com/?p=1908.

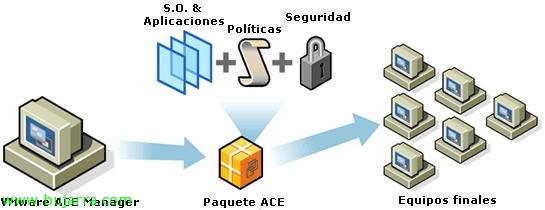
This would be the schematic of the VMware ACE structure, We have a server that manages the machines that we have generated and have run on the end computers, as well as the policies we have created.

Well, we downloaded the VMware ACE Management Server from the official VMware website, We install it on the server that we want to manage all this, we will also need a database, it can be your own local SQLite-based embedded or a remote SQL or ORACLE via ODBC connection. We start the installation wizard, as always of the MyWife type, “Next”,

The default installation path “C:Program FilesVMwareVMware ACE Management Server” & “Next”,

We indicate the necessary information, Domain Name, Server name and an administrator email account; tells us that it will install the Apache web server using the ports 80, 443 and 8000 for your management, “Next”,

Click on “Install” to install it below…

…

Ok, after a few seconds we have the VMware ACE server installed.

Now the configuration wizard will open via the web, otherwise, We connect to our server via a web browser to HTTPS://SERVIDOR_ACE:8000, Pressed “Start” Getting Started,

We accept the license agreement “Yes, I accept the terms in the license agreement” & “Next”,

Select the type of database we want to store the VMware ACE information, Policies, Distributed VM instances… We can select “Embedded Database” or an external one via ODBC connection. I'll use a local database, “Next”,

We select the authentication method, if we want it to be a local administrator account or an LDAP account to be to an Active Directory. In my case local admin.

And if we want to use our own certificates, we can also upload them, “Next”,

We will also have the possibility to select the level of detail of the LOG's, We configure what interests us & “Next”,

Once the wizard is complete, we must restart the VMware ACE server for the changes to take effect, So “Restart” or we do it later manually.

Once we have restarted the VMware ACE, We can log in to the administration website by opening a browser to https://SERVIDOR_ACE:8000, From it we will have two possibilities, one in “Configuration” to administer the ACE, which are the parameters that we have configured in the wizard, or “Help Desk” from where we will manage the instances of the virtual machines that we have distributed or directly the policies.

If we click on “Configuration” It will ask us for the password to be able to log in,

And we will have the same options as during the wizard.

If we are going to “Help Desk” And we logged in with the same account,

We'll have the instances of the virtual machines that are swarming around with their directives, we will see this later when we have a VM created with VMware ACE.


