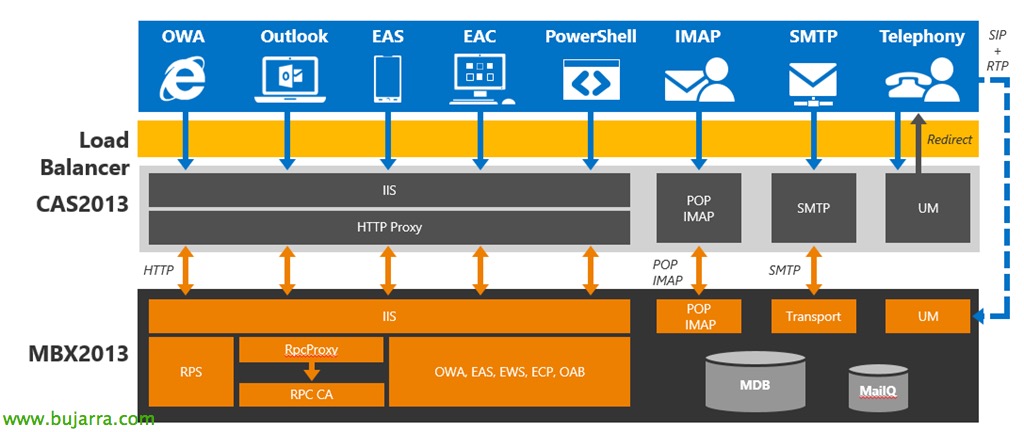
Migrate from Exchange 2010 to Exchange 2013

In this document we will be able to see all the requirements and steps that we must take to proceed with migrating a Microsoft Exchange environment 2010 to Exchange Server 2013. We must bear in mind that it is a long process and especially depending on the number of servers as well as mailboxes we have or their sizes, It will be a migration that will not require a service stop at any time.
Things to keep in mind: Have the Windows Update of the servers updated, plus at least SP3 on all Exchanges 2010, otherwise, we will install it in the CAS first, then in the HUBs and finally in the mailbox servers if we have separate roles. Additionally, it would be advisable to have the Update Rollup installed post SP3 in the same way. We will have to take into account that Exchange 2013 only the following versions of Outlook will be accessible (and This patch if public folders are not connected to Outlooks):
- Outlook 2013.
- Outlook 2010 with SP1 and This update.
- Outlook 2007 with SP3 and This update.
- Outlook for Mac 2011.
- Entourage 2008 for Mac, Web Services Edition.
We will need to have the functional levels of the forest and the domain in at least 'Windows Server 2003', the schema master must be Windows 2003 SP2 or higher, as well as a global catalog in the area with said OS. Also be especially careful with user level quotas or limits, lest migrations fail when exceeding defaults, as well as if we are going to move a large number of mailboxes we will be careful with the LOGs.
Preparation of the AD outline,
The first step will be to apply the schema update for our Active Directory, we can do this step manually or skip it and let it be done by the installation of our first Exchange server 2013 of the organization. We can update it from any x64 domain member server, being Scheme Administrators, Domain Administrators and Enterprise Administrators, from a DOS console or PowerShell (with admin permission) Run:
setup /PrepareSchema /IAcceptExchangeServerLicenseTerms
Installing Exchange Requirements 2013 on Windows 2012 R2,
Podremos continuar con la instalación de los prerequisitos de Exchange Server 2013 sobre nuestro Windows Server 2012 R2, para ello desde PowerShell ejecutaremos:
Install-WindowsFeature RSAT-ADDS

Install-WindowsFeature AS-HTTP-Activation, Desktop-Experience, NET-Framework-45-Features, RPC-over-HTTP-proxy, RSAT-Clustering, Web-Mgmt-Console, WAS-Process-Model, Web-Asp-Net45, Web-Basic-Auth, Web-Client-Auth, Web-Digest-Auth, Web-Dir-Browsing, Web-Dyn-Compression, Web-Http-Errors, Web-Http-Logging, Web-Http-Redirect, Web-Http-Tracing, Web-ISAPI-Ext, Web-ISAPI-Filter, Web-Lgcy-Mgmt-Console, Web-Metabase, Web-Mgmt-Console, Web-Mgmt-Service, Web-Net-Ext45, Web-Request-Monitor, Web-Server, Web-Stat-Compression, Web-Static-Content, Web-Windows-Auth, Web-WMI, Windows-Identity-Foundation, RSAT-Clustering-CmdInterface -Restart
Deberemos además instalar Microsoft Unified Communications Managed API 4.0, además de Microsoft Office 2010 Filter Pack de 64 bit y su SP1. Installing the First Exchange Server 2013 whenever possible with the latest embedded SP. Once installed we must enter the ECP (Exchange Control Panel), when having a mixed installation such as this scenario the default URL “https://SERVIDOR_EXCHANGE_2013/ECP” will take us to the management of mailboxes in the Exchange 2010, if we want to manage the Exchange 2013 we must access with the following URL “https://SERVIDOR_EXCHANGE_2013/ECP?ExchClientVer=15”.
If we want, we can create an administrator temporarily for Exchange 2015 and so the ECP will not redirect us to the Exchange 2010, by creating a user in our AD and making it a member of the 'Organization Management' group’ It will suffice.
We install Exchange 2013 with the installation wizard and apply the last Update Rollup when the Exchange installation is finished!
We create the folder structure for the databases and logs on our server, we rename and move the mailbox DB that comes with the system to our correct path with:
Move-DatabasePath -Identity NOMBRE_BD -EdbFilePath "F:BBDDNOMBRE_BD.edb" –LogFolderpath "G:LOGsNOMBRE_BD"
In addition, we'll set up the default Exchange Offline Address List 2013 on every database we have on the new Exchange, we will be able to verify that we have everything OK running:
Get-MailboxDatabase | select name,offlineaddressbook | Sort name
1º Install the certificates corresponding to Exchange services
We will have to install on this Exchange server 20013 (or on the servers that we are going to have) SSL certificates for the security of the protocols we use, As we know, we will need them to secure:
- HTTPS – Outlook Anywhere, OWA, ECP/EAC, ActiveSync, EWS, OAB or Autodiscover: correo.dominio.com
- IMAPS: correo.dominio.com
- POPS: correo.dominio.com
- SMTPS: correo.dominio.com

To do this,, we will import the .pfx of an existing certificate to the certificates of the local computer or we will have to generate a certificate request from the ECP > Servers > Certificates > New & Follow the wizard by selecting the domain for which you should respond.

Once the certificate is installed, we will assign it to previous services that we are interested in.
2º Configure site URLs
The easiest way to correctly configure all the URLs of Exchange sites would be to run these commands, otherwise, we can do it in a traditional way from the GUI with ECP:
Set-OABVirtualDirectory -identity "SERVIDOR_EXCHANGE_2013OAB (Default Web Site)" -ExternalURL https://correo.dominio.com/OAB -InternalUrl https://correo.dominio.com/OAB

Set-WebServicesVirtualDirectory -identity "SERVIDOR_EXCHANGE_2013EWS (Default Web Site)" -ExternalURL https://correo.dominio.com/EWS/Exchange.asmx -InternalUrl https://correo.dominio.com/ews/Exchange.asmx

Set-ActiveSyncVirtualDirectory -Identity "SERVIDOR_EXCHANGE_2013Microsoft-Server-ActiveSync (Default Web Site)" -ExternalURL https://correo.dominio.com/Microsoft-Server-ActiveSync -InternalUrl https://correo.dominio.com/Microsoft-Server-ActiveSync

Set-OWAVirtualDirectory -Identity "SERVIDOR_EXCHANGE_2013owa (Default Web Site)" -ExternalURL https://correo.dominio.com/owa -InternalUrl https://correo.dominio.com/owa

Set-ECPVirtualDirectory -Identity "SERVIDOR_EXCHANGE_2013ecp (Default Web Site)" -ExternalURL https://correo.dominio.com/ecp -InternalURl https://correo.dominio.com/ecp

Set-PowerShellVirtualDirectory -Identity "SERVIDOR_EXCHANGE_2013PowerShell (Default Web Site)" -ExternalURL https://correo.dominio.com/powershell -InternalURl https://correo.dominio.com/powershell

Set-ClientAccessServer  -Identity SERVIDOR_EXCHANGE_2013 -AutoDiscoverServiceInternalUri https://correo.dominio.com/Autodiscover/Autodiscover.xml

Set-AutodiscoverVirtualDirectory -identity "SERVIDOR_EXCHANGE_2013Autodiscover (Default Web Site)" -ExternalUrl 'https://correo.dominio.com/Autodiscover/Autodiscover.xml' -InternalUrl 'https://correo.dominio.com/Autodiscover/Autodiscover.xml
3º Limits and quotas
We must know the limits and quotas that we have in our organization 2010 before beginning any progress to the 2013. The first thing will be to put the same quotas at the DB level of both Warning, such as prohibiting sending or prohibiting receipt; as well as retention periods for deleted user mailboxes or emails. It is advisable to delete the individual quotas that we have per user while the migration is being performed, so we will write them down in the same way. For example, with this PowerShell we will get the quotas set in the mailboxes:
Get-Mailbox | Where {$_. UseDatabaseQuotaDefaults -eq $False} | ft name,prohibit*,issue*
And with this PowerShell we will take out the limits set in the databases of 2010 to be able to establish them later in the same way in the new databases of 2013, plus retention times for deleted mailboxes or individual items :
Get-MailboxDatabase | fl Name,IssueWarningQuota,ProhibitSendQuota,ProhibitSendReceiveQuota,DeletedItemRetention,MailboxRetention
4º Configure Outlook Anywhere
We will need to configure Outlook Anywhere, We can modify the type of authentication, or directly with this PowerShell your name for external or internal networks:
Set-OutlookAnywhere -Identity "SERVIDOR_EXCHANGE_2031Rpc (Default Web Site)" -InternalHostname correo.dominio.com -ExternalHostname correo.dominio.com
5º Change paths of transport logs

From ECP, in the server properties we can easily change the paths of the Transport logs.
6º Shipping connector
A send connector will need to be created for the Exchange 2013 with the same configuration that we already had in 2010 (Limits…) or, easier, associate and give it sending permissions from a connector already generated on previous Exchange servers 2010.
7º Application or device migration,
Bear in mind that mailboxes that use services will have to be moved, applications or devices as backup software, AV, Printers, FAX, PBX, Scanners, Websites… As well as if we have a relay leg (Receive Connector) on the Exchange 2010, it will have to be configured in the same way in this 2013, in addition to setting up the same authentication, or the same IP address, otherwise, we will have to reconfigure all these apps that send emails through the Exchange server 2010.
8º Move mailboxes,
Continue, The next thing will be to move the users' mailboxes, we must take into account that if the user has the mailbox open, it will disconnect him and ask him to open Outlook again so that it is reconfigured against the new mail server automatically.

Select the users we want to move from the ECP > “Recipients” > “Mailboxes” > And we select to move the mailbox to another database.
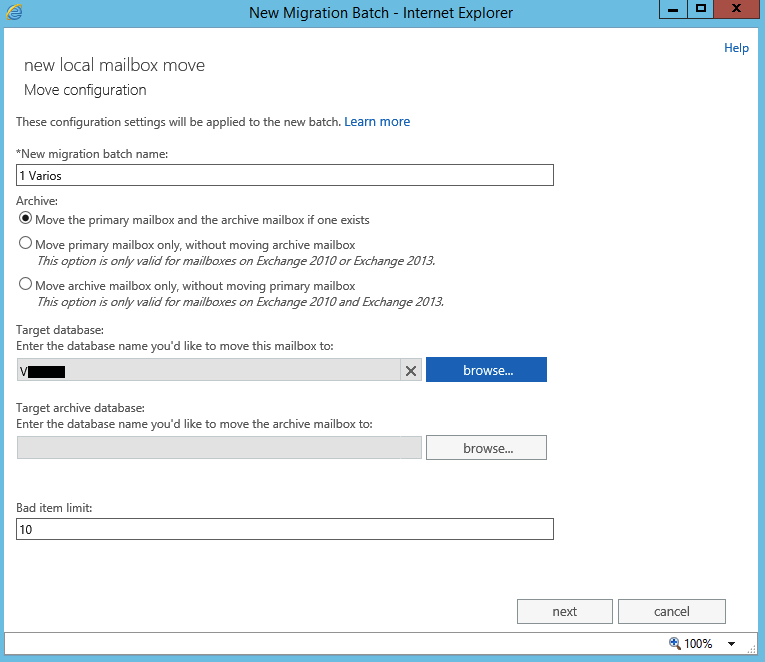
We give the migration task a name and indicate which database we will move the mailboxes to, “Next”,

We will indicate whether to start the migration task automatically and if we will also end it manually, “New” to create it.

We must go to the Migration panel to see the status of mailbox movements, “Yes”,
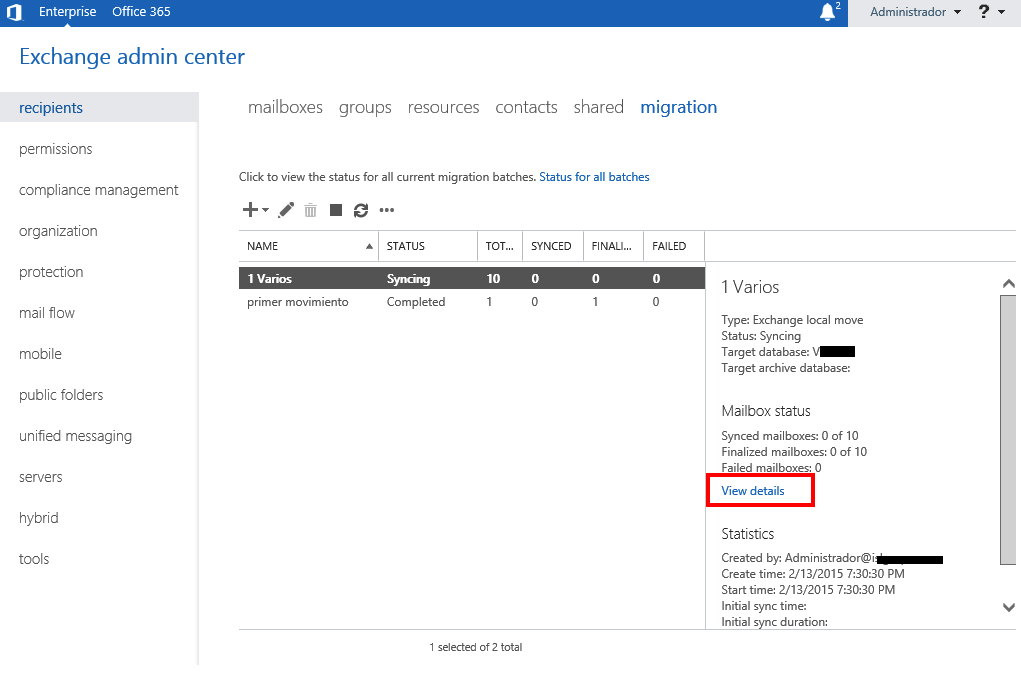
We can click on “View details…” to see more details of the migration process,

Where we will see individually the migration status of each mailbox! We'll wait while you copy…

The most comfortable thing for sure, be move mailboxes by PowerShell, We will move the mailboxes using the following command:
Get-Mailbox -Database BASE_DATOS_2010 | New-MoveRequest -TargetDatabase BASE_DATOS_2013
To see the migration status we can run:
Get-MoveRequestStatistics -MoveRequestQueue BASE_DATOS_2013
And to verify that we have no mailboxes left in the old databases of the 2010:
Get-MailboxDatabase -Identity BASE_DATOS_2010 | Get-Mailbox
9º Migrate public folders,
After moving the mailboxes, we will migrate the public folders from the Exchange server 2010 to the Exchange 2013, We'll get off these first. Scripts hence.
We'll run in the Exchange shell first 2010:

To take a snapshot of the folder structure:
Get-PublicFolder -Recurse | Export-CliXML C:PFMigrateLegacy_PFStructure.xml
We'll take a snapshot of the public folder statistics, as the number of elements, size or owner:
Get-PublicFolderStatistics | Export-CliXML C:PFMigrateLegacy_PFStatistics.xml
And one last one to get the permits:
Get-PublicFolder -Recurse | Get-PublicFolderClientPermission | Select-Object Identity,User -ExpandProperty AccessRights | Export-CliXML C:PFMigrateLegacy_PFPerms.xml
In Exchange 2013 we must not have public folders created, to verify it and if we have we must undo the previous migration, Run:
Get-Mailbox -PublicFolder

Get-PublicFolder
We will also verify from the Exchange 2010 that we don't have public folders with invalid names:
Get-PublicFolderStatistics -ResultSize Unlimited | Where {$_. Name -like "**"} | Format-List Name, Identity

We started on the Exchange 2010, We start by running the following script that will generate a file with the name of the public folders and their sizes:
.Export-PublicFolderStatistics.ps1 PfMapNameToSize.csv SERVIDOR_EXCHANGE_2010

We'll run the following script to create the mapping file between the public folders and the mailbox:
.PublicFolderToMailboxMapGenerator.ps1 TAMAÑO_BUZON PFMapNameToSize.csv PFmapFolderToMailbox.csv

We will create the public folder mailboxes already in the Exchange 2013, The first mailbox must be of the Master Hierarchy Mailbox type, so we'll create it by default with the HoldForMigration mode. We can change the name of the mailbox in the 'PFmapFolderToMailbox.csv file’ and we will indicate this in the following command!
To create the first mailbox we run:
New-Mailbox -PublicFolder Mailbox1 -HoldForMigration:$true -Database BD_EXCHANGE_2013 -IsExcludedFromServingHierarchy $True
And if we have more folders to migrate, We'll create more mailboxes with:
New-Mailbox -PublicFolder Mailbox2 -Database BD_EXCHANGE_2013 -IsExcludedFromServingHierarchy $True

After preparing the migration, We have already started migrating folders in Exchange 2013
New-PublicFolderMigrationRequest -SourceDatabase (Get-PublicFolderDatabase -Server SERVIDOR_EXCHANGE_2010) -CSVData (Get-Content PFmapFolderToMailbox.csv -Encoding Byte)

To verify that the migration has begun and in a simpler way, the % of progress and status, Run:
Get-PublicFolderMigrationRequest | Get-PublicFolderMigrationRequestStatistics
If we have any mistakes, The easiest thing to do is to see it with the following command, we may have the aliases of the public folders of the 2010 with spaces… command to view it:
Get-PublicFolderMigrationRequest | Get-PublicFolderMigrationRequestStatistics -IncludeReport | Format-List
If we have to summarize the migration because we have had a mistake (And we will have seen it with the previous message, Run: Resume-PublicFolderMigrationRequest -identity “PublicFolderMigration”

When the migration status has reached the 'AutoSuspended' state’ and 95%, We can continue to the next step, which will be to lock public folders in the Exchange 2010.

Users would now not be able to access public folders in the Exchange 2010, we run in the 2010:
Set-OrganizationConfig -PublicFoldersLockedForMigration:$True
![]()
Back on the Exchange 2013, To finish the migration process we must execute:
Set-PublicFolderMigrationRequest -Identity PublicFolderMigration -PreventCompletion:$False

And we finish with the last synchronization with the differences between the different public folders.
Resume-PublicFolderMigrationRequest -Identity PublicFolderMigration
We confirm how the migration is going:
Get-PublicFolderMigrationRequest | Get-PublicFolderMigrationRequestStatistics

And we wait for it to end 100%!
![]()
We will be able to test with a user if the public folders are okay, for this, we will be able to associate a test user with the public folder mailbox already in the Exchange 2013, Running:
Set-Mailbox -Identity USUARIO_PRUEBAS -DefaultPublicFolderMailbox Mailbox1

Before you run the above command, we can open the Outlook of that user in question with the “outlook /rpcdiag” to view the status of connections between the Outlook and the Exchange server. We will see at first that the public folders are still on the old server…

And after running the command to set the public folder mailbox to a user in question and let's open their Outlook again with the /rpcdiag parameter, we will see that it already connects against the new Exchange server.
![]()
Once the tests performed are correct, We must enable access to these folders for the rest of the users in the organization, Run:
Get-Mailbox -PublicFolder | Set-Mailbox -PublicFolder -IsExcludedFromServingHierarchy $false
![]()
We confirm that we have the Completed migration and at the 100% migration completed, and we indicate that the migration was completed with:
Get-PublicFolderMigrationRequest | Get-PublicFolderMigrationRequestStatistics

Set-OrganizationConfig -PublicFolderMigrationComplete:$true

Set-OrganizationConfig -PublicFoldersEnabled Local
Undo Exchange migration 2013
On the Exchange 2010 Execute:
Set-OrganizationConfig -PublicFoldersLockedForMigration:$False
10º Removing resources from the 2010
After you already have the public folders in the 2013 in production, the next thing will be to confirm that we have moved all the users' mailboxes and that we have no more system mailboxes such as Archive or Arbitration, we look for them with:
Get-Mailbox -Archive | Fl name,Database
Get-Mailbox -Arbitration | Fl name,Database
If we have any, we'll move it by running the following from an Exchange PowerShell 2013:
Get-Mailbox -Database BASE_DATOS_2010 -Archive | New-MoveRequest -TargetDatabase BASE_DATOS_2013
Get-Mailbox -Database BASE_DATOS_2010 -Arbitration | New-MoveRequest -TargetDatabase BASE_DATOS_2013
In addition to moving the Discovery Search Mailbox:
New-MoveRequest DiscoverySearchMailbox* -TargetDatabase BASE_DATOS_2013
To see the migration status we can run:
Get-MoveRequestStatistics -MoveRequestQueue BASE_DATOS_2013
Once done and verifying again that we have no more mailboxes, we can disassemble and delete the DB.
The next thing will be to remove the OAB from the Exchange 2010, we can do it simply from the GUI, as long as we do not have it assigned to any Exchange DB 2013.
Last, we will remove the public folder database from the 2010, we will dismantle them & Eliminate.
We could proceed to uninstall the Exchange 2010!