
VMware vCenter HeartBeat

In this document, we'll look at installing and configuring VMware vCenter Heartbeat, this product allows us to obtain high availability of our VMware vCenter server in environments where it is critical, allowing application-level protection at all times, services, SQL Server if on-premises, Update Manager or if we have VMware View protecting it for use with VMware Composer. With this product we will have two vCenter servers, A primary one (active) and a secondary one (passive) where we can manually change roles (switchover) or in the event of a fall (failover) We will have high availability since the information is continuously replicated through a private network, This drop could be at the hardware level, S.O., Network Issues, vCenter application crashes or their dependencies.

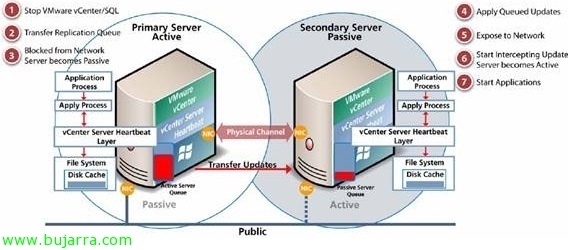
This would be the diagram of the operation between the VMware vCenter HeartBeat nodes,
Installing VMware vCenter Server Heartbeat on the Primary Server,

We started with the installation of VMware vCenter Server Heartbeat, this first installation will be on the vCenter server that we already have installed & Configured, Select “Install VMware vCenter Server Heartbeat” & “Following”,

Normally we will identify the first server as “Primary”,

We accept the license agreement,

We enter licensing information (If we want to test it, we can skip this step),

We must identify the network topology, whether we will have both vCenters on the same network for a high availability system or over the WAN to provide a disaster recovery system. We must also choose between “Identical nodes” (for LAN or WAN will share a name & 'Public' IP) or “Non-identical nodes (for LAN sharing only the 'public' IP),

We must indicate whether the secondary server is a clone of the main server or not,

Select the installation path, default '%ProgramFiles%VMwareVMware vCenter Server Heartbeat’

We will indicate the network through which both vCenter will be synchronized the information/configuration/files/database called VMware Channel Adapter,

We will select from the combo which is the IP of the main server and which will be the IP to which it will connect (that of secondary school),

Identifying the 'public' network adapter,

We confirm which will be the 'public' address’ of our vCenter environment and specify which IP the secondary server will have (in my case I will select that it is the same 'public' IP’ available on the main server).

Communication port for vCenter Heartbeat, Default 52267.

We must select the applications we want to protect, being able to protect only vCenter or if we have the SQL server locally we can check both options. If we have VMware View Composer installed, we must indicate it. If we mark that SQL Server protects us, we must configure it at the service level so that it does not start as a network service but assign it to a user account or service.

We indicate the folder where you will include the information you will need to prepare the secondary server, it will rely on Windows backup tools to perform a complete backup that we will later restore to the secondary server, as well as we can indicate that it includes at this time all the possible information so that when making the first synchronization faster (Include protected data in Pre-Synchronization Data),

We confirm the installation summary & “Following” to begin checks and installation,

We confirm that during the installation check we do not have any errors,

and we start the installation…

Once the installation is successful, the process will continue to back up this vCenter server,

Click on “Proceed”,

… We wait while you back up…

List, We check that we have not had errors in the backup,

At this time we will install Neverfail's Packet Filter to avoid having duplicate IPs between the primary and secondary vCenter since they must have the same 'public' IP,

List,

Once the installation is finished, we must install vCenter Server Heartbeat on the secondary server, restoring all the information collected from the main server,
Installing VMware vCenter Server Heartbeat on the Secondary Server,

What I said, We start the same installation but this time on the secondary server that will be a completely clean computer in which we will restore the configuration of the first one.

In 'Physical Hardware Identity'” Select “Secondary”,

We indicate the path of the folder where the information generated from the first server resides.

…We wait while you perform the pre-installation checks…

“Following”,

… We wait while you install…

List, “Following”,

As in the main one Packet Filter will be installed to avoid duplicity in the 'public' IP address’ vCenter,

We indicate what the VMware Channel will be (the private network between both vCenter),

And we select the adapter 'public'’ which must have the same IP configured as the main one,

An alert pops up informing us that in this installation process we will have to restore the generated backup,

The Windows Backup Tool will open, We must go to “Restoration Assistant (advanced)” and start the wizard,

We must select the NF.bkf file that we will find in the pre-synchronization directory and we will check all the options to restore, “Following”,

“Accept” indicating that we will overwrite the state of our system,

“Close” when installation is complete,

We must restart in order to start with Heartbeat,

Once the secondary server has been restarted, we will be able to open the administration console from any of the servers “VMware vCenter Server Heartbeat Console”, we will need to add the vCenter nodes.

Entering your IP/name, preferably we will enter from the private IP (depending on which configuration we have opted for), “OK”,

We accept certificate “OK”,

We indicate a user with administrator credentials & “OK”,

List, we already have the console with the vCenter servers where we will check who the primary server is and its status, To make a check in order to move the applications and services to the secondary node click on “Make Active…”

It will tell us if we are sure to mark the secondary node as active, “Yes”,

… Wait a few seconds…

And we see how the second node is the one that remains active and everything continues to work optimally.

We will be able to check if all the servers are “OK” and if there were any incident we could quickly check their error or force a solution,

On the “Network” we can configure up to 3 Ping Servers to check for network-level issues,

On the “Applications” we will check the status of all applications as well as LOG-level information of any incident,

On the “Services” We will be able to observe what the status of the services is in both nodes, we could in “Rules” even generate custom rules to perform corrective actions or generate a failover when certain conditions occur.


