Configuring Terminal Services RemoteApp Manager on Windows 2008

From TS RemoteApp we can configure different applications so that users can use them directly without having to connect to the desktop directly from the servers. They can connect via the web or we can also distribute these applications by generating MSI installation packages, or distribute them from the AD.

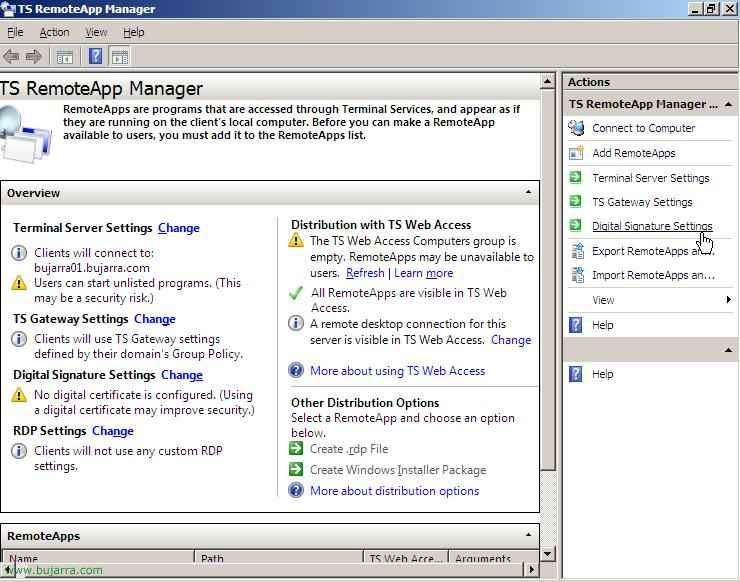
Begin with, We must open the Admin console, in the “Administrative Tools” > “Terminal Services” > “TS RemoteApp Manager”,

This will be the central console for all applications, where we will see them 'published', and possible alerts. To add a published app, Click on “Add RemoteApps”,

We will get an assistant that will help us to publish the applications, “Following”,

It shows us the programs installed on the server, from here we can select it, or else, We have been looking for it since “Explore…”,

We look for the installer's executable, for example to publish the “Notepad” We must publish its executable “notepad.exe”, we look for it and click on “Open”,

Click on “Properties…” and select the name with which we want users to see this application, in “Location” We can add parameters to the executable if you need them. We can check or not to allow this application to run from “TS Web Access”, “Accept”,

Check that the options are ideal and click on “End”,

We see that the application comes out at the end, in remote applications. To view configuration settings on the Terminal Service server, More publication options click on “Terminal Server Settings”,

In the first tab, “Terminal Server” in “Server Name” will be the name of this TS server, unless it is a server belonging to a community/farm. We can change the RDP port, by default is the 3389. We may require server authentication so that before the connection is established it asks us for the credentials. We can check the “Desktop Access” if we are interested in seeing an icon from TS Web Access to connect to this server. And give access to listed apps that have permissions or all of them.

If we have a TS Gateway, we can configure it from here so that users connect from it to TS servers when they run a published application, We can configure it manually indicating which one it is, automatically or by disabling it if it will not be used. The other tabs will be described below.

If from a PC we connect to the server that is running Terminal Server, With a browser we enter HTTP://servidor_ts/ts, It will ask us for authentication to be able to show us the applications we have access to.

If this is the first time we open this website, you will need to install an ActiveX control, By clicking on the bar we choose “Run ActiveX Control”,

Yes, we trust that it is from Microsoft and we click on “Execute”,

We will see the applications that we have published. In this case, Notepad and the TS server desktop. Now it is time to click on the application that interests us to run it.

The first time it will tell us that it is risky to run an application from a server that we do not trust, Not our case, and we trust “Yes”.

… We wait while the app launches…

And after a few seconds it will have opened, the application in question from the Terminal Server, everything we run will consume resources on the TS servers and not on the client PC.

If we want, Can “publish” applications in another way more convenient for users, without having to connect to a website, if not by creating an installer, install it automatically on clients and they won't know if the application is running locally or remotely. In the “TS Remote Manager”, about an application in question, Right-click > “Create a Windows Installer Installation Package”.

We will get another wizard to create this installer, “Following”,

Select the path where we will save the installer, We can change which server it will connect to if it is a farm we will put its name, or if the port needs to be changed, we will do it from here; How to Modify Settings for TS Gateway or Certificate Topics. “Following”,

This will be where the customer will find the icon to connect, if we leave an icon on the Desktop or we will generate a menu within the “Start Menu” such as “TS Applications”. We can also associate the client's extensions to run with this application; This is, when the user runs a file .txt it will open with the Terminal Server Notepad. “Following”,

Check that everything is fine and click on “End” to generate the package.

After a few seconds we will have the MSI file generated. Now it must be distributed to the customer, we can publish it to you in the Active Directory with policies and install it or leave it published to you as an installable application in the Control Panel.

For example, in this case I will install it by running it with double-click from a PC on the network. Begins the installation and finishes the installation in a few seconds,

Now we will see it on the client's PC how we configure it when generating the MSI, this client will have it in his “Start Menu” > “RemoteApps” > “Notepad”. If we open it…

As it is the first time we run it and as all this is not configured with directives, it will ask us if we want to take our hard drives to the server to be able to view/save on our hard drive, How local ports (COM/LTP/USB), or clipboard for CTR+C/CTR+V from local to server, or compatible Plug and Play device connections. We can also prevent them from asking us for this data again by marking the last check.. Click on “Yes”

And we will already have the Notepad open remotely.
We can also configure the most secure access to applications by installing a digital certificate on the server, To do this, click on the “Actions” in “Setting up a digital certificate”,

We mark the check of “Sign with a digital certificate” and we will install a digital certificate that we have available in IIS, Click on “Change…” to select the certificate we are interested in. If you don't know how to generate a server certificate in IIS, You can follow this procedure: HERE.

Check that it is correct and click on “Accept”,

Now when you open the TS Web Access website again, We will see at the bottom of the browser that security is enabled for the browser.
www.bujarra.com – Héctor Herrero – Nh*****@*****ra.com – v 1.0