Installing the following Presentation Servers

Whenever we are going to have an installation with more than one server, we have to follow this procedure, We should not do a full installation, With just one component (Presentation Server) It would be enough, and we would need to join the Community, With this, the installation of a second server would suffice, After that, we would need to configure more aspects such as load balancing or the applications themselves.

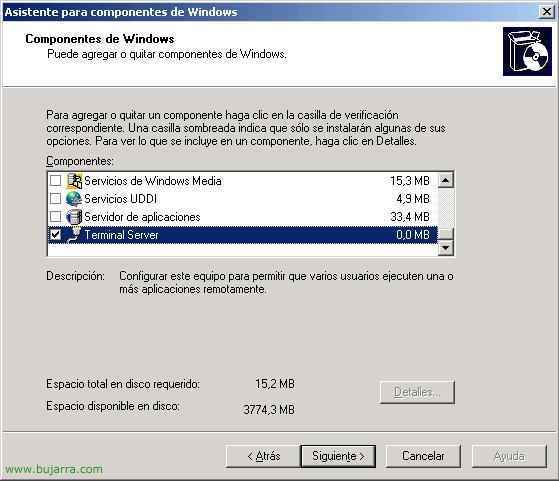
The first thing is to meet the requirements, We will install the Terminal Server service as on all the other servers. Since “Beginning” > “Panel de Control” > “Add or remove programs” > “Add or remove Windows components” and select the “Terminal Server”, Click on “Following”,

“Following”
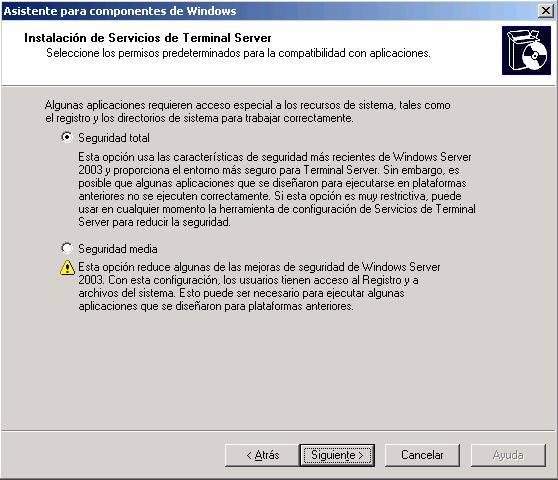
Indicate “Total security” and click Next,

If we have a Terminal Server license server already installed, we indicate it, and if it's a demo what we want we have 120 Days to try it. Following,

License per device, indicates that all customers who are going to connect to us have their own license already installed. “Following”,

…

“End”

And we have to restart mandatorily, Mark “Yes”.

Once rebooted, the most important thing is to rename the disks as soon as possible, is optional, but if we are going to do it we will do it now, because later we will have problems if we have something already installed. We put in the Citrix CD, we access its root and there we will see a “DriverRemap.exe” We run it from there to change the letters of the server drives.

Where I have everything installed, my system partition is C:, I'm going to change it to M: for when users log in, each one connects their drives with the same letters, I put your CD on them if it's D: in D: in case you want to save something in C: let them know that it is their C: of the disc… In the image you can see the new units that I will have, I do.

We wait for you to modify the units…

It is mandatory to reboot so that we can already work with the new disk drives. “Yes”.

Vale, Once the requirements are completed, we begin the installation of Citrix Metaframe, we put the Citrix CD in and in the autorun this menu opens, Select “Product installations and upgrades”.

Click on “Install Metaframe Presentation Server 4.0 and its components”

We accept the license and download the “scroll” all the way down, Click on “Following”

It will install other necessary requirements such as .NET, Java and J#, we simply click on “Following”,

Since it is not the first server, It is not necessary to install all the components, otherwise, Only the necessary ones, As we already have all the services on the other servers, It is enough to install the “Metaframe Presentation Server” and its console for administration (optional). With this we will allow connections to the applications, then we will configure this. “Following”,

…

Now the critical part begins, Metaframe Server Installation, “Following”

Since I want to play with load balancing and I have more than one server we select “Advanced Edition”,

It tells us the components that will be installed on the server, the “Management Console” is to manage it, the “Load Manager” to configure load balancing between Presentation Servers, and the others would not be necessary because they are the 'client' part, the “Program Neighborhood” and the “Program Neighborhood Agent”, We give “Following”,

For our convenience and if we have permissions, we indicate yes, so you don't have to constantly enter your password.

Since this is not the first server here is where we tell it that we are not going to create a community, otherwise, we will join an existing one, We select the second option “Join an existing server community”, “Following”,

We indicate the name of the first server, the one that has the community database and click on “Following”,

We enter a user with access permissions to that database (normally the administrator of the remote machine or the domain), and “Following”

Since we have already configured a license server earlier, the community already points to it, so just selecting the second option is enough, es más recomendable por si seleccionamos la primera opción y alguna vez migramos el servidor de licencias no tener que ir servidor a servidor modificando este valor. Así que seleccionamos “Usar los parametros generales de la comunidad para el servidor de licencias” and “Following”,

Confirm, “Yes”,

Same as before, the MEDO is the remote control of a Citrix session, for example, to a user that we can connect to because they have a problem with a Citrix application, impression… and we want to see what's wrong with him or just to help him with something he doesn't know. Danger, if we prohibit here that it cannot be imitated, or we modify some parameter, after that this can no longer be modified, the normal thing is to leave it as it is. “Following”,

We'll assign a port to the XML service, we can leave it in the 80, but it must be borne in mind that in the 80 We already have the web interface, The License Server, if we have a website within the company… Personally, I usually change it and put another one, But watch out, if it is changed here later it will also have to be changed, Put 8081 and we give “Following”

We leave it as it is, This step will simply add the “Users” of the domain (or the home team, If we are not in dominion) to the group of “Remote Desktop” To have connection permissions, “Following”

Vale, check that everything is fine and give “End”,

“Yes”,

We wait for you to install the server, This is a tricky part because if we have something weird, The installation will fail, for example, Citrix Presentation Server cannot be installed on a domain controller 4, or if it has been, or anything else…

Vale, We are not going to start the Customer Distribution Wizard, So we uncheck the option and close.

Now you will install the administration console, “Following”,

The default path where you will install the console, “Following”,

“Following”,

…

“End”,

Vale, it already tells us if everything has been installed correctly or not, if it fails at any point in the installation it would show it to us and if we run the installation again we could continue where we left off. “End”,

Must be rebooted, “Yes” y con esto ya estaría instalado otro servidor adicional a la comunidad, ahora habría que configurar balanceos de carga, modificar las aplicaciones para que apunten también a este servidor (habría que instalarlas antes!)
www.bujarra.com – Héctor Herrero – Nh*****@*****ra.com – v 1.1