Create a website in Web Interface and connect to it

Una forma cómoda de que se nos conecten los usuarios, o por lo menos desde internet para no tener que hacer grandes configuraciones o explicaciones a ellos, es habilitar un sitio web para que se conecten a las aplicaciones. En este procedimiento se explica cómo habilitar este sitio y la forma de acceder como si fueramos un usuario final.

The first thing to do is open the console: “Home” > “Programmes” > “Citrix” > “Metaframe Presention Server” > “Access Suite Console for Presentation Server”.

The first time we start this console, it will open a server discovery assistant, it is advisable to complete it in order to manage the community from here as well. We will check the box for “Skip this screen in the future” and click on “Following”,

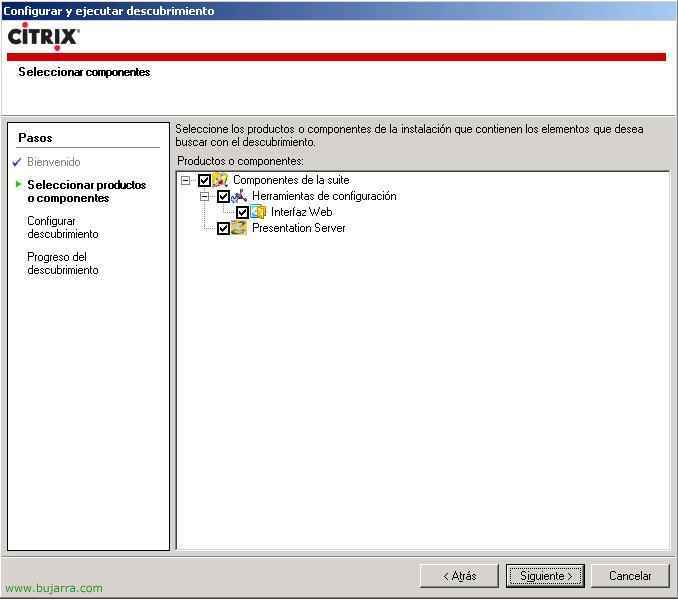
We indicate for which products we want this console to be used, Default All, “Following”,

On this screen we will specify on which servers we have installed the web interface, by default on this one, In the first one, we add the name and “Following”,

Here we will add all the Presentation Servers that we want to manage, in my case myself, So I pulse on “Add the local machine” and “Following”,

“Following” if everything is OK,

and “End”

Vale, with the console open, We must go to “Components of the suite” > “Configuration Tools” > “Web interface”, and we will click on “Create Site”.

We will indicate that it will be a site for our server, that is, one “Presentation Server”, “Following”,

This will create a site in IIS for us, by default, if we don’t have more websites it will create it in “Default Website” and now it’s optional, whether to set it as the default page of the site, that is, if http opens://IIS server or if we want it to be in some folder, normally, if we have an IIS site, we usually have some website as default, so we will do it as follows: HTTP://iisserver/citrix/metaframe, “Following”

If it’s the first website we create and we don’t have a configuration, Mark “Use local configuration files” and “Following”.
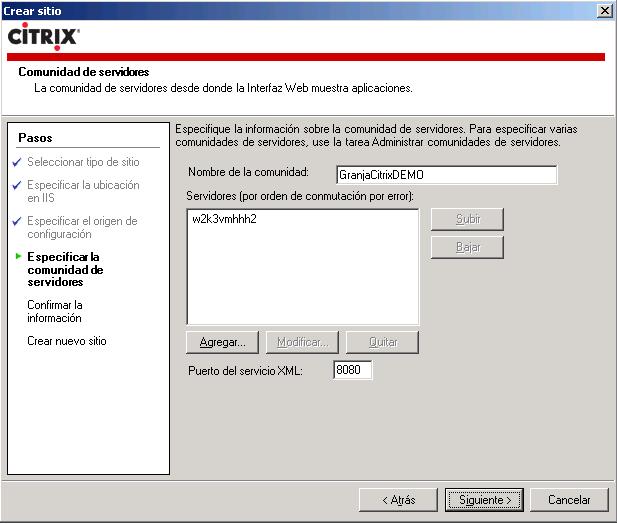
Important step, we need to set which network this website will connect to, and especially which servers and XML port, if we have previously changed the XML port, now we must specify it as well. “Following”,

We check that everything is correct and click “Following”,

Ok, “End”.

Now we will check if everything is fine and open the path, in my case, HTTP://w2k3vmhhh2/citrix/metaframe and this website will load. Important to note that the web interface only works with Internet Explorer. The first time we connect we need to have an ActiveX plugin installed on the PC (or web client). To do this, we download it by clicking the link below “Metaframe Presentation Server Client for Windows 32 Bit”. This will be the most common way to connect from the internet.

Click on “Execute” to install it.

“Yes”

“Yes”

We wait for it to install…

Accept, but WARNING: all Internet Explorer windows must be closed or it won't work.

Vale, abrimos de nuevo Internet Explorer y nos conectamos al sitio web, HTTP://w2k3vmhhh2/citrix/metaframe. Pedirá usuario, Password and domain, lo rellenamos y pulsamos sobre “Sign in”,

Como usuarios nos mostrará las aplicaciones a las que tenemos acceso, si las tenemos organizadas por carpetas, entramos a la que nos interese, por ejemplo voy a abrir Word, entro en “Office 2003”,

Y ejecuto con UN click “MS Word 2003”, ahora esperamos unos segundos para que nos abra la aplicación, la primera vez tenemos que tener paciencia.

…

Esta pantalla nos pregunta si queremos que se lleven las unidades del PC cliente al servidor, si queremos que el usuario tenga acceso a su disco, lo interesante es que sí y marquemos un “Acceso completo”, todo esto se puede personalizar por directivas y que no pregunte. Para eso en el servidor renombramos los discos fisicos, para que el C: from the user's C drive: in Word, and so on with all their drives, and if they want to save the document or whatever interests them they don't get complicated with disk drives. “Accept”,

And this way the published application will open for us, the user won't notice any difference whether it's on their PC or on the server. The interesting thing is that if we are on a LAN/domain, applications open with the Program Neighborhood client and thus we can create shortcuts to the programs on the desktop.
Using Web Interface for a WAN,
If what we want is not only to have this website created but also to take advantage of it to connect from another network, or from the internet itself, as long as any device does NAT we must follow these steps. If we don't follow them, when someone tries to connect via web, the file will be downloaded “launch.ica” with the server's LAN IP of the Presentation Server, and it should not be like this, but with the public IP of our Firewall/Router. To do this, we connect to each Presentation Server and run the following:

Lo que hay que hacer es decirle al servidor Citrix que devuelva la IP pública y no la suya, con el comando ALTADDR desde MSDOS como dirección alternativa. Lo que le pasa si no se usa ALTADDR es que el servidor Citrix devuelve su IP de la LAN y los clientes de otras redes lógicamente no se pueden llegar a conectar. Así que en mi caso: “altaddr /set DIRECCIÓN_IP_PUBLICA”

Y comprobamos con el comando ALTADDR cual sería la IP alternativa (nuestra IP pública que tiene ICA-1494 mapeado al servidor PS).

Ahora simplemente desde la consola de Citrix Access Suite, debemos modificar el tipo de acceso, for this, vamos hasta: “Components of the suite” > “Configuration Tools” > “Web interface” > con el botón derecho sobre el sitio web > “Manage secure client access” > “Modificar configuración de la DMZ”.

Y aquí tenemos que decir que tipos de conexión tenemos y cómo se realizarán. We must “Add” el rango IP de nuestra LAN para que los clientes que vengan desde ese rango IP hagan una conexión “Direct” a los servidores PS, y todos los demás “Default” hagan una conexión por la dirección IP “Alternative” que le hemos metido con ALTADDR, para todos los que se conecten por internet les devuelva la IP pública y todos los que se conecten por la LAN trabajen de forma directa.
Aun que usando WI mediante una WAN se recomienda usar CSG.