

Installing the VMware Mirage Gateway Appliance

If we want to have our VMware Mirage equipment always synchronized with our DataCenter, and not only when they are within the organization, VMware has a virtual appliance that allows us to securely back up or perform any task from outside the organization using the Mirage Gateway Appliance!
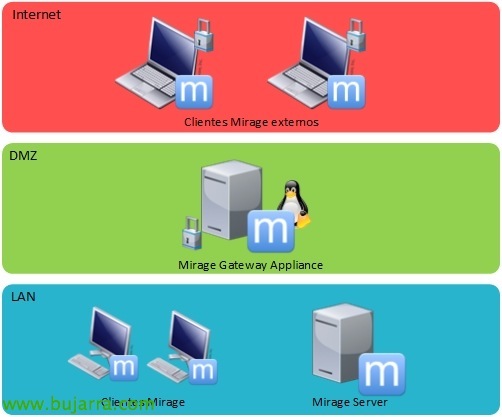
This would be the most common scenario, within the local organization, on our LAN the Mirage clients will synchronize against the Mirage Server directly, if we want Mirage External customers to synchronize in the same way, in the DMZ network we will deploy the Mirage Gateway Appliance virtual machine. Be aware that this is not intended directly for branch offices, but for all computers that leave the organization and have an Internet connection. You can look for more documentation on the internet, but as we know Mirage optimizes WAN traffic at all levels (File and block, Deduplicate and compress…) so 5Mb of daily traffic will be required from a normal use device with office apps.

You can download the appliance of the VMware official website (Be careful, you will need an account!), we deploy it like any OVA or OVF or VMware template. If we place it in the DMZ we must take into account that it needs to connect to the Mirage Server with the 8000tcp, with LDAP/LDAPS domain controllers (389TCP/636TCP), against the Mirage Management Console by 8080tcp, by default external clients will connect to the Mirage Gateway via 8000tcp (which can be switched very easily to 443TCP so that they are not blocked from certain secure networks, libraries, government, Hotels…) and the Mirage Server should be able to connect to the Mirage Gateway via 8093tcp.

We will indicate the network parameters in the deployment wizard…

And once we have the machine already deployed, we start it, We enter through console & Login! We will validate with the default user 'mirage'’ and the default password 'VMware'.
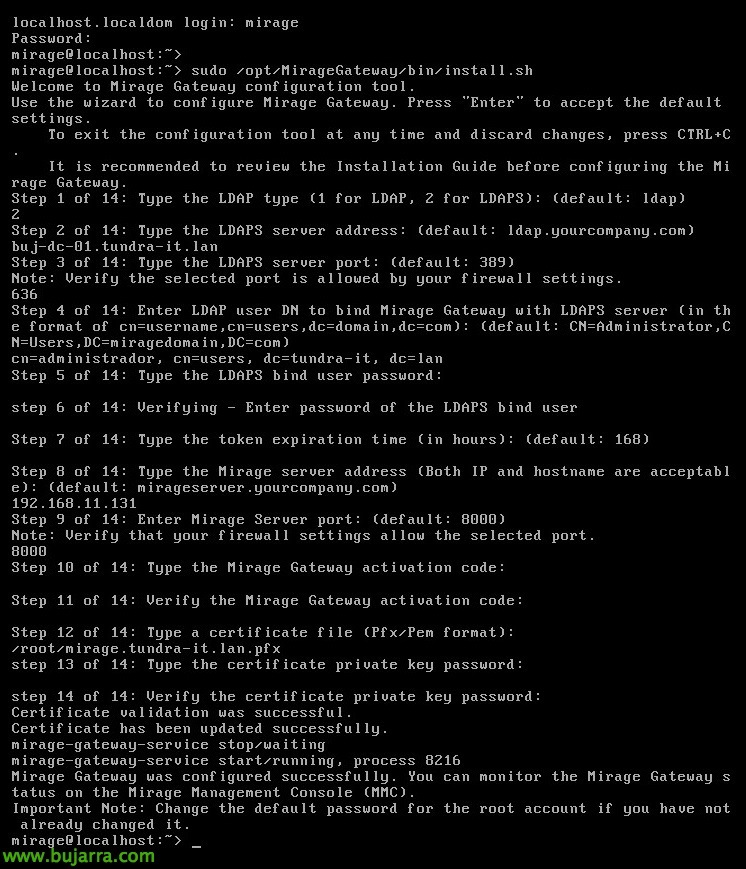
Once logged in, we'll run 'sudo /opt/MirageGateway/bin/install.sh’ to begin configuring the appliance using a wizard. We must continue to answer all the questions you ask us, We will be especially careful with the passage 10 when it tells us 'Type the Mirage Gateway activation code', Here we must enter any code that we will write down, in principle it will not be relevant, you must meet security requirements to link to the Mirage Server. We must also have copied the certificate to the appliance prior to the execution of the command, a WinSCP will suffice and we will place the PFX file with the private key of the site that we will publish (we can easily generate it with an IIS & Export). And in principle ready, There's no more mystery!

If everything has been correct, we will be able to verify that in VMware Mirage Console we already have our appliance in 'UP' in Mirage Gateways!

We will be able to edit the global configurations from the same console and in “System Configuration”, on the “Gateway Authentication” enable “Enable Gateway Customize Logon Message” to allow users when they are outside the organization to synchronize!

And that's it! When we have a team outside the organization, the same message that we just configured will pop up and we will be able to see how in 'Server Address’ connectivity to the Mirage Gateway comes out and it is not a direct connection to the Mirage Server!!!
More Official info About the version 5.1 of the Gateway Appliance.


