Installing and configuring Microsoft Forefront Protection 2010 for Exchange Server

Microsoft Forefront Protection 2010 for Exchange Server (FPE) is the Edge Protection Server for a Microsoft Exchange organization 2010, where we can manage all the blocking of incoming mail in order to reject unwanted emails either by the condition we configure (Anti SPAM), since it provides us with 5 Anti-Antivirus Definition Engines from Different Manufacturers! We will also avoid anti-malware, We have the possibility of extensive configuration from a console that is easy to manage, We also have an information area that is also quite cool. And manageability with PowerShell, of course! This server must be the one that collects external mail and sends it to our organization, the ideal is to mount it on the server that is in the DMZ totally isolated from our organization and on the server with the Edge Transport function.
We start with the installation!

Mark “I agree to the terms of the license agreement and privacy statement” & “Following”,

If we already have the server installed with the Exchange Edge Transport role on this server, it will ask us to restart the service “Transport de Microsoft Exchange”, so if we don't want to affect the production environment, we will assemble it before installing the Edge Transport. “Following”,

Select the folders where we will install the program; by default the program folder will be '%ProgramFiles%Microsoft Forefront Protection for Exchange Server’ and the data folder '%ProgramFiles%Microsoft Forefront Protection for Exchange ServerData'. “Following”,

If we have a proxy, we configure it, “Following”,

Understanding that we will want to use Frontend Protection 2010 to block spam as well as SPAM, We will mark “Enable spam protection now”. “Following”,

Mark “Use Microsoft Update when checking for updates”, “Following”,

“Following”,

Once the Microsoft Forefront assistant has been configured, click on “Following” for installation to begin,

…

… wait a few minutes while installing, Configured…

List! we already have Microsoft Forefront Protection 2010 for Exchange Server installed!
Vale, you will now install Microsoft Forefront Online Protection for Exchange, which is the email filtering service that can be used with Microsoft Forefront Protection 2010 for Exchange Server. Forefront Online filters incoming email traffic before it enters our organization. Forefront Online receives incoming mail traffic, filters it to check for spam, virus, Apply custom spam filters’ and finally forwards the mail (for additional detections and/or subsequent delivery).
Personalized spam filters’ that Forefront Online gives us are:
– Allow/block IP addresses.
– Allow/block sender domains.
– Allow/block sender addresses.
– Allow/block recipient addresses.

We accept the contract “I agree to the terms of the license agreement and privacy statement” & “Following”,

The installation will create the program folder in '%ProgramFiles%Microsoft Forefront Online Protection for Exchange Gateway’ and the data folder in '%ProgramFiles%Microsoft Forefront Online Protection for Exchange GatewayData', “Following”,

… We wait while it is installed…

List, Finally we have the complete installation. “End”,

We will now be able to open the 'Microsoft Forefront Protection Administration Console' 2010 for Exchange Server'.

In “Policy management” > “Antimalware” > “Perimeter transport” We have the configuration on whether or not we want to detect antivirus or antispyware. In addition to configuring the engines with which we want it to analyze us, as well as the detection actions we want it to have when finding a virus or spyware (that deletes them by replacing the infected file with a text, Quarantine shipments, nothing…) and other additional options.

In “Policy management” > “Spam protection” > “Configure”, We will have the possibility to enable/disable and configure:
– Connection filtering: Examine the IP address of the original sender. FPE has lists of configurable static IP addresses that are blocked and allowed, and a list of blocked dynamic DNS that Microsoft maintains and can filter down to 90% of spam (DNSBL…). More info.
– Sender filtering: Examine SMTP sender information. Allows administrators to configure senders allowed and blocked by domains and email addresses. More info.
– ID filtering. of senders: Use a sender identifier framework to validate that the sender is not impersonating someone else, or is phishing. More info.
– Recipient filtering: Can be configured to allow and block mails to certain recipients in your organization. In addition, through Active Directory Domain Service queries, to validate that the recipient exists in said service of the company. More info.
– Content filtering: See the content of the message, even the subject line and message body. Use a third-party spam protection engine to detect spam in all email messages. More info.
– Backcast filtering: A new technology that allows administrators to prevent non-delivery reports (NDR) that are generated in fake sender addresses enter the environment. More info.

In “Online protection” > “Configure” we can configure Forefront Online Protection for Exchange (FOPE) as a mail transmission filter, we will need to register with FOPE and create an account (HTTP://go.microsoft.com/fwlink/?LinkId=128194).

In “Global Settings” > “Detection Options” We can disable the analysis at a specific time, letting all or only certain traffic pass through.

In “Global Settings” > “Engine Options” We will be able to update the engines (The signatures) manually or indicate that we have or want to be an update redistribution server (to receive and distribute updates on servers).

In “Global Settings” > “Advanced options” we have:
– Tests: Where we will define the actions when we have an engine error, The extension to replace deleted attachments, Using DNS Reverse Lookup, Using quarantine if we have a corrupted archive (When matches come)…
– Elimination criteria: When we'll delete a file or message.
– Threshold Levels: Where we set the maximum infection thresholds per file, Compressed file/container size, Maximum depth when analyzing (in compressed and/or nested files).
– Setting Special File Types: To treat special rar or zip files as corrupted files.
– Registration Options: We will enable logging/logs and their options to certain features.
– Intelligent motor management: Here we can indicate that we do not use a specific engine or modify its update, Default, we must leave everything on automatic.

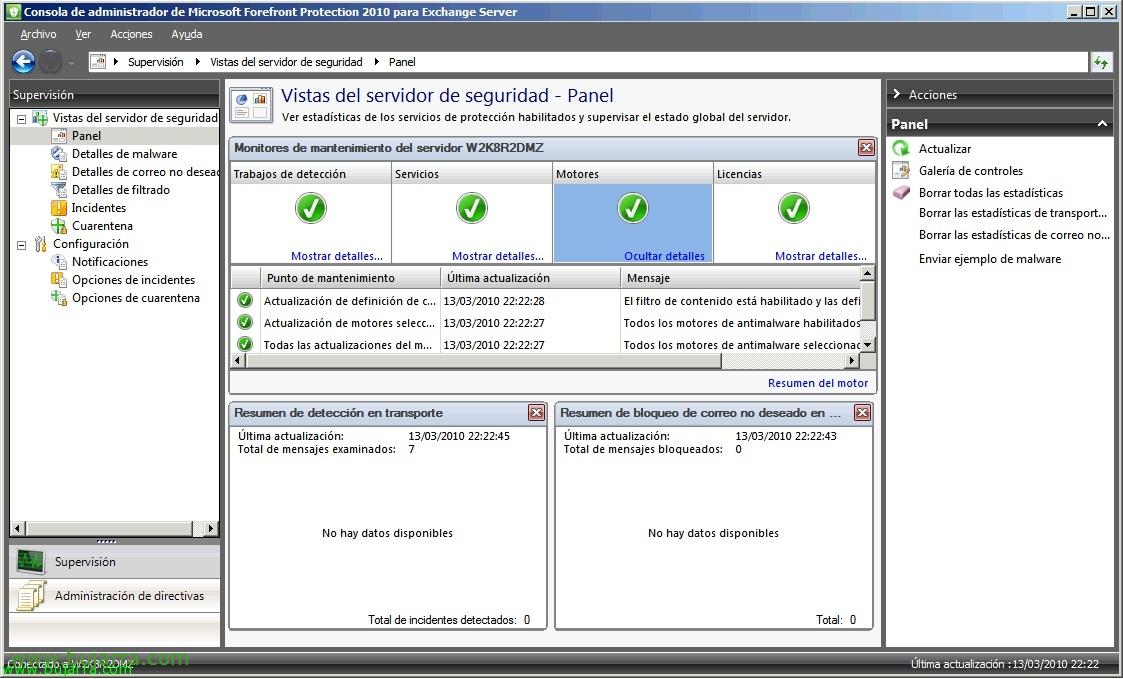
In “Supervision” > “Server Views” > “Panel” We have a summary of the status of all services, if we have updated the engines, Definitions, Messages Examined, Blocked messages. In addition to testing malware.

In “Supervision” > “Server Views” > “Malware details” We have the malware detection statistics.

In “Supervision” > “Server Views” > “Spam details”, different SPAM mail filter statistics,

In “Supervision” > “Server Views” > “Filtering details” Filter Statistics by File, word…

In “Supervision” > “Server Views” > “Incidents” We can check everything that has happened in the detection using filters.

In “Supervision” > “Server Views” > “Quarantine” we will see the elements that we will have in quarantine, we can eliminate them, keep or deliver them; in addition to configuring quarantine options.