Installing Citrix Web Interface on Linux
At last! In this document we will be able to see how to install the Web Interface server 5.3 on a Java server, in this case we will use a new Debian Lenny distribution to which we will install Apache2 and Tomcat6 to be able to run the Citrix Web Interface server, we can therefore save a Windows server with the cost that licensing will entail., Resources… thanks to my great friend Manel who has given me the clues to set it up!!! Started…
First of all, after installing our Debian (Lenny), We'll download and install the signatures from the repositories with: 'apt-get install debian-archive-keyring'.
![]()
We'll need to have this repository added in /etc/sources.list and update the available packages with 'apt-get update’
We first installed the Java requirements to be able to run Citrix Web Interface for Unix (Java servers) with: 'apt-get install sun-java6-bin sun-java6-fonts sun-java6-jre sun-java6-plugin sun-java6-jdk'.
We install Apache2 with 'apt-get install apache2',
We got off Tomcat 6.0 of the Official Website, we decompress it with: 'tar -zxvf apache-tomcat-6.0.XX.tar.gz’
We enter the directory that we just got when we unzipped tomcat, We create a directory in /usr/local/tomcat6 and move the newly unzipped content there, all with:
'cd apache-tomcat-6.0.XX’
'mkdir /usr/local/tomcat6’
'mv * /usr/local/tomcat6’
We created the demon to be able to initiate, Stop or restart Tomcat with any editor, in my case:
'vim /etc/init.d/tomcat6’ and we introduce:
#!/bin/sh
# Tomcat 6 init-script
case $1 in
Start)
sh /usr/local/tomcat6/bin/startup.sh
;;
stop)
sh /usr/local/tomcat6/bin/shutdown.sh
;;
Restart)
sh /usr/local/tomcat6/bin/shutdown.sh
sh /usr/local/tomcat6/bin/startup.sh
;;
Esac
exit 0
Now we indicate by 'update-rc.d tomcat6 defaults’ that starts the daemon when the computer starts and stops it when it is about to shut down.
We make it executable with 'chmod +x /etc/init.d/tomcat6’ and restart it to check that everything is OK with '/etc/init.d/tomcat6 restart’
We installed the Tomcat connector – Apache (mod_jk) con 'apt-get install libapache2-mod-jk’ and restart apache'/etc/init.d/apache2 restart’
We edit the mod_jk settings (with 'vim /etc/libapache2-mod-jk/workers.properties') and we verify that these parameters have the following configuration defined:
workers.tomcat_home=/usr/local/tomcat6
workers.java_home=/usr/local/java6
ps=/
We edit 'vim /var/lib/dpkg/info/libapache2-mod-jk.conffiles’ and we indicate what the configuration files should be:
<ifmodule mod_jk.c>
JkWorkersFile /etc/libapache2-mod-jk/workers.properties
JkLogFile /var/log/apache2/mod_jk.log
JkLogLevel info
</ifmodule>
Finally we restarted tomcat and apache,
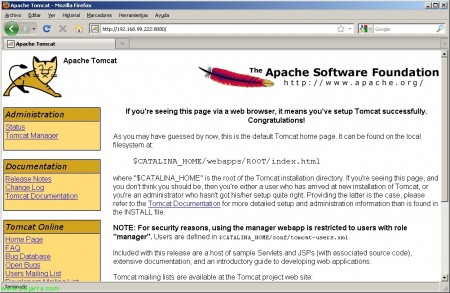
We check that tomcat works for us, From any computer we access the Debian port with a browser 8080 with HTTP.
We download Citrix Web Interface 5.3 for Java Application Servers (UNIX) from the Official Website from Citrix. We run 'java -jar WebInterface.jar’ to install the Citrix Web Interface on this computer, we will have to answer all the questions. “S” to accept the terms of the contract,
We may install a XenApp website or XenApp Services, one for web access and the other via Citrix Online plug-in (former PNA site), During the execution of the installation we will only be able to create one site, if we were interested in both, we would continue with the installation and then run it again with the other option.
We indicate the hostname for the XML service, default 'localhost'.
We indicate the protocol for XML, default is HTTP; we will also select the port, Default 80.
We indicate the appearance of the website, can be reduced (default) or full with all features.
Select the type of applications we have published, Default “Server”,
If we want to install the plugins at this time on the website to make them available in case our users need them, in this case we must have the CLIENTS folder with all of them.
We indicate where we will create the war file, It must be in the Tomcat WebApps directory in addition to the name we want it to have, in my case in '/usr/local/tomcat6/webapps/Citrix.war'.
We confirm that everything is correct,
We restart Apache and tomcat again…
And we check that we have it installed! We open a browser: HTTP://Debian:8080/Citrix and you're done!!!
To configure the site with the necessary parameters, we will edit the corresponding WebInterface.conf file manually, or else, we can copy another generated from a Windows.


