Getting Started with VMware View 4.0

VMware Brings Its New Version of VMware View. VMware View is VMware's solution for virtualized desktop use, where it integrates seamlessly with our VMware vSphere virtual environment 4, with our ESX hosts 4 and vCenter Server 4. Eye, to install this new version, vSphere Update is recommended 1 installed (on hosts, vCenter, Plugins…).
The main new features of VMware View Manager 4.0 son:
– VMware View with PCoIP protocol to replace RDP, Improved possibilities and performance. Eye! over the internet doesn't work, LAN or WAN only :'(
– VMware View Display to support multi-monitor mode (until 4 Monitors!)
– VMware vSphere and VMware Infrastructure 3.x support
– What's new in authentication: Single Sign On, Smart Card Use and Policies.

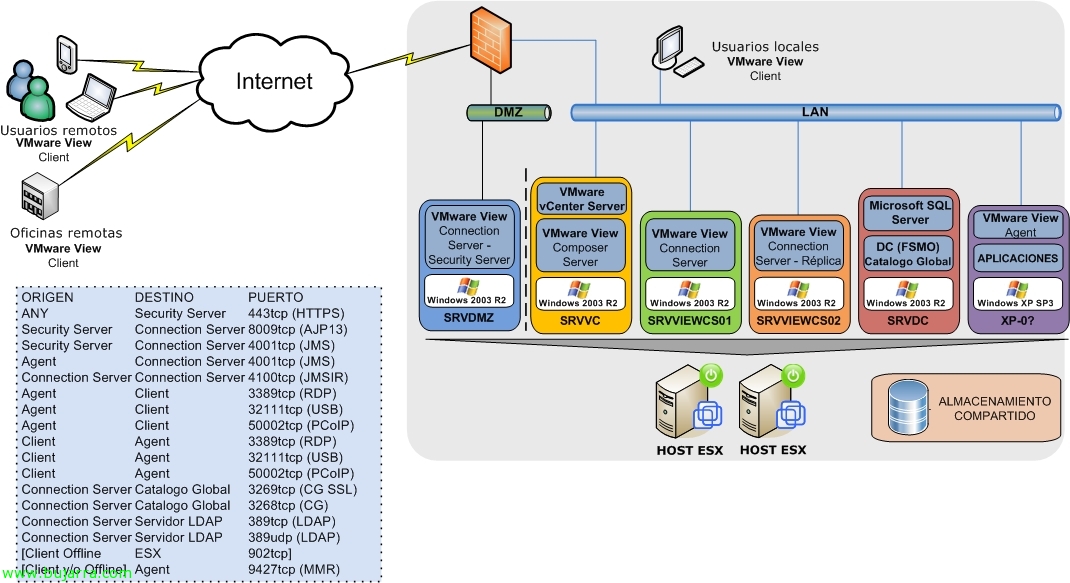
Well, this is the blueprint we can create with a good installation of VMware View under proper conditions, we would have the following components:
– VMware View Connection Server: It will be the server responsible for managing the virtual desktop environment, where we will provide access to the desktops, we will create them…
– VMware View Composer: It must be installed on the VMware vCenter Server(s). This is the server that will allow us to distribute desktops to users from a single image for all. Increasing the speed of desktop provisioning while also reducing storage requirements!
– VMware View Connection Server (Security Server): It will be the server that, without being part of an Active Directory, will be completely isolated in the DMZ providing secure access from the outside to our desktops.
– VMware View Connection Server (Replica): It will be the additional server of our virtual desktop environment, the server that will share the information to ensure high availability.
– VMware View Agent: It is the software that we must install on the desktop to be published (in this new version we will be able to use PCoIP).
– VMware View Client: It is the software that we will install to access our virtual desktop environment.
– VMware View Offline Client: Apart from the above, it will allow us to take the desktop with us in a portable manner to later synchronize it with the
As well as a table of the ports to be taken into account:
| SOURCE | DESTINATION | PORT |
| ANY | Security Server | 443TCP (HTTPS) |
| Security Server | Connection Server | 8009TCP (AJP13) |
| Security Server | Connection Server | 4001TCP (JMS) |
| Agent | Connection Server | 4001TCP (JMS) |
| Connection Server | Connection Server | 4100TCP (JMSIR) |
| Agent | Client | 3389TCP (RDP) |
| Agent | Client | 32111TCP (USB) |
| Agent | Client | 50002TCP (PCoIP) |
| Client | Agent | 3389TCP (RDP) |
| Client | Agent | 32111TCP (USB) |
| Client | Agent | 50002TCP (PCoIP) |
| Connection Server | Global Catalog | 3269TCP (CG SSL) |
| Connection Server | Global Catalog | 3268TCP (CG) |
| Connection Server | LDAP Server | 389TCP (LDAP) |
| Connection Server | LDAP Server | 389UDP (LDAP) |
| [Client Offline] | [ESX] | [902TCP] |
| [Client and/or Offline] | [Agent] | [9427TCP (MMR) |