Migrating VMware VI3 Virtual Network Environment to VMware vSphere with Distributed Switches
Well, once we have our entire virtual environment already migrated to the new version of VMWare vSphere 4.0, all servers running under VMware ESX 4.0 and our VMware vCenter Server as well, We will be able to enjoy its advantages, One of them is the new switch environment, called Distributed Switches or vNetwork Distributed Switches. With this we will achieve comfort when managing network environments, Much simpler, Change the way switches are configured, No more configuring a switch or virtual network for each host, otherwise, is a global environment, everything is done at the vCenter Server level and will apply to all of our hosts.
Well, this is an example of what a network environment is like in VMware Virtual Infrastructure 3; and the same environment on VMware vSphere 4. On VMware VI 3, switches are manually configured on each ESX host, The same configuration must be created on all hosts, with the same names to the virtual networks (so that when a VM moves between different hosts it remains connected to the network). Now, on VMware vSphere 4, as many switches as we need are created, in my case, with a distributed switch (dvSwitch) for the whole organization it will be good for me. Change the terminology completely, Virtual machines are no longer assigned to virtual networks, if not to Distributed Port Group (dvPortGroup). There are quite a few novelties between the different technologies, In addition, we can always maintain a mixed environment between one technology and another. Another difference is that now the dvSwitches are configured with Distributed Up Link Port. (dvUpLink Port), which are the physical adapters that will connect the distributed switch to the external network, using the network adapters on the ESX hosts (NIC), associating which dvPortGroup with dvUpLink Port, to configure which VMs/VMsernel Port/Service Console Port will exit through which physical network adapter.
It is quite a long procedure, At the end of it there will be a brief summary of all the steps, To be taken into account.
This procedure shows the steps to migrate a virtual network environment without performing a service shutdown and to be able to perform it in production. To do this, it is necessary that we have at least two physical network adapters in each virtual network. To migrate, first we will remove the second NIC from each virtual switch and create the dvSwitch and assign the NICs that we release to this switch. Subsequently, we will use various VMware wizards to migrate the virtual networks of virtual machines/VMotion/iSCSI and finally those of Service Console.
In this document I have tried to simulate a more or less complex environment, not because you have VLAN's, Why aren't there, otherwise, Different networks, One for virtual machines (Lan), a Service Console for management (Service Console), for my iSCSI array where my datastores are (iSCSI Network), and a network for VMotion (VMotion Network). Each network with two network adapters. It is about migrating this environment without stopping. The process could be streamlined, but in this document I have done it taking a step further to make it clearer how to migrate the environment.
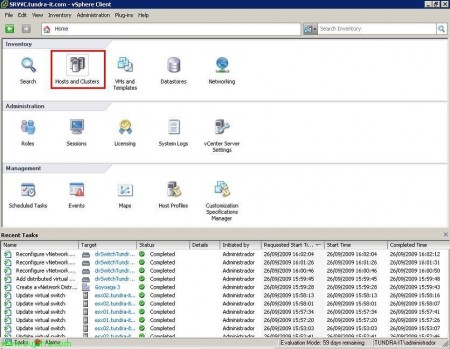
Well, As I said, we have to go to a virtual network and remove the second adapter, I start with my iSCSI network, so from the view of “Hosts and Clusters”, Let's go to that network and let's go to their “Properties”,
On the “Network Adapters”, we select a NIC and remove it, In my case it will be VMNIC2, Click on “Remove”,
“Yes” to deallocate this NIC from that virtual switch, we should not worry because if everything is well configured, all network traffic will go through the other adapter and you won't even notice that we have disconnected this NIC.
IDEM Now with Another Virtual Switch, in this case we are going for the one from VMotion, We repeat the process, Let's go to their properties “Propierties”,
Eyelash “Network Adapters”, we select a NIC and remove it, Now it will be VMNIC4, Click on “Remove”,
“Yes”,
And now in the virtual machine network, In my case I only have one network of this type, But let's go, as many networks as we have, We repeat the step, in addition, in this network I have the Service Console, if I would have the SC on another switch, Well, we'd repeat the step. Click on “Propierties”,
Eyelash “Network Adapters”, we select a NIC and remove it, The VMiC0, Click on “Remove”,
“Yes”,
We will have to repeat the process of removing the NICs on as many ESX hosts as we have, and to follow a correct order and not get lost, we will always remove the same NIC's from the same switches. We can see that we have been left in all virtual switches without the second NIC.
We changed our view to finally create a distributed switch for all our ESX hosts, Let's go to sight “Networking”,
About our datacenter, Right-click “New vNetwork Distributed Switch…” we will create the Distributed Switch.
We indicate a name to the switch distributed, I am going to leave you the name that comes by default plus what you think is appropriate, I do this so that the tutoring is a little clearer and no one gets lost, so for the company Tundra IT, created the dvSwitchTundraIT switch. We need to indicate how many dvUpLink ports we want it to have, These are the connectors (Physical NICs) What this switch will have with the outside. We can already configure the number of all the NICs that we have or will have; but so that it is clear I will go little by little and for now I will only tell you that I want to 2 NIC's, I will name them, assign the physical IASs and then, I'll do the rest. So “Next”,
We select a NIC from each ESX host to assign as dvUpLink to this switch, Of course, what I said before, that we could have already assigned all the external ports. But as I said they will be 2 dvUpLink Ports, Assign 2 NIC's, those in my iSCSI network for example. “Next”,
We check that you have assigned two Hosts to the two ports, called dvUpLink1 and dvUpLink2, What to do now, is to rename the ports and add to the rest of the NICs, “Finish”,
To edit the name of the dvUpLink port's, Let's go to the distributed switch and with right button “Edit Settings…”
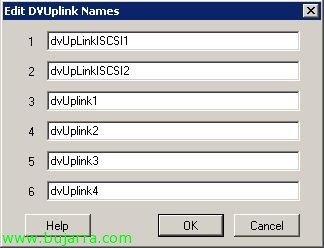
On the “Propierties” in the part of “General”, We have the number of associated ports, We edit the names from “Edit dvUpLink port”,
What I said, These are the names it comes with by default, We change them…
I'll use these first two for my iSCSI network, since I have two NIC's on each host for this private network, I indicate a name that refers to me, As I said, I leave the default names plus their function, so dvUpLinkISCSI1 and dvUpLinkISCSI2. “OK”,
“OK”,
Once understood, Now what we will do is assign the number of ports that we want this switch to have, If in my case I have 6 NIC's on each host, I'll tell her I want to 6 dvUpLink Ports, Re-editing the distributed switch,
In “Number of dvUpLink ports” we indicate the NIC's we want and click again on “Edit dvUpLink Port”,
We must rename the dvUpLink
IDEM, we give a name to each of them, So I'll have it again 6 NIC's that connect me with the outside world, all duplicates in case a network NIC breaks down, or a physical switch connected to a NIC. “OK”,
We change the view and we go to “Host and Clusters”,
Now we will map the dvUpLink Ports with the corresponding NIC, this must be done as many times as ESX host we have or want to assign, so let's go for the first ESX host, to the tab “Configuration” > “Networking” > Button “Distributed Virtual Switch” > “Manage Physical Adapters…”,
And we assign the dvUpLink Port the NIC that it has to, yes indeed, since we have only released one of each VI3 virtual switch we can only assign one to each dvUpLinkXXXX1. In my case, we have associated vmnic2 with dvUpLinkISCSI1 during the creation of the distributed switch, now let's go with the VMotion network, assigned the IAS that corresponded to it from “Click to Add NIC”,
I select the NIC that is from that network, VMNIC4 and “OK”,
Let's go with the LAN network, Click on “Click to Add NIC” by dvUpLinkLAN1,
I select your NIC, In this case the VMiC0 & “OK”,
List, We see the distributed SWTICH taking shape…
Now we are going to create what we used to call virtual networks, which are now called Distributed Port Group, To do this, you have to change your view and go to “Networking”,
About the right-click distributed switch “New Port Group…”,
We indicate the name of the port group that we are going to create, I'll create one for the iSCSI network, then another one for VMotion and as by default it already creates one for us, I'll rename it and assign it to the LAN. As said, we indicate a name, I will name it dvPortGroupISCSI, Select the number of ports we want it to be assigned, each VM will be associated with a port by default (In the beginning, Why can we have more VMs than ports on a switch, Of course, not all of them at the same time turned on). If this dvPortGroup will be on a VLAN, we indicate this and select the type, there are different types of VLAN's. “Next”,
“Finish”,
Now we create another one for the VMotion network, on the distributed switch, Right Button “New Port Group…”,
I call it dvPortGroupVMotion, “Next”,
We confirm the assistant, “Finish”,
And what I said, as by default when creating the distributed switch creates a dvPortGroup, We renamed it, right button on top of it and “Edit Settings…”,
We changed the name,
From dvPortGroup to dvPortGroupLAN, “OK” to confirm,
And now, we must assign each Port Group to its dvUpLink Port, Bone, we will associate the networks with the NICs that correspond to them, for this purpose on the dvPortGroup in question with a right-click “Edit Settings…”, we start with the iSCSI network,
In “Teaming and Failover” we have to indicate in “Activate dvUpLinks” that UpLink Port will be for this group of ports, So…
In this case it will only be dvUpLinkISCSI1 and dvUpLinkISCSI2, “OK”,
Now about VMotion's PortGroup > “Edit Settings…”
Same as before, we take down the networks that do not interest us with “Move Down” in the “Teaming and Failover”,
And we leave only dvUpLinkVMotion1 and dvUpLinkVMotio2, “OK”,
And finally the same thing about the dvPortGroupLAN,
“Teaming and Failover”, we upload dvUpLinkLAN1 and dvUpLinkLAN2 with “Move Up”,
“OK”,
It is taking shape… As I said, remember that everything we do from the view of “Hosts and Clusters” we will have to do it on all ESX hosts.
Well, since we already have the partially distributed switch configured, but totally to put into production, we can now start migrating virtual networks from VI3 to vSphere. Let's go to sight “Networking”,
About the right-click distributed switch “Migrate Virtual Machine Networking…”
We must select the source VM network in the combo of “Select Source Network” and to the destination network that we want to migrate those virtual machines in “Select Destination Network”,
In my case I will migrate from the 'LAN Network' network’ (of VI 3) to the 'dvPortGroupLAN’ of the distributed switch 'dvSwitchTundraIT), Click on “Show Virtual Machines” and we mark all virtual machines to migrate to your new network with “OK”, if we have carried out all the correct steps and the configuration is correct we should not even lose a PING with these virtual machines and users will not notice. If we have more virtual machine networks, we repeat the step until we migrate all the VMs.
After VM networks are migrated to the new environment, it's time to migrate VMkernel networks (iSCSI, VMotion… all except the Service Console, which we will leave for the end). So let's go to the view of “Hosts and Clusters”,
Remember that this step must be repeated on all ESX hosts. Let's go to the tab “Configuration” > “Networking” > Button “Distributed Virtual Switch” and we are going to “Manage Virtual Adapters”. By the way, we can already see that the virtual machines that we have migrated in the previous wizard come out of the dvPortGroup.
Click on “Add…”,
Select “Migrate existing virtual adapters” & “Next”,
All our VMkernel networks will be released, we have to indicate which network we will migrate to which Port Group, and anyway, What we say, the Service Console we will leave for the end, So we unchecked it.
We indicate that the 'iSCSI Network'’ (of VI 3) we will migrate it to 'dvPortGroupISCSI’ (vSphere) and the 'VMotion Network'’ (SAW 3.0) we will migrate it to 'dvPortGroupVMotion’ (vSphere). “Next”,
We confirm that it is correct and “Finish”,
We can see that we already have more networks on our distributed switch.
Once we have migrated these networks from the VI3 environment to vSphere, We can eliminate them, To do this, go to the “Virtual Switch” And we'll see the ancient view, We can remove both switches from “Remove…” and we will confirm its removal. With this we will be able to free up two more adapters and be able to connect them to the distributed switch.
So once we have the two adapters released, the two NICs (or whatever they are), we assign them to the switch distributed from “Manage Physical Adapters…”,
Click on “Click to Add NIC” in dvUpLinkISCSI2 and in dvUPLinkVMotion2,
We add to each port its corresponding NIC, to dvUpLinkISCSI2 la vmnic3 and to dvUPLinkVMotion2 la vmnic5. “OK”,
List, Still taking shape, Now what has been said, we must perform all this same configuration on the rest of the ESX servers.
Once done, now we only have to migrate the Service Console, so we created a Port Group for it and performed the same steps we have done previously. Man, this step is repetitive since I wanted to show the migration process more clearly with these steps, Of course we could have done it earlier. Let's go to the view of “Networking”,
About the Distributed Switch > “New Port Group…”,
We provide you with a name for the Service Console, e.g. dvPortGroupServiceConsole, “Next”,
“Finish”,
Same as before, We must assign the ports (Distributed UpLink Ports) that will connect you to the outside world to this network.
IDEM, we downloaded all the networks to “Unused dvUplinks” and we leave those that have to be in “Activate dvUplinks”. In my case, how did I share the MV LAN network with the ServiceConsole, I will assign you the same UpLinkPorts.
So I leave you dvUpLinkLAN1 and dvUpLinkLAN2. “OK”,
And now we migrate it to the new environment, To do this, we are going as before to “Host and Clusters” (repetitive, But if not, Surely he forgets, all this in each Host),
Eyelash “Configuration” > “Networking” > Button “Distributed Virtual Switch” and we are going to “Manage Virtual Adapters”,
By the way, we see that we already have the two VMkernels, vmk0 and vmk1 for iSCSI and VMotion. Well, Click on “Add…”
“Migrate existing virtual adapters” & “Next”,
We mark the old (SAW 3) Service Console, and we took it to the Port Group that we just created called 'dvPortGroupServiceConsole', “Next”,
It informs us that when migrating the SC (Service Console) We may lose the connection, If all the steps are correct, we will not lose connectivity, So “Yes”,
We confirm with “Finish”,
And the Service Console will have been migrated to us as well, yes indeed, A couple of PING we will lose, but not connectivity.
And what I said, Once the network has been removed, We can now eliminate if Virtual Switch (from the “Virtual Switch”).
After the network is removed from the Service Console, We will have the last network adapter released, so we assign it to your UpLink Port, from the “Distributed Virtual Switch” > “Manage Physical Adapters…”,
In the one we have left, in my case in 'dvUpLinkLAN2', we added the NIC from “Click to Add NIC”,
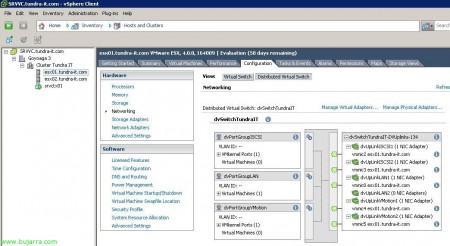
And we put in the vmnic1 that was the only one I had left. And for the last time, Remember to do these steps on all the hosts we have. “OK” and we would already have a distributed switch environment in our VMware vSphere environment 4.
And well, this would be an image of how Port Groups are configured, associated with which UpLink Ports and these in turn with which physical NICs of the ESX hosts.
By way of summary, These would be the steps to be taken in any environment:
0. Have everything well configured and documented, What networks do we have?, Which NIC's With Which Virtual Switches… Let's go, be clear about our VI3 virtual network environment.
1. Remove NICs from virtual switches in iSCSI networks, VMotion, Virtual Machine Networks (LAN, DMZ, WAN…)
2. Create a distributed switch, assign UpLink Port number as NIC's we have on each ESX Host, rename said UpLink Ports. Associate the released NICs with these UpLink Ports.
3. Create Group Ports for each virtual network we have, assign each of them with the corresponding UpLink Ports.
4. Migrating iSCSI networks, VMotion, Virtual Machine Networks (LAN, DMZ, WAN…) to the new PortGroup.
5. Delete old switches that have been released. Assign the NICs that have been released to the corresponding Port Groups.
6. Create Group Port for the Service Console and assign UpLink Ports to it ( and if necessary to these UpLink ports, their corresponding NIC's).
7. Migrate the Service Console to the newly created Port Group on each host. Remove the switch from the old SC and assign the released NIC to the dvUpLink Port that has the Service Console.
Of course, No? 😉 Luck, that has its logic!


