Other – Basic Configurations 1/2

We will see in a couple of documents some base configurations that normally have to be carried out after the installation of OTRS, as you well know one of the best Ticketing systems, Especially because of how customizable it is, in addition to being Open Source! The configurations that I will detail will allow us to have this system prepared to receive and manage incidents from our users, via web and via email. In these documents we will create the Queues, Customers, Agents, We will enable custom autoresponders, Signatures, Email Templates, surveys, We will set up and report, or we will customize the access portal to OTRS among other things!

We will base ourselves on a very simple example, a company that provides technical service to its client companies, these are called 'Clients', and the people who manage the incidents will be the 'Agents'. GOOD, these Customers will create incidents of different types and priorities, usually from a very very simple web portal (Be aware that there are also apps to use with Android or iOS mobile devices for iPhon / iPad). We as Agents will follow up and solve the incidents, and at the end of the month we will be able to obtain a list with all the incidents that we have solved, to bill these customers or whatever! What we will also enable is, that when a customer sends an email to an email address that we specify, A ticket will automatically be created with the incident, but for this we first have to enable the sending/receiving of mail from the OTRS server, In addition to what has been said, We will customize answers that will reach you every time a ticket is opened, there is a note or we directly close it as solved; We can also put a small survey so that they can assess the quality of service or whatever. Let's go??? With nougat!!!!
If you don't already have OTRS installed, Remember This document where you will see how to install it on a Debian!
Allow External Mail,
First of all, we will enable the sending of mailing on the OTRS server, now, We will have to decide how, if the shipment is direct, if we have a mail server on our network and we will use it to do relay… OTRS to Use Exim as MTA Mail Carrier Agent (Mail Transport Agent).

Very simple, From the Linux shell, We run as root:
[SourceCode]dpkg-reconfigure exim4-config[/SourceCode]
And we indicate the type of configuration that we are going to implement, In my case I do not have a mail server on the network so I want it to be a direct delivery. The normal thing in an organization will be through a smarthost. Click on “Accept”,
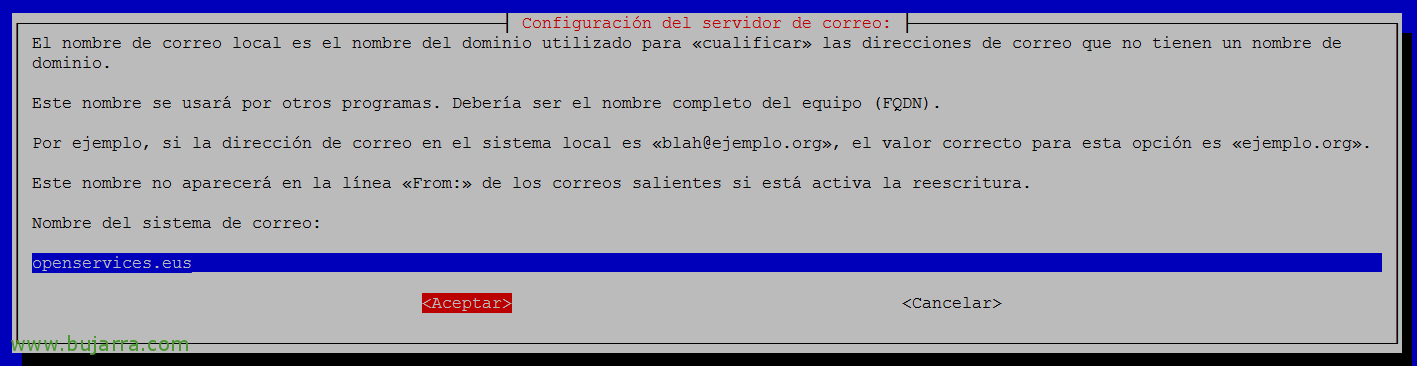
We indicate the name of the mail system, which must be the FQDN of the public domain that will send the emails. “Accept”,

If we have several interfaces or at least different IPs in the OTRS for receiving the mail, we will indicate their IP address here, by default we can leave it empty and accept mail through any IP assigned to it. In principle we will not use this as a reception, we will see how the OTRS will receive the emails, For now we will use this to send emails! “Accept”
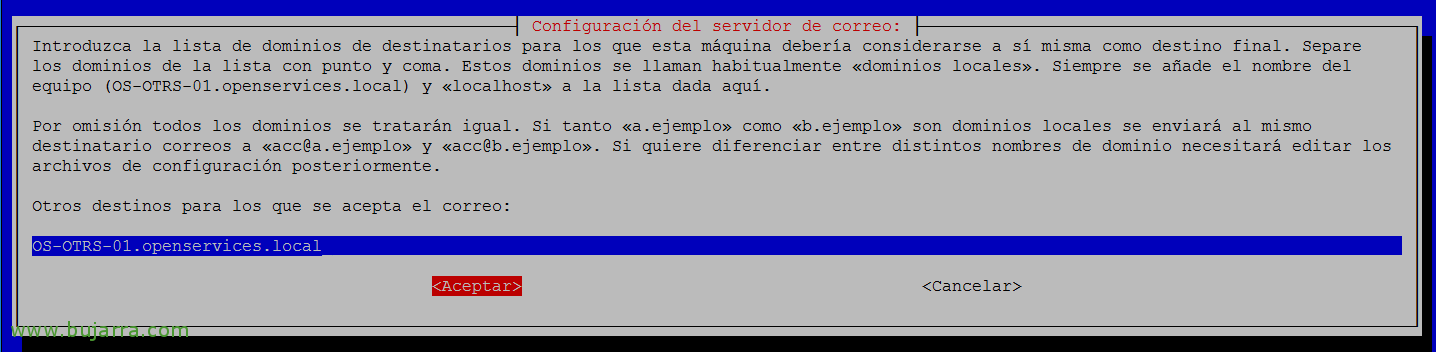
We add if we have other domains for which the mail will be accepted, Normally here we will have to put the local domain (at least). Click on “Accept” To follow,
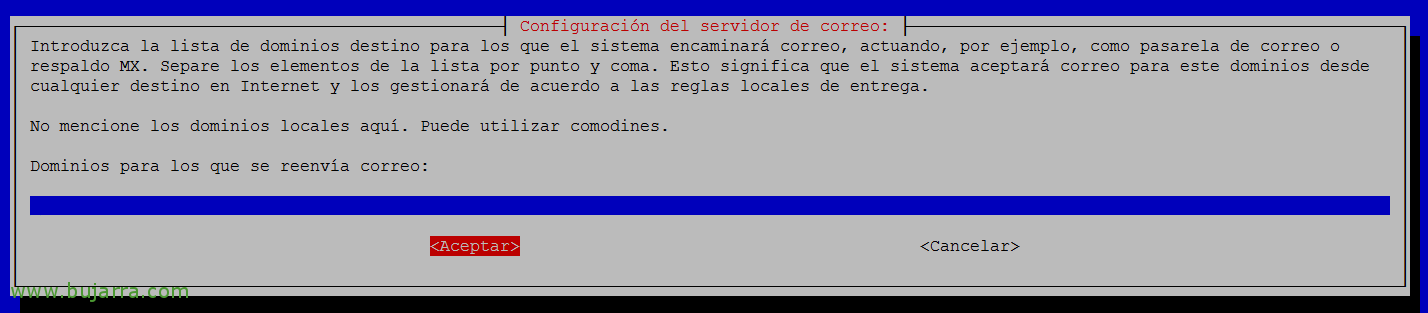
We leave empty and continue with “Accept”,
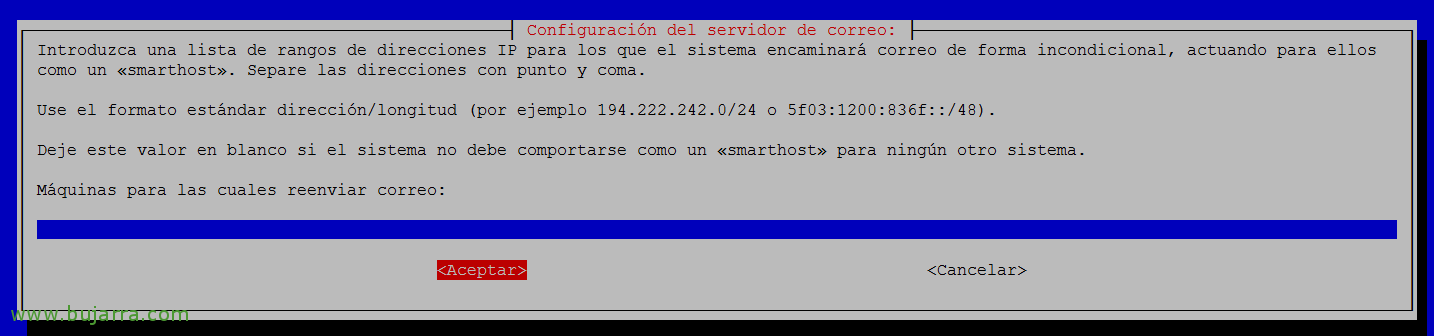
If we are going to allow them to send emails through this OTRS server, we must indicate the IPs as a whitelist, We leave empty and continue, “Accept”,
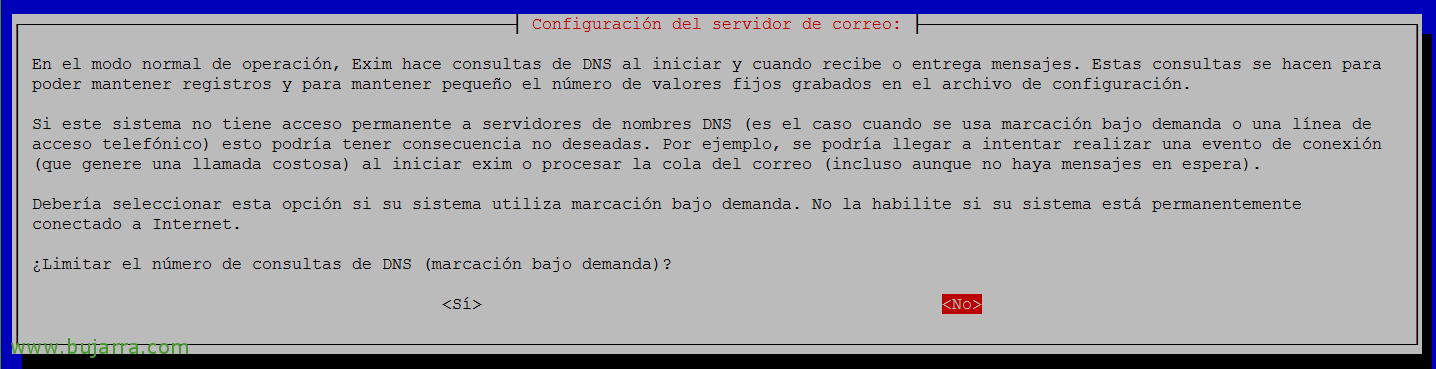
Pressed “No”,

We indicate the format for storing local emails, Normally we'll use mbox format in /var/mail, Pressed “Accept” to continue,
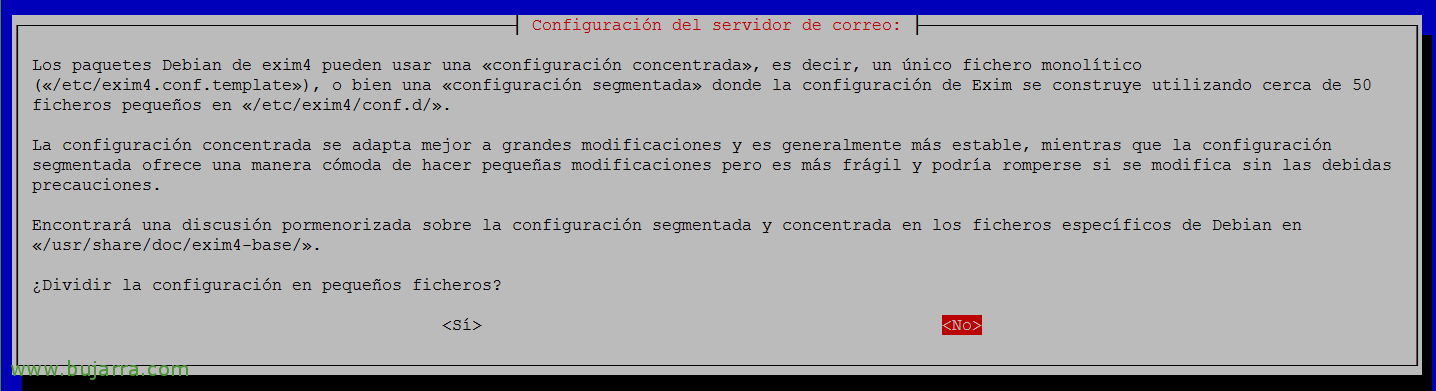
Indicate “No” To keep the EXIM4 configuration in a single configuration file, Normally it will be /etc/exim4.conf.
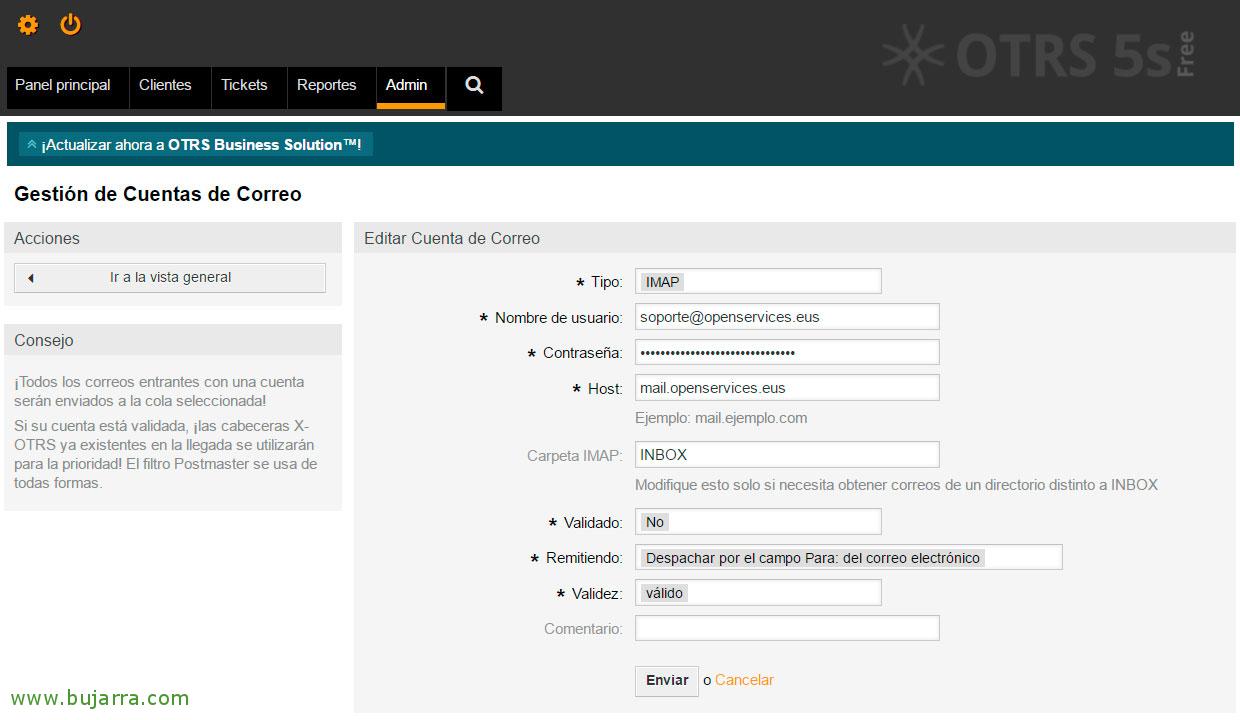
GOOD, since “Admin” > “Email settings” > “Email Accounts” we can edit the default email account or add as many email addresses as we need. These will be the email accounts that will receive the incidents from the users, and then we can associate them with the different Queues for their correct classification. We will be able to download all the mail with POP or simply synchronize your inbox with IMAP (or the folder we are interested in), we fill in the connection data to the mailbox and save with “Send”.
Create queues,
Queues are the destinations of tickets, following the example I mentioned initially, I'll have different queues, which will be where I'll sort the tickets. Being a company that serves other companies, I'll generate this type of Queues: “Support – Bond”, “Support – Closed”, “Projects – Bond”, “Projects – Closed”, “Courses”… By the time a ticket is generated, we will assign it to a queue specifying if they are Projects, or well-paid Support incidents through a pool of hours or bonus, as well as with a fixed cost. Then I will be able to generate filter by these queues to get some reports among other wonders.
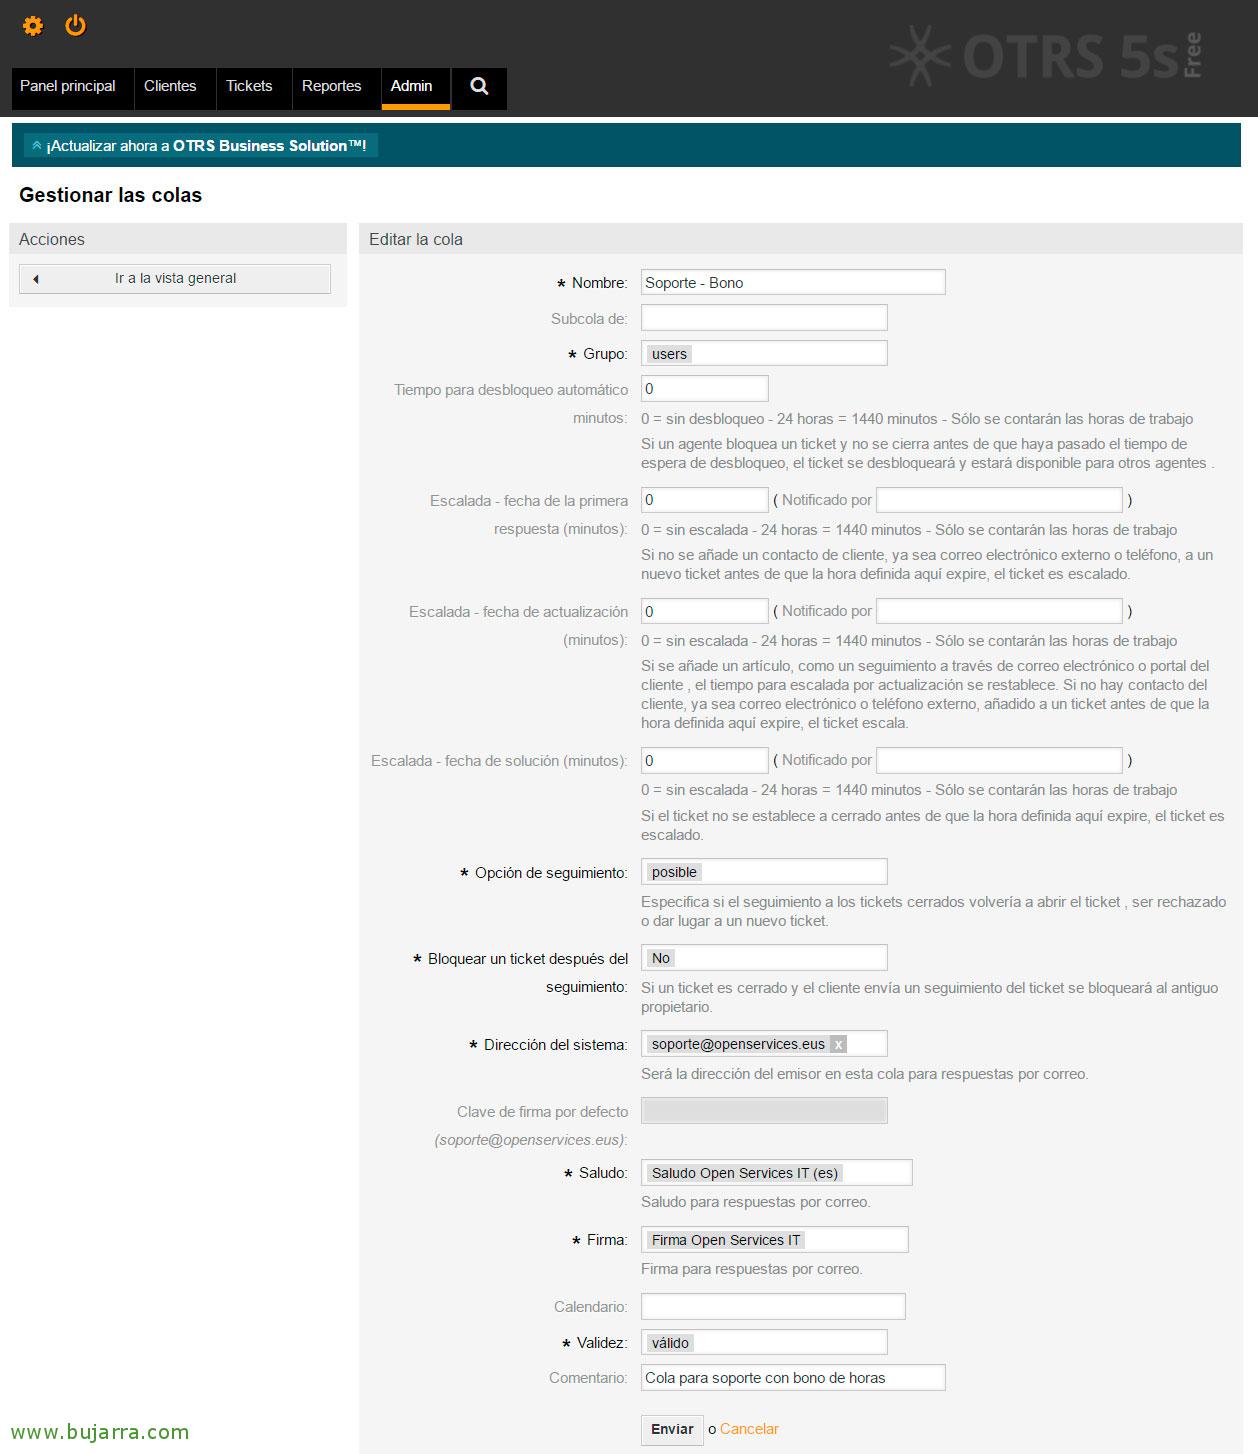
We're going to “Admin” > “Queue settings” > “Queues” > “Add Glue”, and we complete at least:
Name: Tail Name.
Group: It will be the group that will have access to the queue, by default all 'users'.
Tracking option: Offering if we want closed tickets to be reopened.
System Direction: We will associate the email address that this Queue will use for email notifications.
Greeting: It will be the email template that will be sent when creating a ticket in this Queue.
Signature: It will be the signature that will be applied at the end of the emails to all the emails you send.
Click on “Send” to record the config.
Create Customers,
In this scenario, Customers will be the companies that will be able to use the system to generate service requests, They will therefore have to be registered, both to the Company as such, and the users of said company.
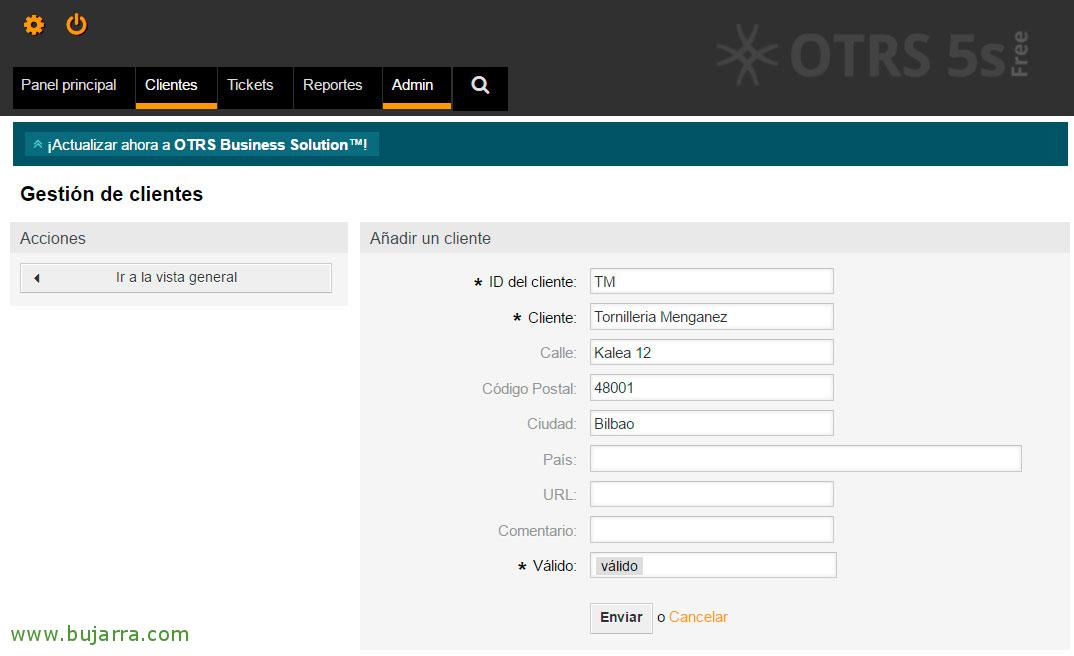
If we are going to “Admin” > “Customer Management” > “Clients” > “Add a customer” we will be able to register the Customer's Identifier as well as their name, and it will also be interesting to add contact details, since later during the management of your tickets we will have this data at a glance.

Since “Admin” > “Customer Management” > “Customer” > “Add a customer user” we will be able to register the users of the Clients who will use the system. We will add the necessary contact details in addition to creating a user for you & Access Password, without forgetting to associate it with the previously generated Customer ID.
Create Agents,
Now, we should create the Agents, who will be the people who provide solutions to the incidents of said Clients, they can be local users or if we are interested, know that we could also validate by LDAP against an Active Directory, that we will see this in a future document!

GOOD, to register an Agent, We must go to “Admin” > “Agents” > “Add Agent”. We fill in at least the contact details marked with an asterisk, in addition to creating a user for access, the notifications we want you to receive… Click on “Send”,
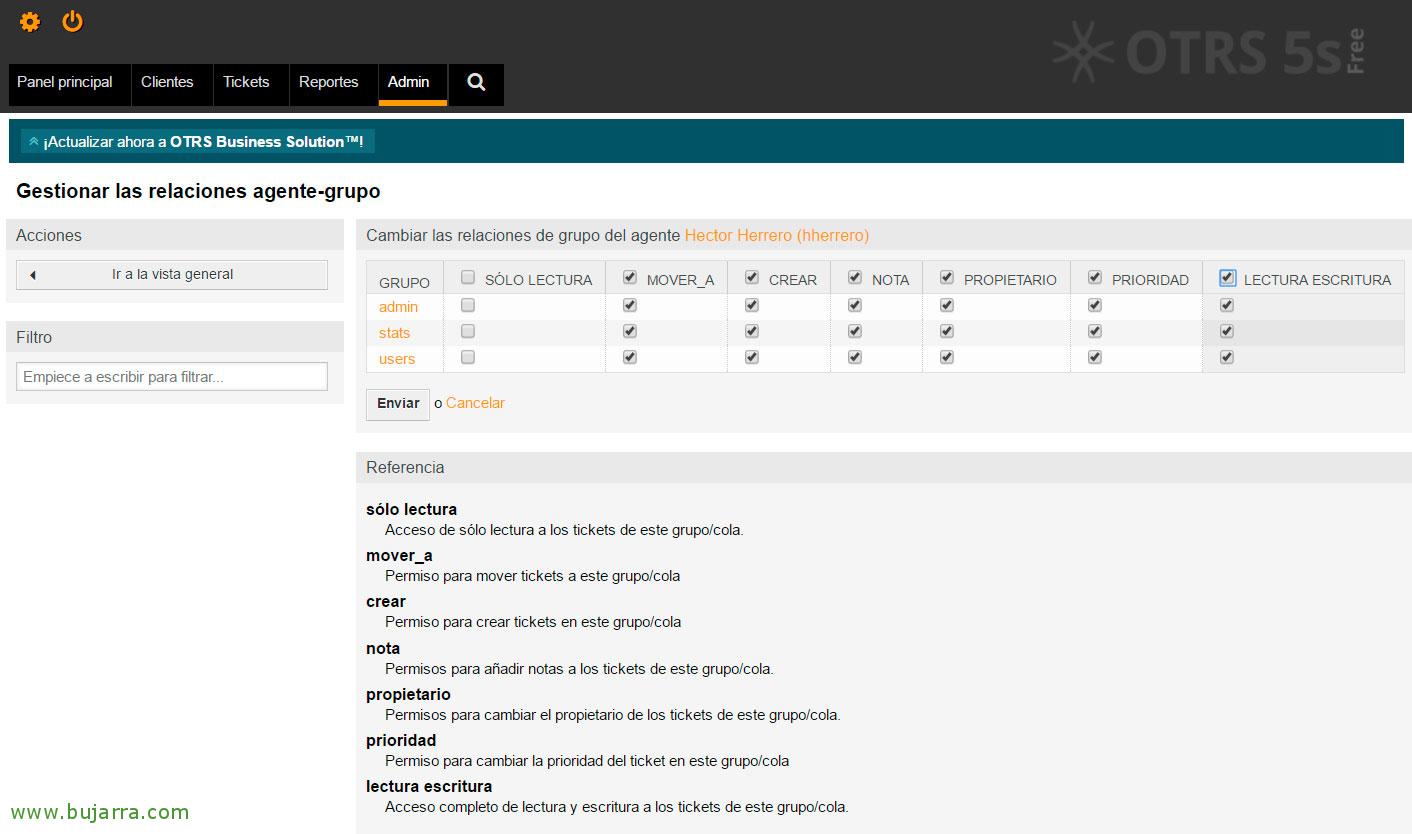
Following the creation wizard, We will need to select the permissions for this account, which groups you will belong to and the type of privileges. In this case I will create one that in addition to accessing the users' tickets will also be able to access the reports and the admin panel. (Not to use root@localhost). “Send”,
Autoresponders,
If we want to automatically respond to any customer interaction on a Ticket, we must first enable these responses (By Type) and then modify the response templates with our data in order to make it more corporate.

If we are going to “Admin” > “Queue settings” > “Autoresponders <–> Queues” we must select the Queues that we are interested in modifying and we will select a type of automatic response depending on the customer's interaction, If the ticket is accepted/rejected, about ticket tracking and the customer add a briefing note, or if the ticket is deleted… We must select a template for the response to the following actions:
Auto-Reply.
Automatic rejection.
Automatic tracking.
Ticket auto-reply / New ticket.
Automatic deletion.
Modify response templates,
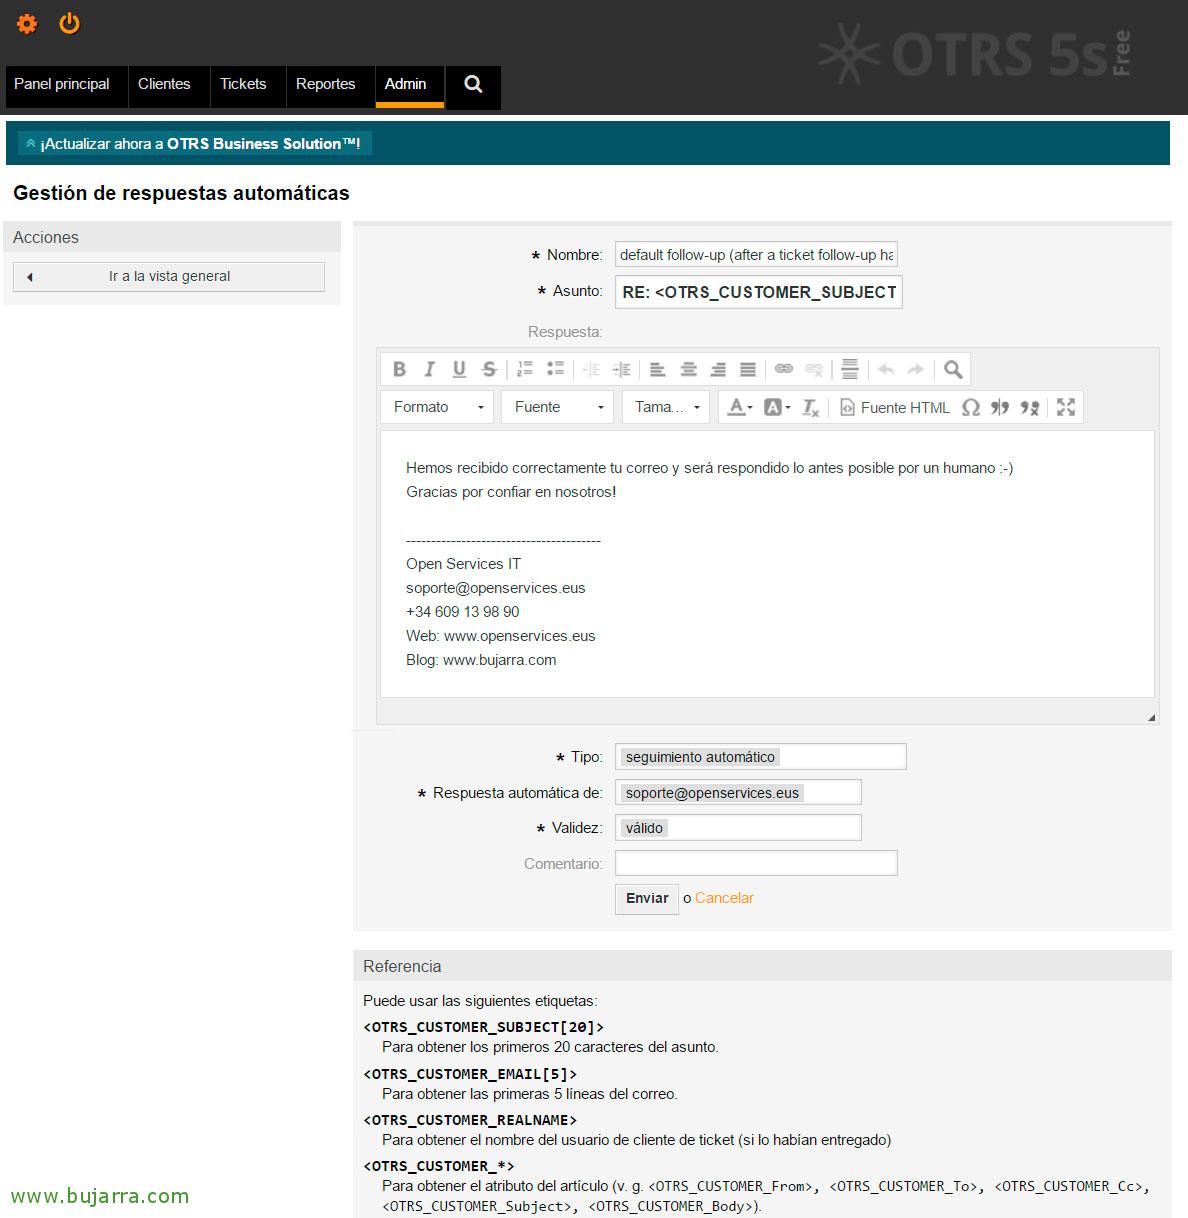
What I said, you will have to modify or create Response Templates, with our fully customized data, for this, We're going to “Admin > “Queue settings” > “Autoresponders”. We will create the Templates to our liking or directly modify the existing ones! I leave you as an example the base templates that come and the content that I give as an example, do not forget that each Template must have associated with the Type of response and which email account you will use to respond to the Client.
Name: default follow-up (after a ticket follow-up has been added)
Affair: D: <OTRS_CUSTOMER_SUBJECT[24]>
Answer:
We have successfully received your email and it will be answered as soon as possible by a human 🙂
Thank you for trusting us!
Name: default reject (after follow-up and rejected of a closed ticket)
Affair: Your email has been rejected! (D: <OTRS_CUSTOMER_SUBJECT[24]>)
Answer:
Your ticket is closed.
— Their follow-up has been rejected.. —
Please, Create a new ticket if necessary,
Thank you for trusting us,
Name: default reject/new ticket created (after closed follow-up with new ticket creation)
Affair: A new ticket has been created! (D: <OTRS_CUSTOMER_SUBJECT[24]>)
Answer:
Your previous ticket has been closed.
— A new ticket has been created. —
You have written to us:
<OTRS_CUSTOMER_EMAIL[6]>
Your email will be answered as soon as possible by a human 🙂
Thank you for trusting us,
Name: default reply (after new ticket has been created)
Affair: D: <OTRS_CUSTOMER_SUBJECT[24]>
Answer:
Hello!
We have created a ticket with a number: <OTRS_TICKET_TicketNumber>
Summary of your ticket:
<OTRS_CUSTOMER_EMAIL[6]>
Your email will be answered as soon as possible by a human 🙂
If you need, tracking, You can do it from here: <OTRS_CONFIG_HttpType>://<OTRS_CONFIG_FQDN>/<OTRS_CONFIG_ScriptAlias>customer.pl?Action=CustomerTicketZoom;TicketNumber=<OTRS_TICKET_TicketNumber>
Or if you wish, You can continue to reply to this email chain!
Thank you for trusting us,
Name: Elimination
Affair: D: <OTRS_CUSTOMER_SUBJECT[24]>
Answer:
We have proceeded to the automatic deletion of the ticket: <OTRS_TICKET_TicketNumber>
Thank you for trusting us,
Best regards,
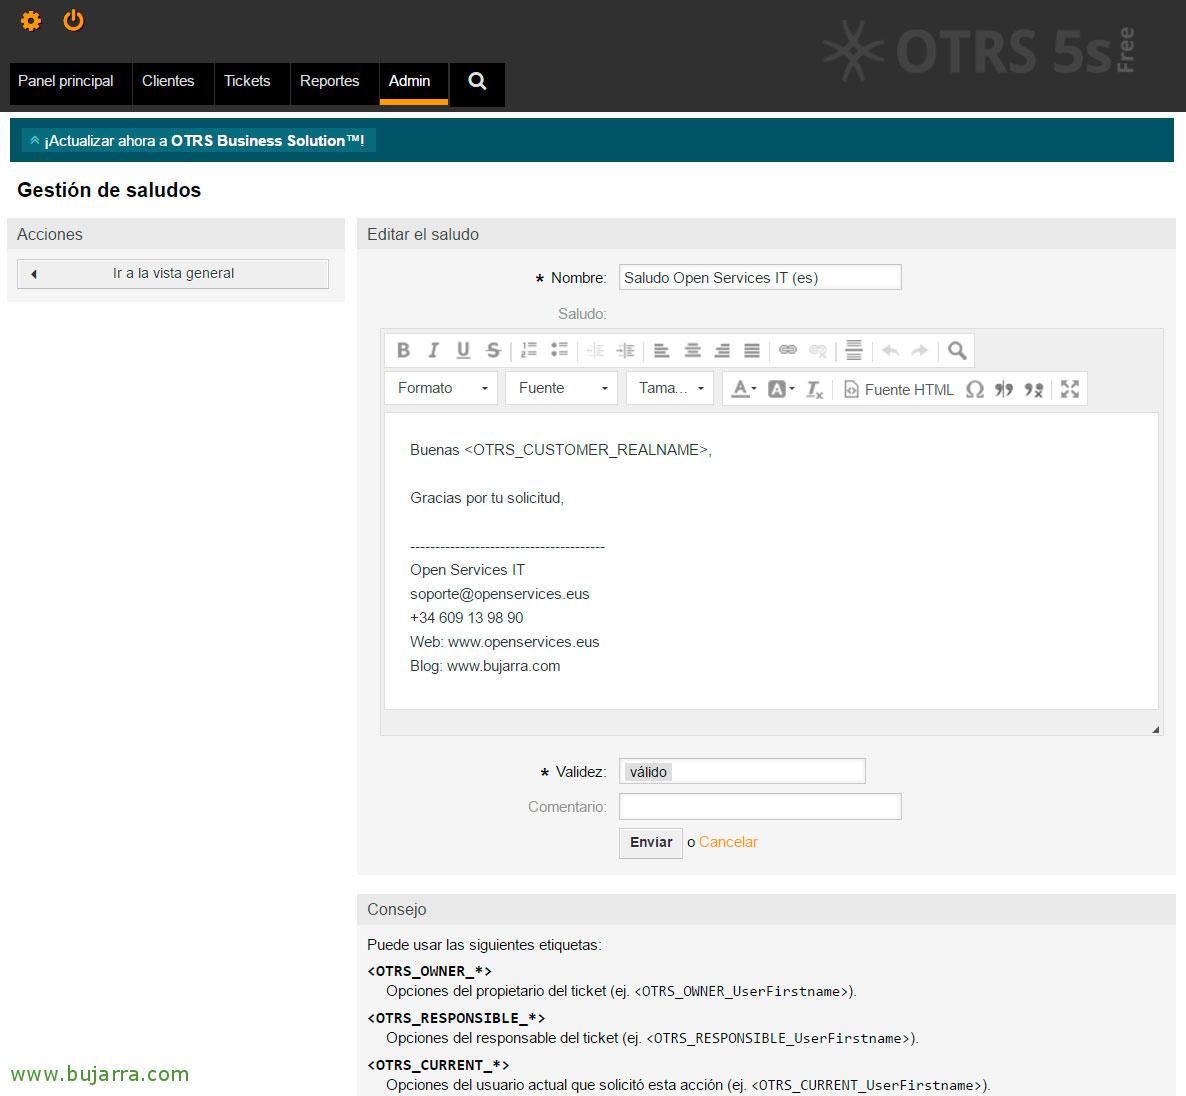
Since “Admin > “Queue settings” > “Best regards” we may add or modify the message that the Client will receive when they contact us, We provide you with a name as an identifier in addition to the greeting:
Good <OTRS_CUSTOMER_REALNAME>,
Thank you for your request,
We will remember that we can apply it by Glue, You can respond differently depending on where the ticket comes in, we remember that it would be in “Admin” > “Queue settings” > “Queues” > Select a queue and change the “Greeting”.
Signatures,
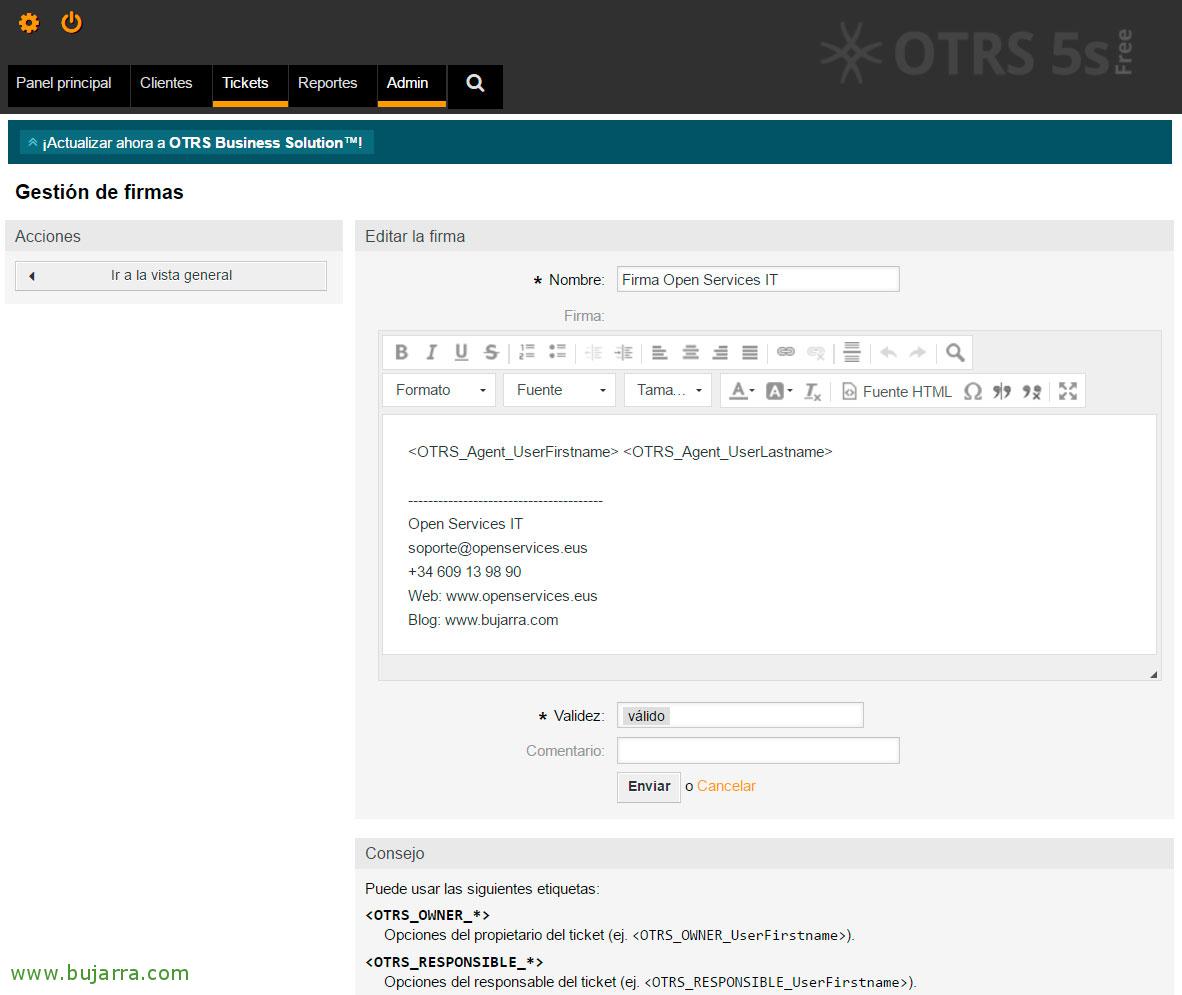
Just like greetings, we can also apply signatures to outgoing emails and thus we will give all emails in the same Queue the same contact signature, both the agent who contacted you and some generic data. We would change it into “Admin > “Queue settings” > “Signatures”, and this would be an example:
<OTRS_Agent_UserFirstname> <OTRS_Agent_UserLastname>
—————————————
Open Services IT
his*****@**********es.eus
+34 900535139
Web: www.openservices.eus
Blog: www.bujarra.com
Email Template
If we want to edit the email template with which Customers are contacted, This is, customize it a little to give it a more corporate and close touch when they receive a notification email, it will be enough to edit this file with any HTML editor:
[SourceCode]/opt/otrs/Kernel/Output/HTML/Templates/Standard/NotificationEvent/Email/Default.tt[/SourceCode]
So much for this first initial document on a base configuration! We will follow up with more interesting articles from OTRS in the coming days!