Using VMware View Composer 4.6
Con VMware View Composer conseguiremos distribuir escritorios a los usuarios a partir de una misma imagen para todos, sin tener que andar clonando una máquina virtual origen, or have one full virtual machine per user, This is, los escritorios que generemos a partir de esto no tendrán un disco duro virtual, If not a link’ to a replica of the original virtual hard drive. With this we will achieve impressive storage savings, For example, if we design that our Desktops we want them to have 20Gb of disk, You don't need to allocate that amount to each VM, if, for example, we are going to distribute 50 Desks: 50MV x 20Gb = 1TB of space for VDI or VMware View environment only, as this does not make much sense, VMware View Composer is used to deploy Desktops from a single image, these new Desktops will occupy only their swap memory plus space (optional) que queramos dar a los usuarios para que almacenen información, What can it be 0. A greater level of detail will be given later.
This would be the graphical schematic of how the provisioning of the Desktops works. We have a source virtual machine with its operating system installed, with your common applications for our future users installed, member of a domain, Network Configuration with DHCP, with the agent installed, etc... Once it's ready to be cloned, a snapshot is taken of it while it is turned off. We can have several snapshots of this virtual machine with different configurations for different desktop deployments.
The replica is a copy of an exact version of the source VM, This is, is a complete copy of one of the chosen snapshots (In this document there will be only one snapshot, no more will be worked with).
And from this structure, We created so many clones (Also called vClon) of this replica as we need, in the image you can see a couple of VMs generated from this version of the source VM, They are snaphost instants. Clones don't write anything to disks, if they are not isolated in their own snapshots, So the data on the 'replica' disk is untouchable and therefore all clones continue to access this disk. Apart from this, We have the possibility to create a data disk for users to store information, during the wizard it will ask us and if so,, it will map them to us with a letter on each of the Desktops.
Installing VMware View Composer,
This is the software that will allow this to be fulfilled, para ello deberemos instalar VMware View Composer en cada uno de los servidores VMware vCenter de nuestra organización que querramos que pueda proveer Escritorios de forma automatizada.
We begin the installation of VMware View Composer on the VMware vCenter server, The installation is not crumb at all, "Next",
We accept the patent agreement & “Next”,
I accept the terms in the license agreement & "Next",
We check that the installation path is correct (por defecto %ProgramFiles%VMwareVMware View Composer), “Next”,
To install VMware View Composer, we need a SQL database, for this, During the Wizard, we will have to create a connection to it, so we first create an empty DB on our SQL server and connect to it from "ODBC DSN Setup...". Enter the name of the DSN connectors we just created and the credentials we provided during the ODBC setup. "Next",
Select the SOAP port, which by default is 18443 and if we have an SSL certificate installed on the computer we can select it, in my case, It will generate a new one for me. "Next",
Click on “Install” to begin installation,
…
After a few minutes, We have the app installed, ready. "Finish".
Deberemos reiniciar el servidor para continuar.
Now, debemos ir a la administración de nuestro servidor VMware View, “View Configuration” > “Servers” a la parte de “vCenter Servers”, e editamos el que tenemos configurado desde “Edit…”
Mark “Enable View Composer” indicamos el puerto de conexión, that by default we have said that it will be the 18443. We must add at least one domain administrator account, so that VMware View Composer has sufficient domain-level privileges to customize the Desktops if needed, desde “Add…”,
Enter the domain name, el nombre del usuario conpermisos de crear cuentas en el dominio y su contraseña & “OK”,
Comprobamos que tenemos el composer habilitado si vemos que el icono del servidor vCenter cambia.
Once we have that, antes de continuar hay que hacer un snaphost de la MV Origen que utilizaremos como imagen, So first, We turn it off (IMPORTANT) y hacemos un snapshot desde el cliente de VMware, on the right-click VM > “Snapshot” > “Take Snapshot…”, We indicate a name & description & “OK”.
Ya podremos crear ya el conjunto de Escritorios, for this, Let's go “Inventory” > “Pools” , y pulsamos en “Add…” para crearlo, e indicamos un conjunto de Escritorios automatizado o “Automated Pool” & "Next", to create a few Desktops for end users,
As we would like, puede ser Dedicado o Floating, Dedicado indica que cuando un usuario se loguea por primera vez en un Escritorio éste se le asocia a él (podremos además indicar que se hagan las asignaciones automáticas y así siempre que dicho escritorio esté libre tendrá preferencia sobre el resto), y Floating que será aleatoria la conexión, "Next",
Marcamos el/los servidores de VMware vCenter que hemos instalado VMware View Composer, "Next",
And now we're going to create the Desktops pool, debemos indicar el ID, and the name that users who connect will see, this name has to be something that is associated with the Desktops set, and that when they click on it, I took them to one of their Desks, "Next",
When generating this type of pool, we will indicate whether we will leave it enabled or not, we will be able to indicate which Connection Server will allow connections through tag's that we will have previously configured in its properties. If we want to indicate that the VM's are turned off after the user uses them and when requested, they can be started or directly leave them always on; as well as force a logout in the event that the user leaves by disconnecting the session (and if we are interested we can allow them to restart their machines if necessary). We will also indicate the default PCoIP protocol of use, which protocol will be used by the 4172udp, even though the first connection will be made through 4172TCP, we can indicate RDP if we need it or allow the user to control it. At the PCoIP level, we can indicate the maximum number of monitors we want as well as their maximum resolution (1920×1200 o 1920×1200 o 2560×1600). We can even check the image quality at the Flash level to use more or less bandwidth by achieving more or less image quality or controlling the ratio of the frames of a flash with Adobe Flash throttling (With the most aggressive mode we will get better bandwidth. "Next",
Podremos indicar la ruta donde almacenará el perfíl de usuario y si nos interesa que los usuarios puedan almacenar información en la máquina virtual tenemos dos opciones, one is to create and associate a hard drive for each Desktop, with the space we indicate and the user will have it mapped with the unit we indicate, care, pq if we indicate that we want 2Gb per virtual machine and we create 10 MV, we will already have 20Gb occupied. Or we can instruct it to be stored with the Desktop disk, limitless. "Next",
We must enable if we want to use the provisioning of the Desktops, the number of Desktops we want it to generate (in this case we will create 2 clones) así como el número de ellos que siempre queremos mantener encendidos, y si queremos que se generen mediante demanda o de forma inmediata. Por último el formato del nombre de los Escritorios utilizando variables (en mi caso usaré algo como XP-01, XP-02… para más información sobre la nomenclatura leer el PDF de VMware View Administration Guide), "Next"
Debemos indicar la MV que utilizaremos como imagen inicial desde “Browse…”,
Seleccionamos la MV maestra en “Browse…”,
La marcamos & “OK”,
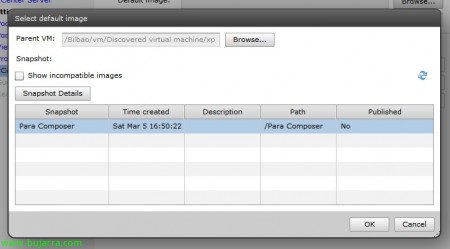
Seleccionamos el snapshot que hemos creado anteriormente & “OK”,
Indicaremos el resto de información: la carpeta, el cluster, el resource pool y el/los datastore(s) que utilizaremos para nuestros nuevos escritorios & “Next”,
Indicaremos además indicaremos la forma de generar el SID en las nuevas máquinas, si con QuickPrep o con una plantilla de customización (que deberemos tener previamente configurada, More info: http://www.bujarra.com/?p=1133), “Next”,
We check the summary & “Finish”,
We can see on our VMware vCenter server, How fully automated virtual machines are generated, and they are initiated once they are created.
List, we see that the Pool of Desktops is out, now just like a regular Desktop, we must give permission to access it, para ello igual que siempre pulsando en “Entitlements…”
“Add...” To add users/groups & buscamos un grupo de usuarios que pueden usar este conjunto de Escritorios y listo, "OK"
Esto sería una exploración del datastore del entorno virtual, As we can see, Each directory has the disk space we originally estimated, Desktops or clones only have one large swap file, el disco Z que hemos indicado durante el asistente…


